How to Delete Recall Snapshots in Windows 11
Deleting Recall snapshots in Windows 11 lets you free up disk space by removing saved images of your computer activity.
Recall is a new Windows 11 feature that automatically takes screenshots of what you do on your PC. These saved images, called snapshots, let you look back at past screens and information. The snapshots are stored directly on your computer.
As you use Recall, these snapshots can take up a lot of storage. For example, heavy use can create gigabytes of snapshot data very quickly.
You can manually delete these Recall snapshots to get storage back. This helps you clear out stored data from certain times or remove everything Recall has saved.
Access Storage settings within Privacy & Security to manage Recall data. Click “Delete snapshots” and choose a timeframe like the past hour, day, week, or month to remove them. Confirm the deletion to free up disk space.
What are Recall Snapshots?
Recall Snapshots are pictures your Windows computer takes of your screen over time. They create a history of what you’ve seen, making it quick to find things later without searching through files. Think of them like saved screenshots that help you remember what was on your screen.
Think of Recall Snapshots as photos your computer takes of your screen at different times. Windows saves these so you can quickly search for things you’ve seen or worked on previously. You can find more details about this feature in the Recall & Snapshots explained documentation. While Windows automatically deletes the oldest snapshots when your storage is full, you might want to clear some out yourself. Here’s how you can delete snapshots from the last hour, day, week, or month.
Steps to Delete Recall Snapshots from a Specific Timeframe
Deleting Recall Snapshots from a specific timeframe, like the last hour, day, or week, frees up space on your computer. This is a quick process, done right in the Windows 11 Settings app. Managing these snapshots helps keep your storage under control by clearing out older ones.
- Open the Settings app: You can do this by clicking the Start menu (Windows icon at the bottom left) and choosing Settings, or just press Windows key + I on your keyboard.
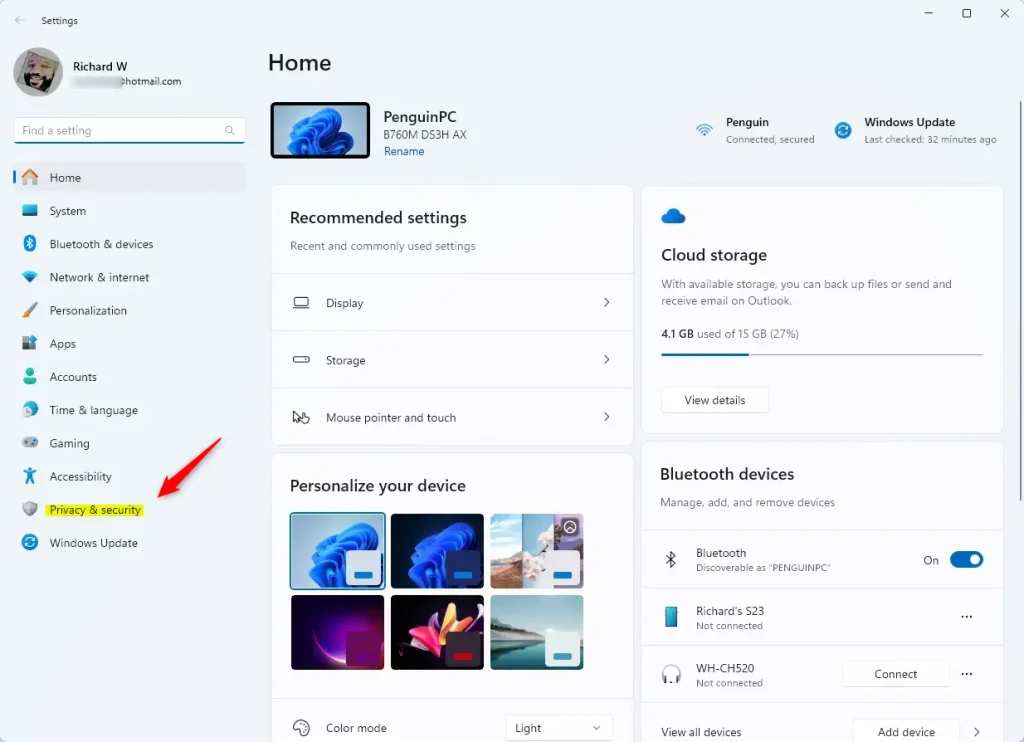
- Go to Privacy & Security: In the Settings window, look at the left side menu and click Privacy & security.
- Open Recall & Snapshots settings: On the right side, find and click Recall & snapshots.
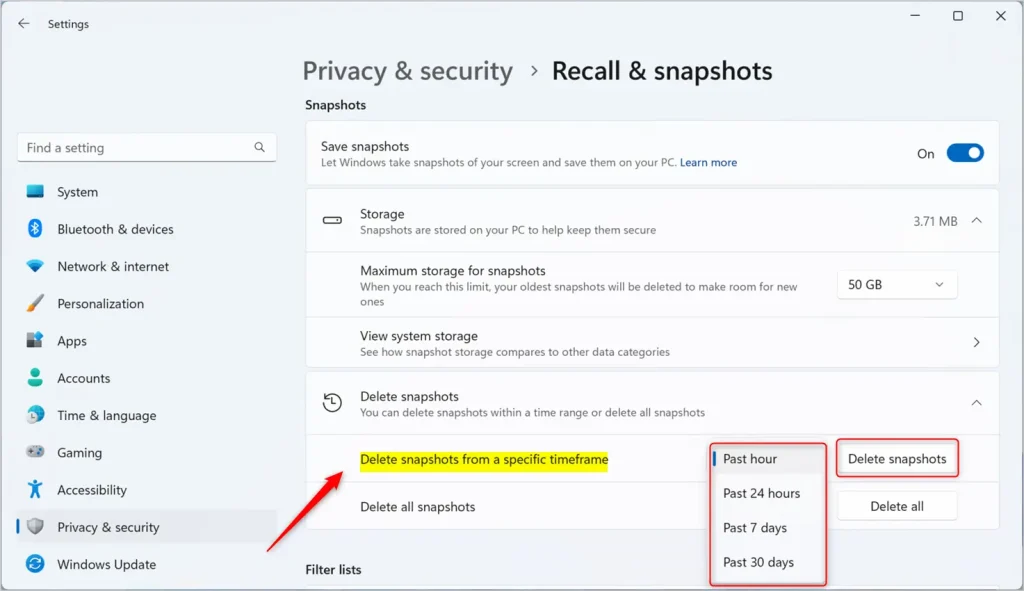
- Delete snapshots: Scroll down to the Storage section and click Del snapshots to expand it.
- Choose a timeframe: Click on Delete snapshots from a specific timeframe. You can pick from these options:
- Past hour
- Past 24 hours
- Past 7 days
- Past 30 days
- Confirm deletion: Click the Delete snapshots button after choosing the timeframe. The snapshots from that period will be removed.
Here is what the Privacy & Security menu looks like in Windows 11:
And this is the screen where you delete snapshots from a specific timeframe:
That’s it! You have now deleted Recall snapshots for the timeframe you selected.
Need More Help?
You can visit Microsoft’s official page about Recall and your data here: Microsoft Support – Recall and Your Data
Summary
- Recall Snapshots save pictures of your screen to help you find things later.
- You can delete snapshots from the last hour, day, week, or month to free up space.
- It’s easy to manage this in the Windows 11 Settings under Privacy & Security.
- Following these steps helps keep your computer storage under control.
Recall snapshots save pictures of your screen to help you find things later, and you can delete recall snapshots from the last hour, day, week, or month to free up space. Managing recall snapshots is quick in Windows 11 Settings under Privacy & Security. Following these steps helps keep your computer storage under control.
How do I delete Microsoft recall screenshots?
Deleting Microsoft Recall screenshots can be done anytime through your PC’s Settings menu under Privacy & security.
Is disabling Recall good?
Disabling Recall gives users and administrators control over what's being captured and stored, ensuring transparency and better system performance.
Was this guide helpful?

About the Author
Richard
Tech Writer, IT Professional
Richard, a writer for Geek Rewind, is a tech enthusiast who loves breaking down complex IT topics into simple, easy-to-understand ideas. With years of hands-on experience in system administration and enterprise IT operations, he’s developed a knack for offering practical tips and solutions. Richard aims to make technology more accessible and actionable. He's deeply committed to the Geek Rewind community, always ready to answer questions and engage in discussions.


No comments yet — be the first to share your thoughts!