How to Uninstall and Reinstall Snipping Tool in Windows 11

The Windows 11 Snipping Tool captures screenshots of your screen. Uninstalling and reinstalling the Snipping Tool fixes problems or provides a fresh start. This guide explains how to uninstall and reinstall the Snipping Tool on Windows 11 version 22H2 and newer versions.
The easiest way involves using PowerShell, a command-line tool that lets you manage Windows settings. Don’t worry if you’ve never used it before; we’ll walk through each step simply.
To uninstall and reinstall Snipping Tool, go to Settings > Apps > Installed apps, find Snipping Tool, click the three dots, and select Uninstall. Then, download the correct version from the Microsoft Support page and run the installer file.
Step 1Remove the Current Snipping Tool
Our first job is to remove the Snipping Tool from your computer. This is a necessary step to get a fresh, working version. Don’t worry, your saved screenshots will not be affected.
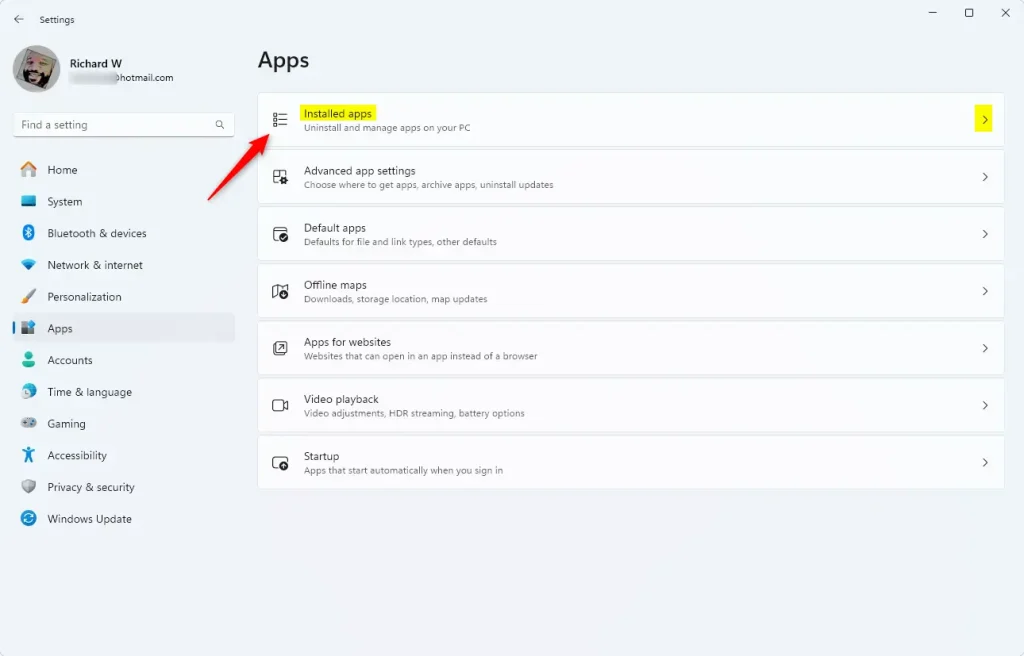
Accessing Your Installed Apps
You can find and manage all the apps installed on your Windows 11 computer by opening the Settings app and selecting the ‘Apps’ section, which lists everything you’ve added.
In the Settings window, look for ‘Apps’. Click on it. This is where Windows lists all your installed programs and tools.
Inside the ‘Apps’ section, click on ‘Installed apps’. You will see a list of everything on your computer. Scroll through the list or use the search bar at the top to find ‘Snipping Tool’.
Locating and Uninstalling the Snipping Tool
To uninstall the Snipping Tool on Windows 11, find the Snipping Tool in the list under Settings > Apps, click the three dots next to the Snipping Tool's name, and choose 'Uninstall' to remove the Snipping Tool from your PC.
A small menu will appear. Click on ‘Uninstall’.
Windows prompts for confirmation. The prompt states, "This app and its related info will be uninstalled." Click 'Uninstall' again to confirm the removal.
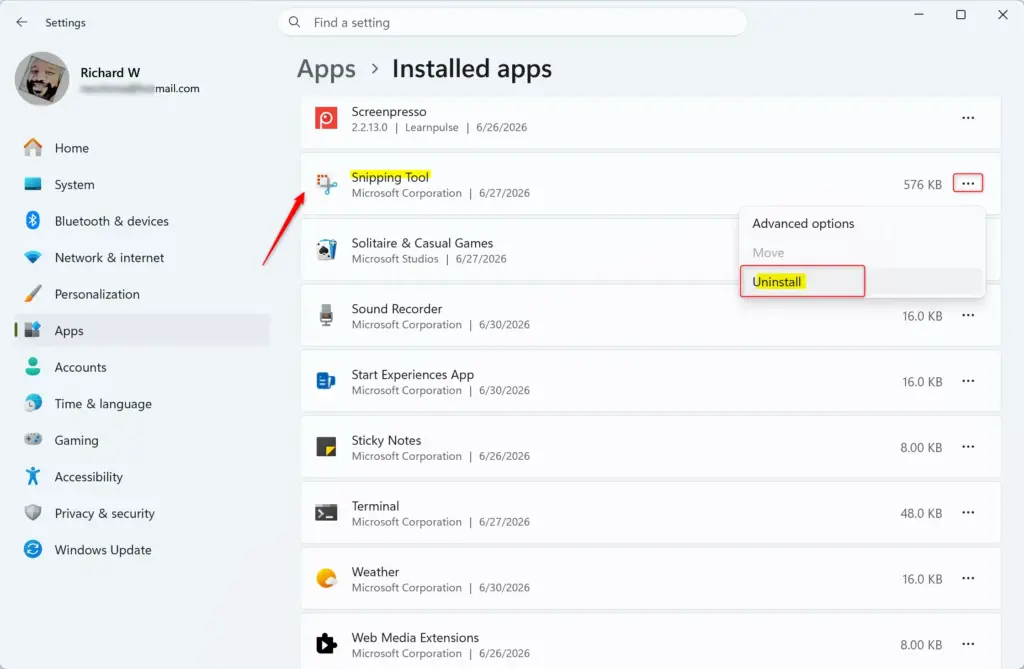
And just like that, the Snipping Tool will be removed from your computer.
Step 2Install a Fresh Copy of Snipping Tool
After removing the old Snipping Tool, users can install a new version from Microsoft. Download the correct installer file from Microsoft's official website, and then run the downloaded file to begin the installation process.
Finding the Right Download
To reinstall the Snipping Tool, download the latest version from Microsoft’s official support page, looking for the ‘Snipping Tool Windows 64-bit (most common)’ link for most Windows 11 computers.
You need to choose the link that matches your computer. Most computers use 64-bit Windows. So, the ‘Snipping Tool Windows 64-bit (most common)’ link is usually the right one.
- Snipping Tool Windows 64-bit (most common)
- Snipping Tool Windows 32-bit
If you have an older computer or a special setup, you might need the 32-bit version (‘Snipping Tool Windows 32-bit’) or the ARM64 version for ARM devices. If you are unsure, the 64-bit version is best for most users.
Click the download link that fits your system. Your browser will download a small file, usually ending in .exe.
Installing Your Newly Downloaded Snipping Tool
After downloading the Snipping Tool, install it by opening your Downloads folder, finding the setup file (likely named ‘SnippingTool_x64.exe’), and double-clicking it to start the installation process.
Find the downloaded file (it might be named SnippingTool_x64.exe or something similar) and double-click it.
The installer program will start. Follow the instructions on the screen. You might need to agree to terms or choose where to install it, but the default location is usually fine.
Click ‘Next’ or ‘Install’ until the process is complete. The installer will set up the Snipping Tool on your computer.
When it says “Setup Complete” or “Finished,” you have successfully reinstalled the Snipping Tool!
Reference:
Summary
This guide explains how to uninstall and then reinstall the Snipping Tool on Windows 11 by removing it via Settings and then downloading and installing a fresh copy from Microsoft.
Did 🪟 Windows 11 get rid of the Snipping Tool?
Capture images easily with the new Snipping Tool app on Windows 11. Use mouse, touch, or pen to edit screenshots and share them anywhere. Note: The new Snipping Tool is available only on Windows 11. If you're using Windows 10, Snip & Sketch will download to your PC instead.
Was this guide helpful?

About the Author
Richard
Tech Writer, IT Professional
Richard, a writer for Geek Rewind, is a tech enthusiast who loves breaking down complex IT topics into simple, easy-to-understand ideas. With years of hands-on experience in system administration and enterprise IT operations, he’s developed a knack for offering practical tips and solutions. Richard aims to make technology more accessible and actionable. He's deeply committed to the Geek Rewind community, always ready to answer questions and engage in discussions.


No comments yet — be the first to share your thoughts!