How to Uninstall and Reinstall Paint in Windows 11

Uninstalling and reinstalling Paint in Windows 11 is a reasonable fix when the built-in image editor has corrupted files, crashes over and over, or is missing tools. Paint is the default drawing app that comes pre-installed with Windows 11.
The process removes the broken copy and its data, then puts a fresh copy of the app back on the PC. It takes about ten minutes, and you rarely need to restart.
Open Settings Apps Installed apps, find Paint, click the three dots next to it, select Uninstall, then confirm. Download the Paint installer matching your system type from the Microsoft Support page for reinstalling built-in tools, double-click the file, and follow the prompts to reinstall.
Why Uninstall and Reinstall Paint?
Reinstalling is worth trying when Paint won’t open, closes by itself, or has damaged internal files. A fresh copy gives the app a clean slate, which clears most persistent glitches and restores normal behavior.
Try the simple fixes first. Restart the PC and check for app updates. If Paint still misbehaves after that, go ahead with the steps below.
Before You Start
- Press Win+R to open the Run box.
- Type winver and press Enter.
- Read the version and build number in the “About Windows” window that appears. It should say 22H2 or newer.
- Click OK to close the window.
If your version is older than 22H2, run Windows Update before you continue.
Step 1Uninstalling Paint
First, remove Paint completely from your system using the Windows Settings app. The Home and Pro editions use the same steps here.
Open Windows Settings
- Click the Start button in the taskbar and select the Settings gear icon. A faster way is to press Windows key + I.
- Wait for the Settings window to open. You should see a list of categories down the left side.

Go to Apps
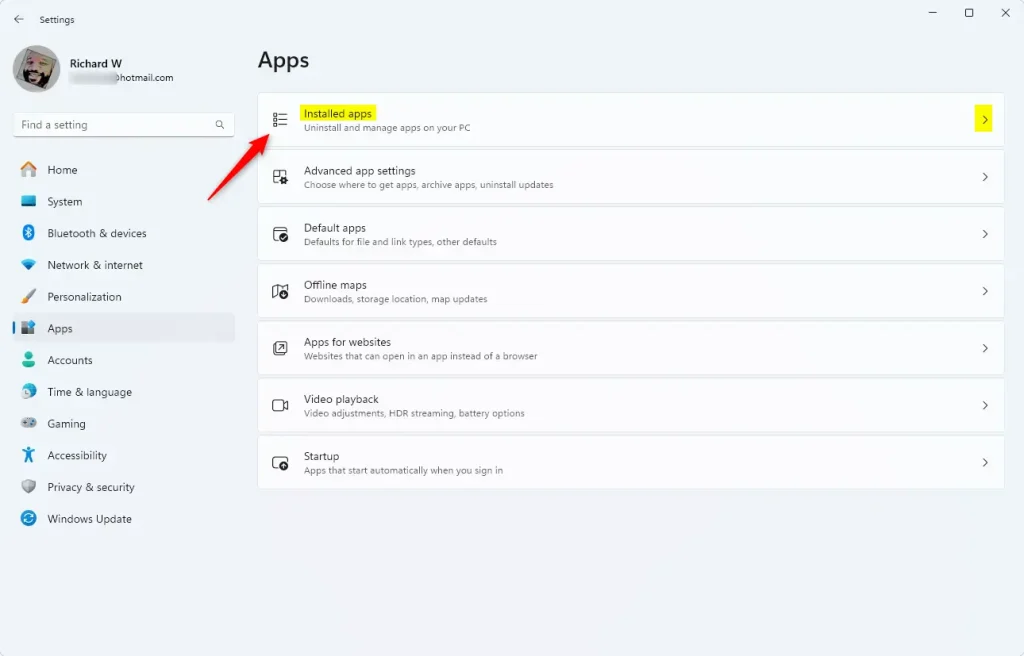
- Select Apps from the left sidebar inside the Settings window. This is where Windows manages installed software.
Find Installed Apps
- Click Installed apps. A list of the software currently installed on your computer appears.
Locate Paint
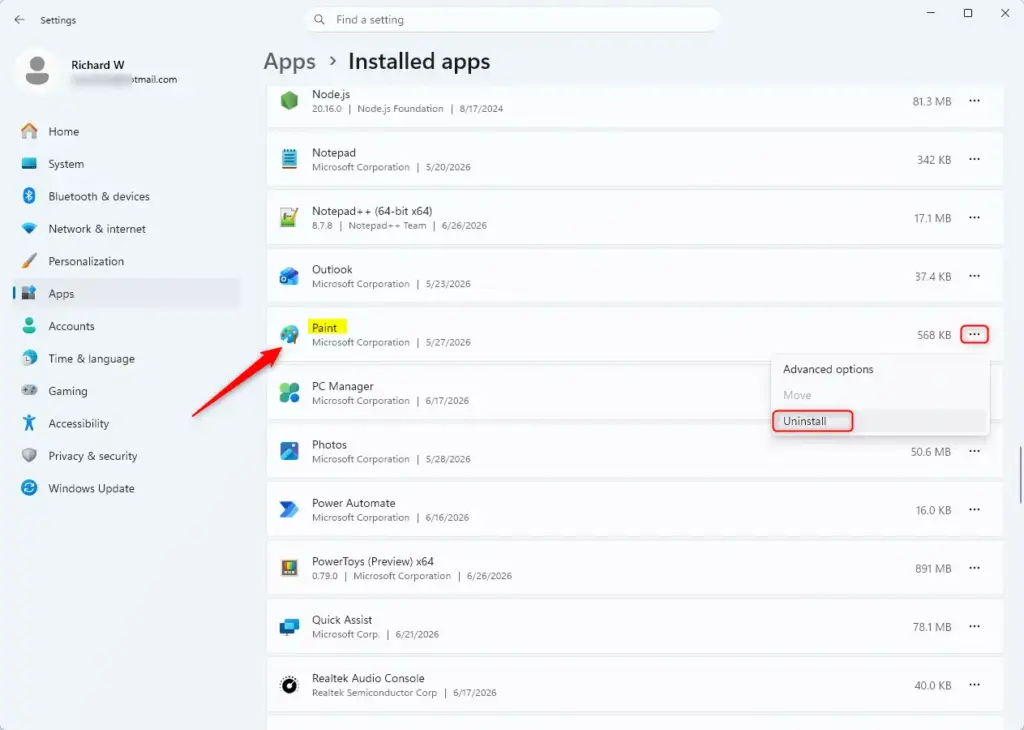
- Find Paint. You can scroll through the list, or type "Paint" into the search bar at the top of the "Installed apps" list to filter the results instantly.
- Make sure the entry is named Paint. Other apps with similar names may show up in the results.
Start the Uninstall
- Click the three dots next to the Paint listing. A flyout menu opens.
- Select Uninstall.
If Uninstall is greyed out, close Paint completely first, then try again. Also check that you are signed in with an account that has permission to remove apps.
Confirm the Uninstall
- A prompt asks for confirmation before making changes. Read the warning.
- Click Uninstall to let Windows remove the program.
- Check that Paint no longer appears in the "Installed apps" list or when you search for it in the Start menu.
Step 2Reinstalling Paint
Reinstalling a built-in component like Paint requires a package downloaded directly from Microsoft, because the standard app marketplace does not host these packages. That is how this guide does it. Paint is also updated through the Microsoft Store on current Windows 11, so a quick Store search for Paint is worth a try first.
Go to the Microsoft Download Page
- Open a web browser and go to the official Microsoft Support page for reinstalling built-in tools. If you can't find it, search online for "uninstall reinstall Paint Windows" to locate the exact page.
- Pick the download option you need from the list below.
- Paint Windows 64-bit (most common)
- Paint Windows 32-bit
Choose the Right Installer
To check your system type:
- Open Settings System About
- Look at the "System type" entry under Device specifications. It tells you whether the machine runs a 32-bit or 64-bit architecture, and whether the processor is x64 or ARM-based.
- Click the download link that matches this information. The installation package is saved to your Downloads folder.
Wait until the download finishes before moving on. You should see the file in the Downloads folder.
Run the Installer
- Open the Downloads folder once the transfer finishes.
- Find the installer file. It typically carries a name like
Paint_x64.exe. - Double-click it to launch the setup utility.
Follow the Instructions
A setup wizard handles the reinstallation.
- Click Next or Install whenever the wizard prompts you.
- Wait for the progress to complete. This restores Paint version 11.2309.2007.0 to the machine.
Finish the Installation
- Close the setup window after the completion prompt appears.
- Open the Start menu and type Paint to confirm the app is back, then launch it to make sure it opens normally.
The app should now work normally and stay available from the Start menu. If it still crashes, restart the PC once and test again.
Reference:
Summary
To repair broken drawing tools, uninstall the package through Settings and download a fresh installer from Microsoft. In short: open Settings, go to Apps and then Installed apps, locate the program, open the three-dot menu, and select Uninstall. Then run the new installer from your Downloads folder.
Have a question about this guide?
Answered by AI from this guide. Good questions may be added to this page — please don't include personal details.
Did this guide fix your problem?

About the Author
Richard
Tech Writer, IT Professional
Richard is a writer at Geek Rewind who turns complex IT tasks into clear, step-by-step guides. He draws on years of hands-on experience in system administration and enterprise IT operations, focusing on Windows, Linux and WordPress: the problems people actually run into, and the fixes that work. His server and WordPress guides come from systems he runs himself. Richard builds and maintains the platform behind Geek Rewind, from its Ubuntu servers and Nginx configuration to its custom WordPress plugins. Many new tutorials start with readers' questions, and he's always glad to answer them in the comments.
No comments yet — be the first to share your thoughts!