How to Use Point-in-Time Restore in Windows 11


- 17 steps
- Needs administrator rights
- Includes a restart or sign-out
Point-in-time restore in Windows 11 rolls your computer back to an earlier working state. It helps when a bad update, a broken app, or a wrong setting has caused trouble. Think of it as a save point for the whole system. It puts your apps, files, and settings back the way they were at a specific date and time.
Windows 11 automatically creates these save points before you install major system updates or new software. You can also make one manually at any time, which gives you a quick safety net before you try something risky on your PC.
Open Settings System Recovery to run Point-in-time Restore in Windows 11. Select a restore point from the list, click Restore, and confirm. Windows rolls your apps, files and settings back to that date and time, then restarts. Save your open work first, because this step cannot be undone.
What is Point-in-time Restore?
Point-in-time Restore is a Windows 11 feature that lets you roll back your system when a recent change breaks your computer. It uses saved snapshots called restore points. Each one returns your system files, apps, and settings to the exact condition they were in at a given date and time. That lets you undo a bad update or a broken driver without losing your personal data.
Restore points are saved snapshots of your system at a certain moment. The feature relies on the Volume Shadow Copy Service (VSS), a built-in Windows component that handles system backups. Windows usually saves these snapshots automatically every 24 hours, but you can change that schedule. A restore point includes your operating system, installed apps, settings, and your personal files, so it is a complete record of your system's state.
The feature is built for fixing recent problems. It saves and keeps restore points for the last 72 hours, which makes it a good fit when something broke today or yesterday. It is not meant for long-term storage, and it does not replace a full system backup. Use it as a quick fix for immediate trouble. If you need to go back further than three days, you need a different kind of backup.
Point-in-time Restore vs. System Restore
Point-in-time Restore and regular System Restore both roll back your PC, but they cover different data. Point-in-time Restore captures the entire system state, including personal files and documents. Standard System Restore only touches system files, installed programs, and registry keys, and it leaves your personal files alone.
- What’s SavedPoint-in-time Restore saves your whole system, including your personal files. Regular System Restore usually saves only system files and settings, not personal files.
- How it StartsPoint-in-time Restore is designed to run automatically on a schedule you can set. System Restore is often started by you or by specific events, such as an installation.
- How Long it Keeps SavesPoint-in-time Restore keeps snapshots for up to 72 hours. System Restore points can be kept much longer, depending on your storage space and settings.
- How You Use ItPoint-in-time Restore is managed through the Settings app. System Restore is reached through the older Control Panel tools.
In short, Point-in-time Restore is the newer way to fix recent problems quickly. System Restore is an older tool with a different purpose and way of working. Because they work differently, turning one on or off does not change the other.
How to Turn Point-in-time Restore On or Off
You need administrator privileges on your PC to change these settings. If you are signed in with a standard account, Windows will ask for an administrator password when you try to save changes.
Point-in-time restore is usually on by default for computers with a large system drive (200GB or more). If your computer has a smaller drive, the feature might be off, but you can turn it on yourself. Keep in mind that restore points take disk space, so on a small drive, check your storage limit settings (covered below) after you enable it.
Option 1Using Windows Settings
You can turn Point-in-time Restore on or configure it in the Windows Settings app, in the Recovery menu. Everything you need to manage restore points is on that one page.
- Press
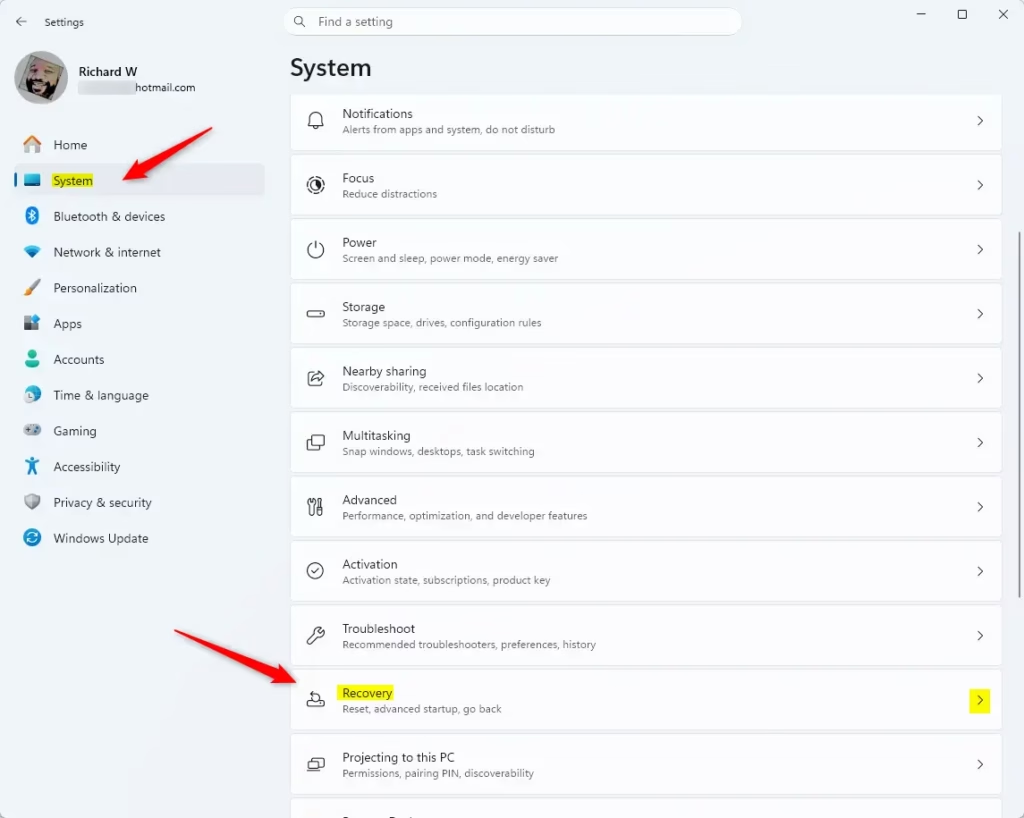
Windows key + Ion your keyboard. The Settings app opens. - Go to Settings System Recovery. Click System on the left, then click Recovery on the right. You should now see the recovery options for your PC.
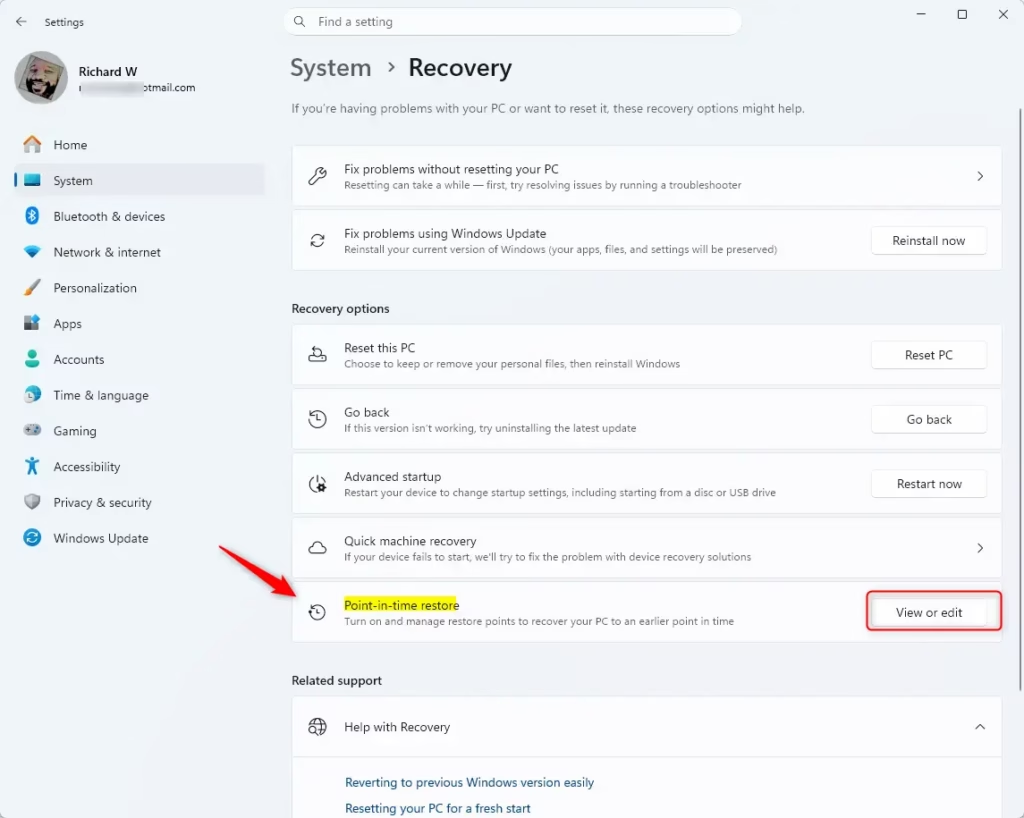
Tip: If you don’t see Recovery right away, scroll down a bit in the System section. - Under Recovery options, find Point-in-time restore and click it. If you can’t find it, your version of Windows may not support it yet, or it may be turned off by policy on a work or school computer. Check that Windows is fully updated, or ask your IT department.
Warning: If you see a View or edit button instead of a clickable Point-in-time restore entry, click that button to continue. - Approve the User Account Control (UAC) prompt if one appears. Click Yes to allow the changes. If you are not an administrator, you will be asked for an administrator password instead.
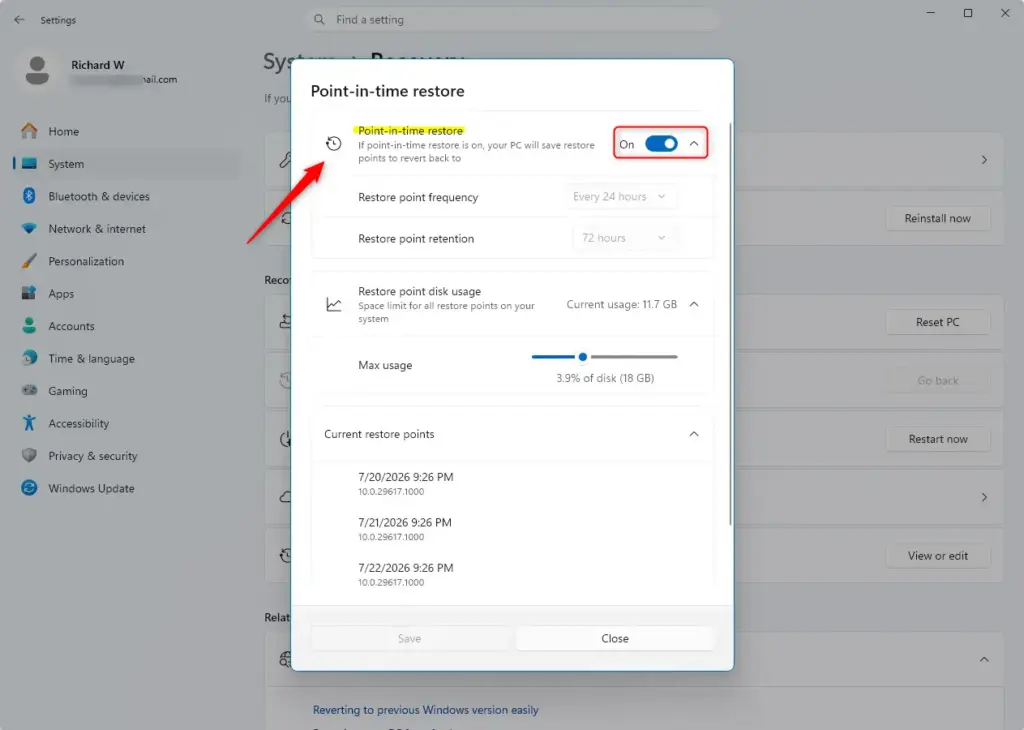
- Choose to turn the feature on or off. You will now see the options to manage it:
- To Turn OnChoose Turn on Point-in-time restore. This is usually the default. You can also change how often restore points are made, how long they are kept, and how much storage they can use on this screen. These settings are explained below.
- To Turn OffChoose Turn off Point-in-time restore. You can come back to this page and turn it on again at any time.
- Click Save and Close. Any change to the frequency, retention time, or storage limit is saved along with your on/off choice.
- Close the Settings app. You do not need to restart your PC for this change.
Customizing Restore Point Settings (When Turned On)
Restore point settings control how often Windows saves system snapshots and how much drive space those snapshots can use. Once the feature is active, you can set the creation frequency to every 4, 12, 16, or 24 hours and set a storage limit. This lets you balance protection against free disk space.
- Restore point frequencyThis decides how often Windows creates a new restore point. The default is every 24 hours. You can pick 4, 12, 16, or 24 hours. Shorter intervals mean more frequent saves but use more storage. Longer intervals save space, but you may lose a bit more recent work if you need to restore.
- Restore point retentionThis sets the maximum time a restore point is kept. The default is 72 hours (3 days). You can choose shorter times such as 6, 12, 16, or 24 hours, or go up to 72 hours. Older restore points are removed automatically to make space.
- Maximum usage limitThis is the most important setting for storage. It controls how much total space all your restore points can use. It is set as a percentage of your drive, with a minimum of 2GB and a maximum of around 50GB. For example, setting it to 2% of a 1TB drive might reserve about 20GB. When the limit is reached, older restore points are deleted to make room for new ones. If your system runs low on space, restore points may also be deleted so Windows has room to work.
The default settings work well for most users. If storage space is a concern, shorten the retention time or set a lower maximum usage limit. If you want more protection, for example a restore point every 12 hours instead of every 24, you will be able to recover from recent problems with less lost work. The cost is more storage use. After changing any of these, click Save and Close so the new values apply.
Option 2Editing the Windows Registry (For Advanced Users)
Advanced users can use it to configure Point-in-time Restore manually. You open it by pressing the Win+R, typing regedit, and pressing Enter. Be careful, because incorrect changes can break your operating system. For most people, the Settings method above is the safer choice.
- Press
Windows key + Rto open the Run box. Typeregeditand press Enter, or click OK. Click Yes if User Account Control asks for permission. Registry Editor opens. - Go to the right location. Copy and paste this path into the address bar at the top of the Registry Editor window and press Enter:
HKEY_LOCAL_MACHINE\SOFTWARE\Microsoft\Windows\CurrentVersion\Setup\Recovery\PITR\SettingsThe key should now be selected in the left pane. - In the right pane, look for the value named
Active_UX. This value controls whether Point-in-time Restore is on or off. - Double-click
Active_UXto edit it. An edit window opens with a Value data box.- To Turn OnType
1in the Value data box and click OK. - To Turn OffType
0in the Value data box and click OK.
1turns the feature on, and a value of0turns it off. - To Turn OnType
- Close Registry Editor.
- Restart your PC. A restart is usually best so the change takes effect fully. To undo the change later, set the value back to its previous number and restart again.
If you are not comfortable with it, use the Settings app instead. Always back up the Registry before making changes. In Registry Editor, you can do this with File Export.
References:
Summary
Point-in-time Restore in Windows 11 gives you a reliable way to fix computer problems by rolling your system back to an earlier working state from saved snapshots. You can turn it on or off, change how often restore points are created, and set storage limits. Use the Windows Settings app for this, or the Registry Editor if you are an experienced user.
Have a question about this guide?
Answered by AI from this guide. Good questions may be added to this page — please don't include personal details.
Did this guide fix your problem?

About the Author
Richard
Tech Writer, IT Professional
Richard is a writer at Geek Rewind who turns complex IT tasks into clear, step-by-step guides. He draws on years of hands-on experience in system administration and enterprise IT operations, focusing on Windows, Linux and WordPress: the problems people actually run into, and the fixes that work. His server and WordPress guides come from systems he runs himself. Richard builds and maintains the platform behind Geek Rewind, from its Ubuntu servers and Nginx configuration to its custom WordPress plugins. Many new tutorials start with readers' questions, and he's always glad to answer them in the comments.
No comments yet — be the first to share your thoughts!