How to Reset Default App Settings Back to Recommended Values in Windows 11

Resetting default app settings in Windows 11 clears out messy file associations and makes your computer open files and web links with the programs you want. Over time, software installs and system updates often take over file types. PDFs, audio files and web links then open in programs you did not choose.
There are two ways to fix this. You can restore individual file types to their recommended values, or you can wipe every customized preference on your user account at once. The Settings reset is the quicker option and the safer one. The registry method is for cases where you want to fix one file type without touching the rest.
Open Settings Apps Default apps, scroll to the bottom, and click the Reset button next to Reset all default apps. Windows clears all custom file associations and returns every file type to recommended defaults. No restart needed.
Method 1Reset All Default Apps via Settings
Click Default apps, scroll to the bottom of the page, and click the Reset button next to Reset all default apps. This clears all custom file associations at once and returns every file type and protocol to the Windows defaults.
This works the same on Windows 11 Home and Pro. The reset applies to your user account, so other people who sign in to the PC keep their own choices. You do not need to restart afterwards.
- Press Win+I to open Settings .

Windows 11 Start menu with Settings gear icon highlighted. - Click Apps in the left-hand sidebar.
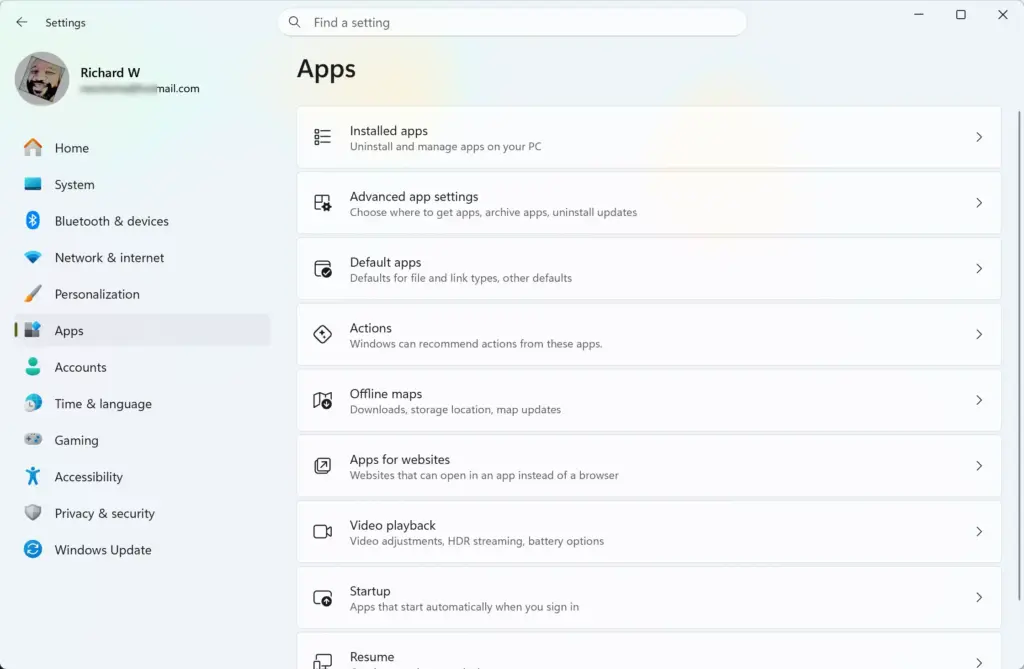
Settings › Apps - Click Default apps on the right side of the window. You should see a searchable list of installed apps.
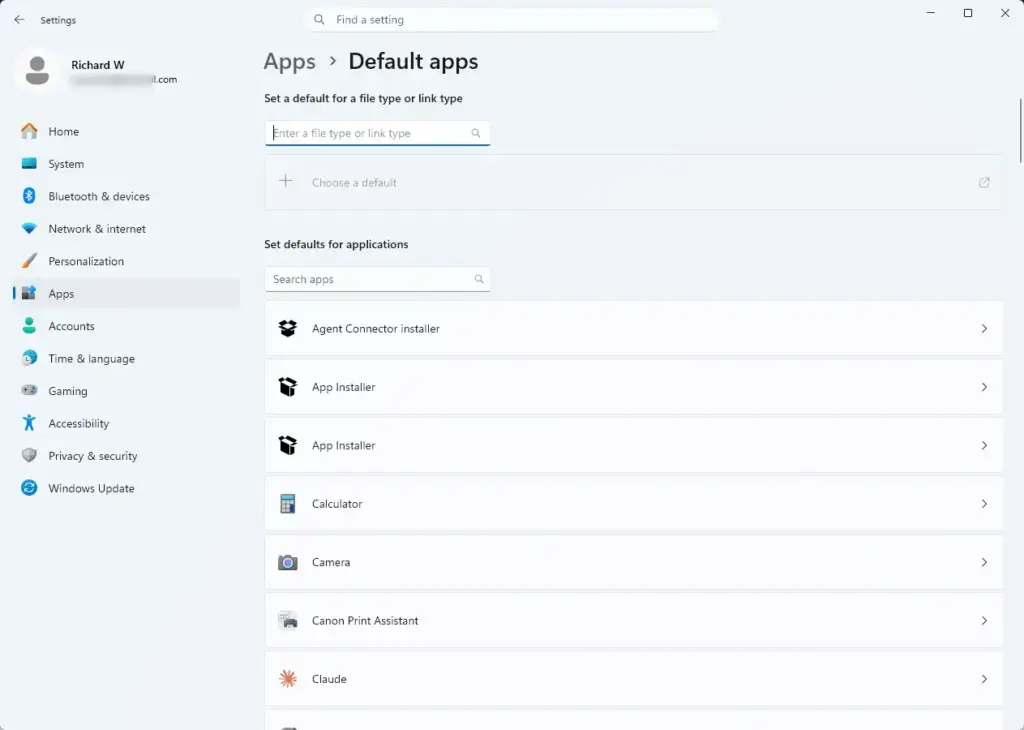
Settings › Apps › Default apps - Scroll all the way down to the bottom of the Default apps page until you see the Reset all default apps section.
- Click the Reset button.
- Wait a few moments while Windows clears the existing protocols and file associations. A checkmark appears next to the button when the process finishes.
If you want a browser, PDF reader or media player back as your default afterwards, set it again from the same Default apps page. Remember that the reset also puts back the Microsoft apps as defaults, so web links may open in Microsoft Edge until you change them.
Method 2Restore a Specific File Type via Registry
To restore a specific file type to its recommended default app without resetting everything, use Registry Editor. Delete the user choice registry key for that exact file extension. Windows then forgets your custom program choice and goes back to the original recommended application for that file type.
Registry Editor (a database for low-level system and app settings) holds the key configuration for your user profile. Mistakes here can cause unexpected system behavior, so follow these steps carefully. Before you delete anything, back up the key. Right-click it, choose Export, and save the .reg file somewhere safe. To undo the change later, double-click that file and confirm the merge.
- Press Windows Key + R to open the Run dialog box.
- Type
regeditand press Enter to open Registry Editor. Click Yes if the User Account Control prompt asks for administrative permission. - In the left sidebar, navigate to the key location that matches the file extension you want to fix. Expand the folders one at a time until you reach that extension's entry.
- Right-click the specific file extension subkey you want to clear and select Delete. Confirm the prompt if one appears. If Windows refuses with a permissions error, you are probably on the wrong key. Check that you are working under your own user profile, then try again.
- Close Registry Editor.
- Open Task Manager (a tool that lets you monitor and stop running background processes) by pressing Ctrl + Shift + Esc. Find Windows Explorer in the Processes list, right-click it, and select Restart. The taskbar and desktop flicker briefly and the change takes effect. Alternatively, sign out of your user profile and sign back in.
The next time you open a file of that type, Windows may ask which app to use. Pick the one you want and decide whether to make it the default.
Method 3Registry Cleanup for a File Type
Sometimes a default app keeps reverting even after you change it. This usually means corrupted or conflicting registry entries are tied to that file type. Deleting the leftover user choice keys in Registry Editor makes Windows drop the broken associations, clear the conflicting settings, and rebuild the file handler link from scratch.
Incorrect changes to the registry can corrupt your system configuration, so proceed carefully. Export any key before you delete it, as described in the previous section, so you can restore it if something goes wrong.
- Press Windows Key + R, type
regedit, and press Enter to open Registry Editor. - In the left-hand directory tree, navigate to
HKEY_CURRENT_USER\Software\Microsoft\Windows\CurrentVersion\Explorer. - Look for subkeys or values related to user choice overrides that might be locking your file types into a loop. Only look at the file type that is misbehaving, and leave the rest alone.
- Right-click the problematic string or subkey and choose Delete.
- Restart your computer, or restart Windows Explorer through Task Manager, to finish removing the stale cache. A full restart is the more reliable choice if the old app still opens afterwards.
What to do next
Check that the reset worked by opening a few common files:
- Double-click a PDF and see whether it opens in your preferred reader.
- Double-click a JPEG image and check the viewer or editor that launches.
- Click an HTML file or a web link and confirm it opens in your chosen browser.
If an app keeps taking back its associations, open that program's own settings and turn off its option to check or set itself as the default at startup. Otherwise it will undo your changes the next time it runs.
Have a question about this guide?
Answered by AI from this guide. Good questions may be added to this page — please don't include personal details.
Did this guide fix your problem?

About the Author
Richard
Tech Writer, IT Professional
Richard is a writer at Geek Rewind who turns complex IT tasks into clear, step-by-step guides. He draws on years of hands-on experience in system administration and enterprise IT operations, focusing on Windows, Linux and WordPress: the problems people actually run into, and the fixes that work. His server and WordPress guides come from systems he runs himself. Richard builds and maintains the platform behind Geek Rewind, from its Ubuntu servers and Nginx configuration to its custom WordPress plugins. Many new tutorials start with readers' questions, and he's always glad to answer them in the comments.
No comments yet — be the first to share your thoughts!