How to Reset an App to Default in Windows 11

Resetting an app in Windows 11 clears out broken cache files, bad data, and frozen settings and returns the program to its original state. It is a built-in troubleshooting tool. It fixes most misbehaving software in fewer than 5 clicks through the Settings menu, and you don’t have to uninstall and reinstall the program.
Most Microsoft Store packages and modern apps support this reset. Some programs let you keep your personal files, while others start completely clean. It depends on whether the app stores its data locally or in the cloud. If the app syncs to an account, signing back in usually brings most of your data back. Anything stored only on this PC is gone after a reset.
Classic desktop programs installed with a traditional setup file (an .exe or .msi installer) often have no Reset button. For those, the only options are the program’s own repair tool or an uninstall and reinstall. This is also why the Reset option can be missing for some apps in the steps below.
Open Settings , go to Apps Installed apps, find your app, click the three dots next to it, select Advanced options, scroll to Reset, and click Reset twice to confirm. The app returns to default settings and clears all cached data and saved files.
What Happens When You Reset or Repair an App?
That fixes stubborn glitches and crashes, but it also removes your personal settings and unpins the program from your taskbar .
Try the Repair option first. It tries to fix the app without touching your saved data, so it is the safer choice. Not every app offers it, and if it isn’t there you can go straight to Reset.
A full reset makes sense when Repair fails to fix the problem. Typical cases are an app that crashes on launch, shows a blank window, or keeps failing to sign in.
Taskbar shortcuts disappear during a reset. Once the reset finishes, pin the icons to the taskbar again by hand.
If the app holds data you can't recreate, such as local notes or game saves that don't sync, back it up first. A reset can't be undone. The only way back is to set the app up again from scratch.
How to Reset an App in 🪟 Windows 11
Option 1Reset App Using Settings
- Open the Settings app by pressing
Win + Ion your keyboard. - Click Apps on the left menu, then click Installed apps on the right.
- Find the app you want to reset (for example, "Microsoft Store") in the list.
- Click the three dots (︙) next to the app, then select Advanced options.
- Click Terminate to stop the app from running.
- Scroll down and click Reset.
- Confirm by clicking Reset again when prompted.
- The app will be reset to its default settings. You can now close Settings.
The main Settings app is the most reliable way to reset an app in Windows 11. It works on Home and Pro, and it needs no commands or third-party tools. You can also force-stop a frozen program from the same screen before you wipe its cache files. The steps are the same on current Windows 11 builds, though the exact layout of the Advanced options page can vary slightly between versions.
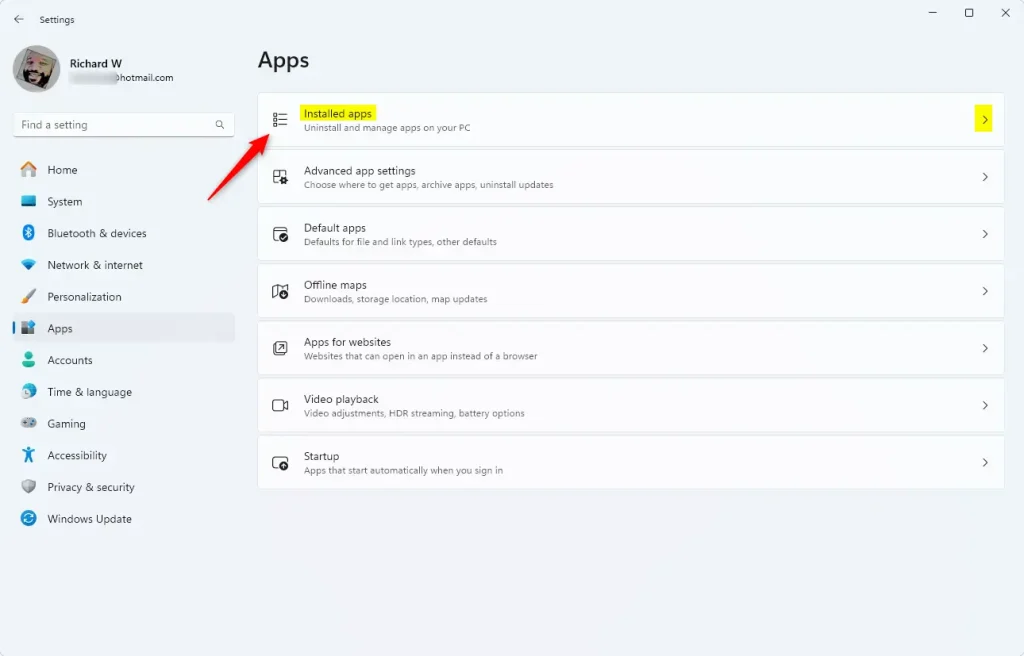
Open Settings Apps Installed apps You will see a list of every program on the PC. Use the search box at the top of the list to find the app quickly, or change the sort order if the list is long.
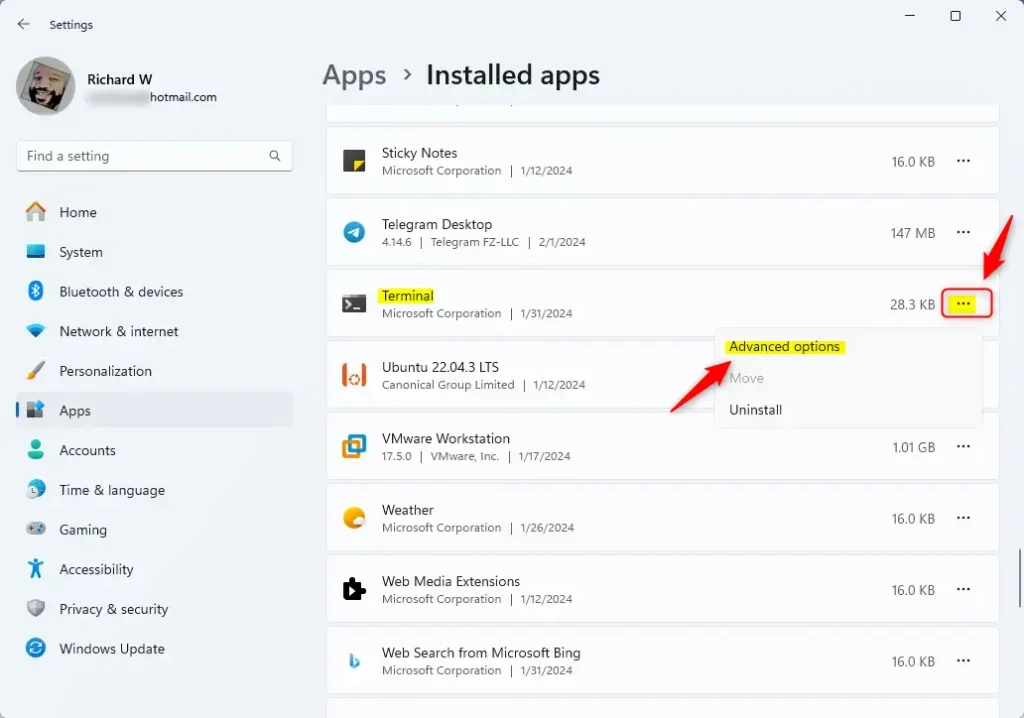
Click the three dots to the right of the app's name and select Advanced options. If the menu shows only Modify or Uninstall, the app does not support a reset through Settings. That is normal for classic desktop programs. If it does support one, a page opens with the app's details and a Reset section further down.
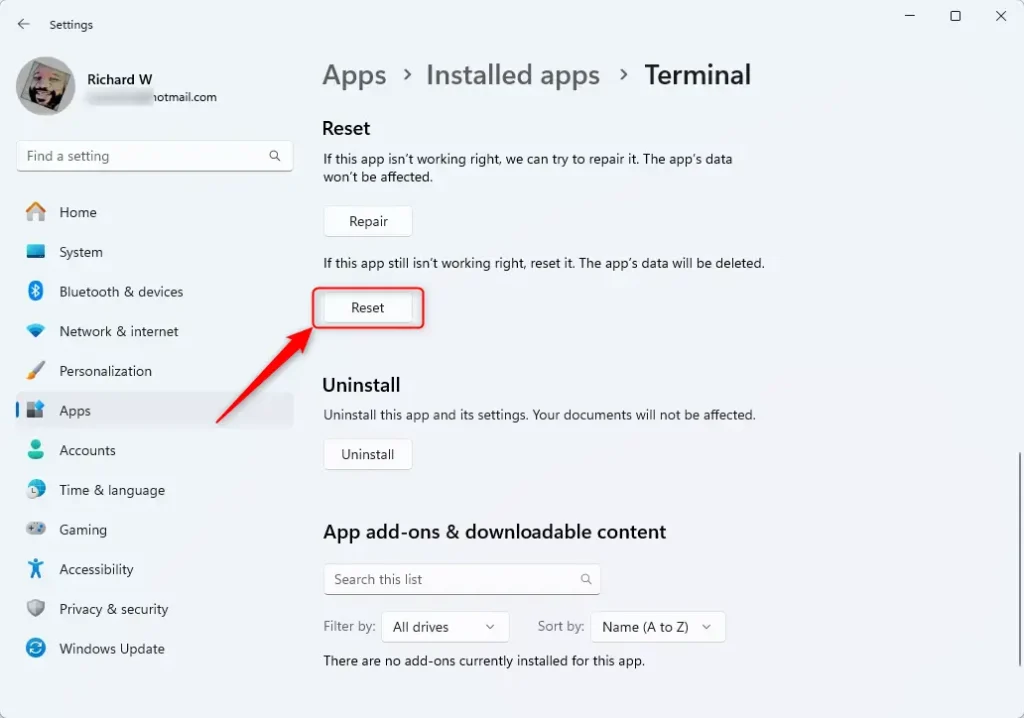
Scroll down to the Reset section. If the app is frozen, click Terminate first to stop it and any background processes. Then click Repair and test the app. If it still misbehaves, click Reset. A confirmation message warns that the app's data will be deleted. Click Reset again to confirm. A checkmark appears next to the button when the reset finishes. You don't need to restart Windows, but you do need to reopen the app and set it up again.
Option 2Reset App from the Start Menu
You can also reach the reset page straight from the Start menu, without browsing the full Settings list. Right-click any installed app and jump to its advanced options screen, where you can clear broken cache files. This works for Microsoft Store and other packaged apps. For a classic desktop program, the right-click menu may not show the settings entry at all.
- Open the Start menu.
- Click All apps to see a list of your apps.
- Right-click the app you want to reset (for example, "Microsoft Store").
- Hover over More, then click App settings.
- Follow the same reset steps as in Option 1.

If the app isn't pinned to the Start menu, click All apps in the top-right corner of the Start menu. This opens an alphabetical list of everything installed. Scroll to the app, or click a letter heading to jump to it. Then right-click the app and choose App settings. This opens the same Advanced options page you get from Settings, so the Terminate, Repair and Reset buttons work as described above.
Option 3Reset App Using PowerShell (For Advanced Users)
PowerShell is a command-line tool for running text commands. Advanced users can use it to reset or reinstall built-in system apps that have no reset button in the normal Settings menu. This method works on the app's package files directly. It is useful for apps that refuse to open or work normally, such as a stock app like Photos or Calculator.
Work through the steps in the list below in order. You will need an administrator account, because the commands change system-level app packages. Be careful with these commands. Copy them exactly, and don't run them against apps you don't understand.
- Open Windows Terminal or PowerShell (search "PowerShell" in Start, then open it).
- Type this command and press Enter to see all installed apps:
Get-AppxPackage | Select Name - Look through the list to find the exact name of the app you want to reset (e.g., Microsoft.WindowsStore for Microsoft Store).
- Type the command below, replacing AppName with the actual app name, and press Enter:
Get-AppxPackage *AppName* | Reset-AppxPackage - Example for Microsoft Store:
Get-AppxPackage *Microsoft.WindowsStore* | Reset-AppxPackage - Close PowerShell when you're done.
Option 4Use Pre-made PowerShell Commands for Popular Apps
The following text snippets run app resets when you paste them into PowerShell. To paste in a PowerShell window, right-click or press Ctrl+V, then press Enter. Wait for the prompt to return before you close the window, since some commands take a few seconds to finish.
| App | PowerShell Command |
|---|---|
| Calculator | Get-AppxPackage *Microsoft.WindowsCalculator* | Reset-AppxPackage |
| Microsoft Store | Get-AppxPackage *Microsoft.WindowsStore* | Reset-AppxPackage |
| Photos | Get-AppxPackage *Microsoft.Windows.Photos* | Reset-AppxPackage |
| Settings | Get-AppxPackage *windows.immersivecontrolpanel* | Reset-AppxPackage |
| Snipping Tool | Get-AppxPackage *Microsoft.ScreenSketch* | Reset-AppxPackage |
| Sticky Notes | Get-AppxPackage *Microsoft.MicrosoftStickyNotes* | Reset-AppxPackage |
Summary
- You can reset apps in Windows 11 using Settings, the Start menu, or PowerShell.
- Try Repair first if your app has problems. It won't erase your data.
- Reset will erase app data and settings. Only use it if repair doesn't work.
- After resetting, you might need to pin the app back to your taskbar if you had it there.
- PowerShell is a powerful tool if you want to reset apps quickly using commands.
- By following these easy steps, you can fix most app problems and get everything working again in Windows 11.
You can reset a misbehaving app in Windows 11 from the Settings menu, the Start menu, or PowerShell. Try the safer Repair option first, because it fixes many bugs without losing your saved data. A full reset clears your preferences and unpins the program from the taskbar, so use it only when repair has failed. If a reset doesn't help either, uninstalling and reinstalling the app is the next step.
Was this guide helpful?
0% of readers found this helpful (1 votes)

About the Author
Richard
Tech Writer, IT Professional
Richard is a writer at Geek Rewind who turns complex IT tasks into clear, step-by-step guides. He draws on years of hands-on experience in system administration and enterprise IT operations, focusing on Windows, Linux and WordPress: the problems people actually run into, and the fixes that work. His server and WordPress guides come from systems he runs himself. Richard builds and maintains the platform behind Geek Rewind, from its Ubuntu servers and Nginx configuration to its custom WordPress plugins. Many new tutorials start with readers' questions, and he's always glad to answer them in the comments.




No comments yet — be the first to share your thoughts!