How to Find Hardware ID (HWID) in Windows 11

A Hardware ID (HWID) is a unique string of letters and numbers that acts as a digital fingerprint for physical components inside your PC, such as your graphics card or Wi-Fi adapter. Windows 11 uses this code to recognize each piece of hardware and load the correct driver software.
Finding an HWID helps you track down missing drivers when a device stops working properly. For example, components like the Intel Wi-Fi 6 AX201 rely on HWID strings that start with PCI\VEN_8086&DEV_A370.
Open Device Manager, find your device, right-click to open Properties, select the Details tab, and choose “Hardware Ids” from the dropdown menu. The ID will appear in the box below.
Method 1Finding the Hardware ID Using Device Manager
Device Manager serves as the central hub for your computer’s hardware. It lists every connected component—from keyboards to graphics cards—making it the most common place to find an HWID.
Step 1Open Device Manager
Press Win+R to open the Run dialog box. Type devmgmt.msc into the box and press Enter or click OK.
Step 2Find the Device
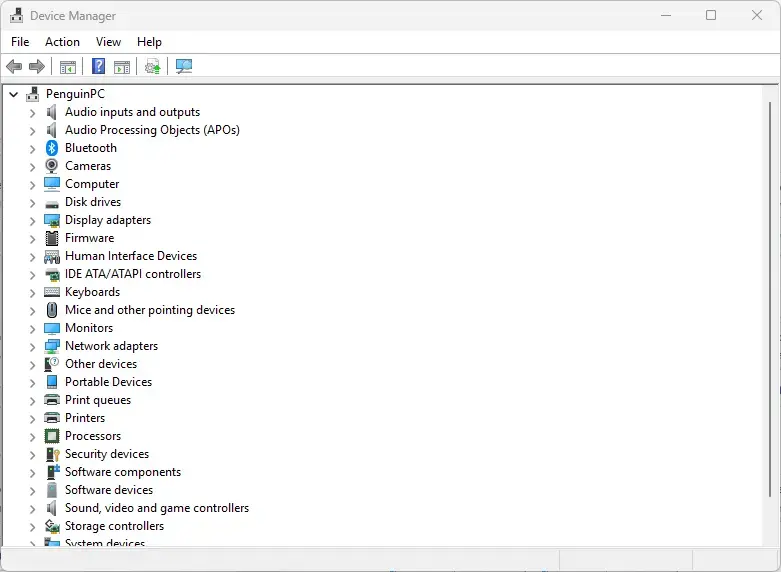
Device Manager groups your computer parts into categories to help you locate specific hardware in Windows 11. Open Device Manager, look through categories like Display adapters or Network adapters, and click the small arrow next to a category to see the individual devices listed inside.
Click the small arrow next to a device category to reveal the devices listed within that category. Expanding "Display adapters," for example, might show your NVIDIA or AMD graphics card.
Step 3Open the Device's Properties
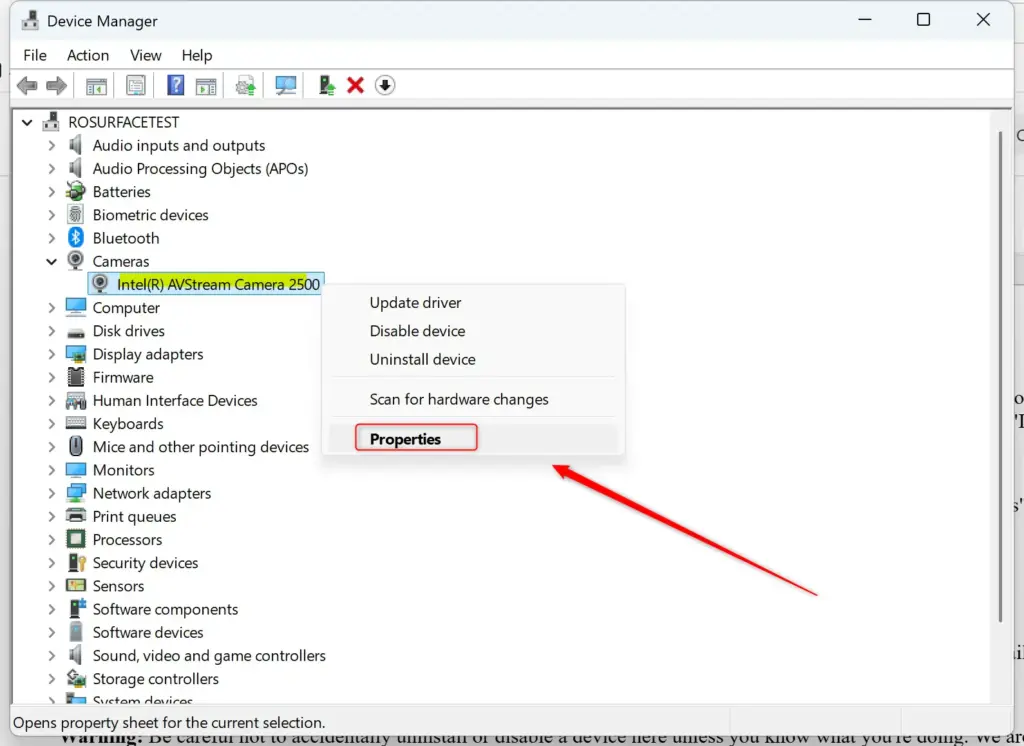
Locate the specific device for which you need the Hardware ID. Double-click that device. The device's Properties window will appear, displaying all details about the hardware. Within the Properties window, find and click the "Details" tab.
Step 4Go to the Details Tab
In the Properties window, locate and click the "Details" tab.
Step 5Select "Hardware Ids"
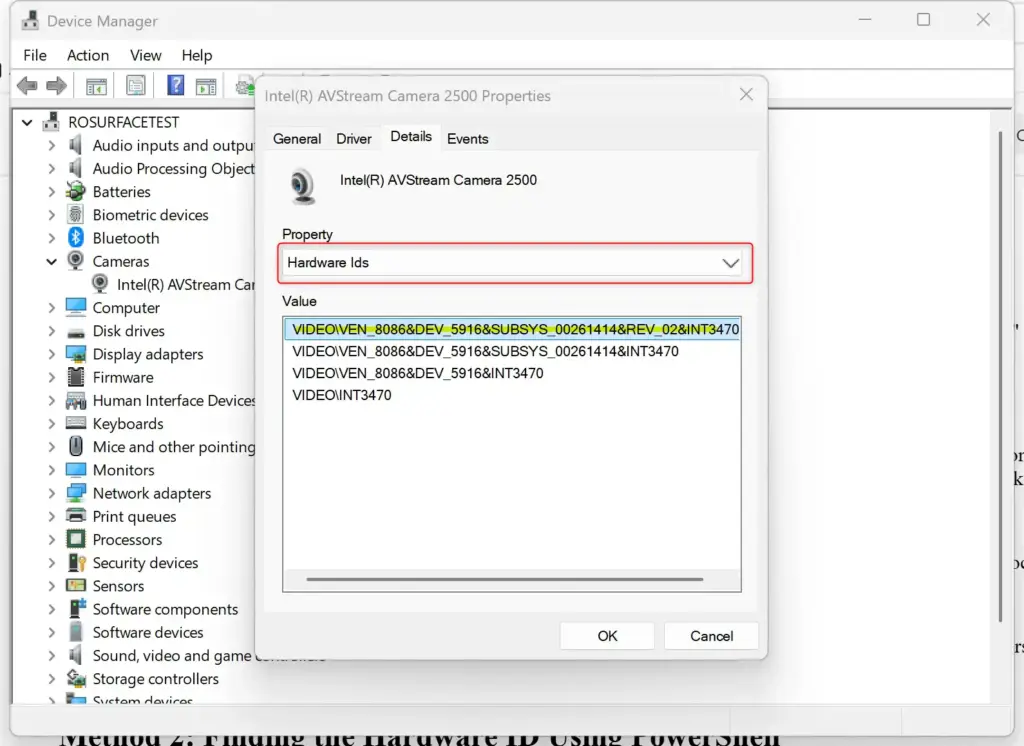
You will see a field labeled "Property" with a dropdown menu. Click this menu. Scroll down and choose "Hardware Ids."
Step 6Copy the Hardware ID
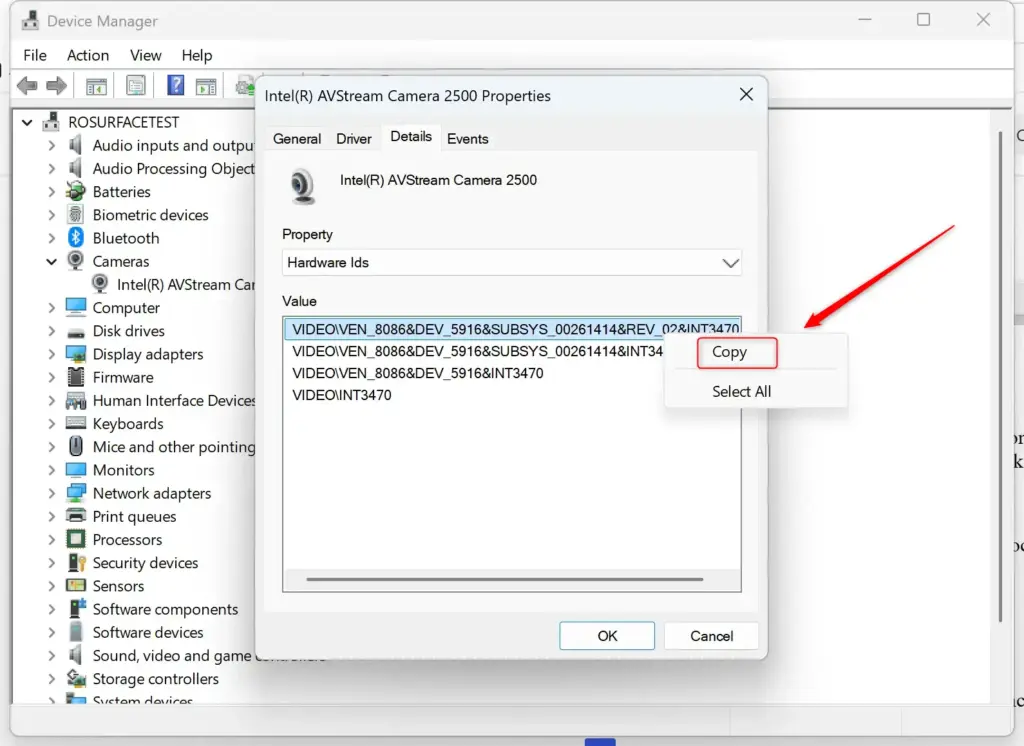
Copying your windows 11 hardware id lets you save the unique text string for driver searches or troubleshooting. Right-click the specific Hardware ID in the properties list, select Copy from the menu, and paste the code into Notepad or another text editor.
To copy a Hardware ID, right-click the Hardware ID text and select "Copy." You can then paste this Hardware ID using Ctrl+V into a document, email, or any other location where the Hardware ID is required.
Method 2Finding the Hardware ID Using PowerShell
PowerShell can efficiently retrieve the Hardware IDs for all your devices simultaneously. This approach is particularly useful if you require information for multiple components.
Step 1Open PowerShell
Right-click the Start button and choose Terminal (Admin) or PowerShell (Admin).
This level of access prevents potential permission errors when you try to view device properties.
Step 2Choose Your Command
Running a specific command in PowerShell displays every connected device and its windows 11 hardware id directly on your screen. Type Get-PnpDevice -PresentOnly | Select-Object Name, HardwareID | Format-Table -AutoSize into the PowerShell window and press Enter to generate the complete list.
Option A: Display All Hardware IDs in PowerShell
You can view all Hardware IDs within the PowerShell window by entering the following command and pressing Enter: `Get-PnpDevice -PresentOnly | Select-Object -Property Name, HardwareID`. This command lists each hardware device and its unique Hardware ID, which can be useful for troubleshooting or driver installation.
Get-PnpDevice -PresentOnly | Select-Object Name, HardwareID | Format-Table -AutoSizeThis command instructs Windows to list all connected devices (-PresentOnly), display their name and Hardware ID (Select-Object -Property Name,HardwareID), and then format the output neatly (Format-List).
Option B: Save All Hardware IDs to a Text File
To save the list to a text file on your Desktop for later use, enter this command and press Enter:
Get-PnpDevice -PresentOnly | Select-Object Name, HardwareID | Format-Table -AutoSize > "$env:USERPROFILE\Desktop\HardwareID.txt"This command performs the same function, but the > "$env:USERPROFILE\Desktop\HardwareID.txt" portion redirects the results to a file named "HardwareID.txt" located on your Desktop.
Step 3Find the Hardware ID in the Output
Scanning the PowerShell output list helps you match your specific device to its correct windows 11 hardware id. Read down the name column to find your hardware, then look at the matching code on the same line to copy the identifier you need.
Understanding What Those IDs Mean
Decoding a windows 11 hardware id reveals specific details about who made your computer part and how it connects to your system. The prefix shows the connection type like PCI or USB, while VEN and DEV codes identify the exact manufacturer and model.
- PCI or USB: Shows the type of connection the device uses.
- VEN_XXXX: The Vendor ID. This is a unique code for the company that made the hardware (like NVIDIA or Intel).
- DEV_XXXX: The Device ID. This identifies the specific model of hardware from that maker.
- SUBSYS_xxxx: The Subsystem ID. This often identifies the main device or system board it's on.
- REV_xx: The Revision number. This shows a specific version or update of the hardware.
Device VEN and DEV codes provide valuable information. You can use these codes on websites like PCI Lookup to find the specific device and its maker. This method is a good first step to locate the right drivers for your hardware.
References:
https://learn.microsoft.com/en-us/windows-hardware/drivers/install/hardware-ids
Summary
Device Manager lets you check individual device properties under the Details tab, while PowerShell allows you to view all hardware identifiers at once using a command.
```Was this guide helpful?

About the Author
Richard
Tech Writer, IT Professional
Richard is a writer at Geek Rewind who turns complex IT tasks into clear, step-by-step guides. He draws on years of hands-on experience in system administration and enterprise IT operations, focusing on Windows, Linux and WordPress: the problems people actually run into, and the fixes that work. His server and WordPress guides come from systems he runs himself. Richard builds and maintains the platform behind Geek Rewind, from its Ubuntu servers and Nginx configuration to its custom WordPress plugins. Many new tutorials start with readers' questions, and he's always glad to answer them in the comments.




No comments yet — be the first to share your thoughts!