How to Change Account Type in Windows 11
Changing a user account type in Windows 11 switches a user between Standard User and Administrator privileges. A Standard User account has limited access, stopping system-wide changes, while an Administrator account gives you full control over your PC.
This is important for managing your computer’s security and who can make changes, especially if others share your PC. You can change account types for both Local Accounts and Microsoft Accounts quickly.
Standard users can run apps and change their own settings but cannot make big changes that affect other people. Administrators can install software, change settings for everyone, and approve permission requests.
Open Settings, navigate to Accounts > Other users, select the desired account, click “Change account type,” and choose between Standard User or Administrator. You must be signed in as an administrator to make these changes.
How to Change Account Type
Option 1Change Account Type Using Settings
- Press Win + I to open Settings.
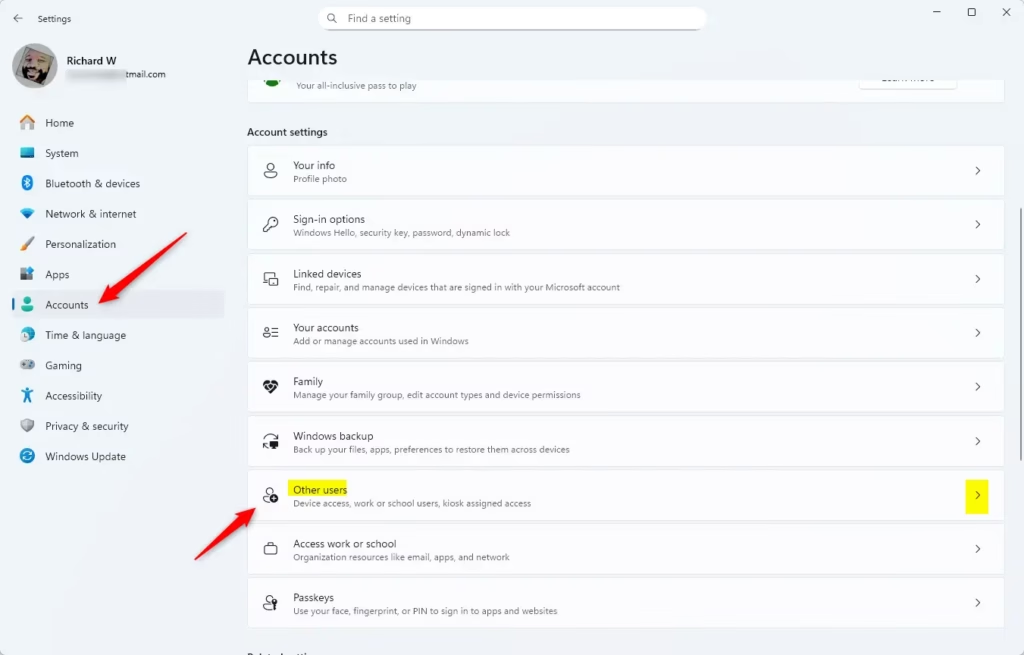
- Click Accounts on the left side, then select Other users on the right.
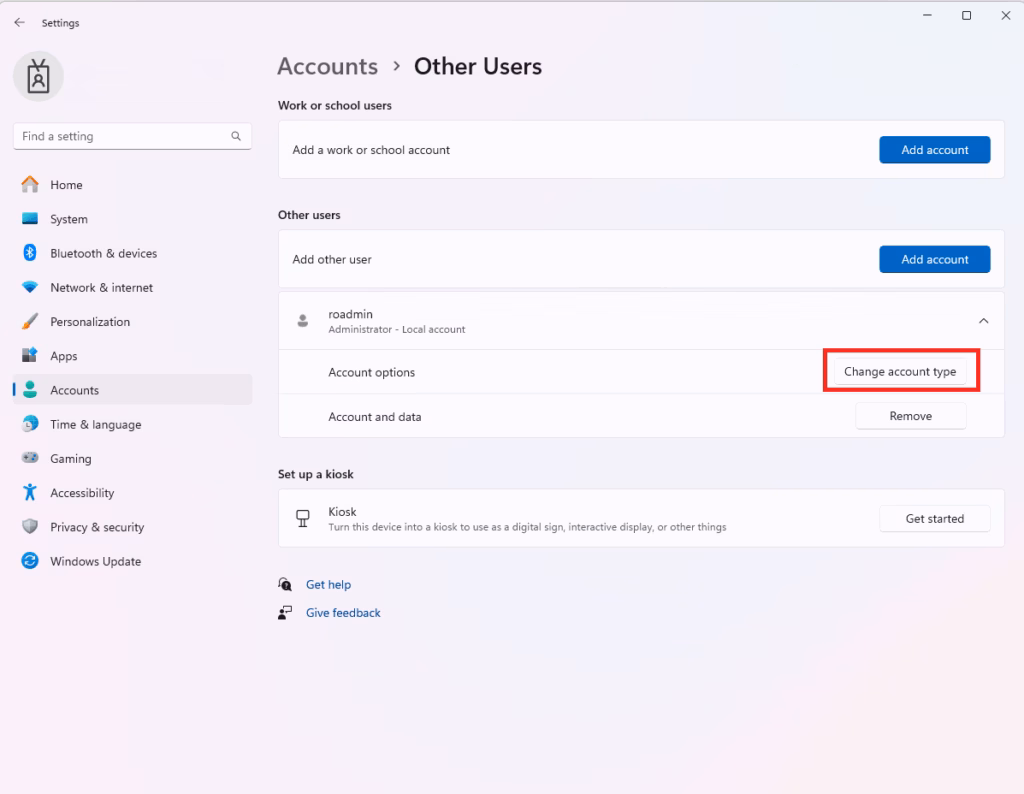
- Find the user account you want to change, click on it to expand, then click Change account type.
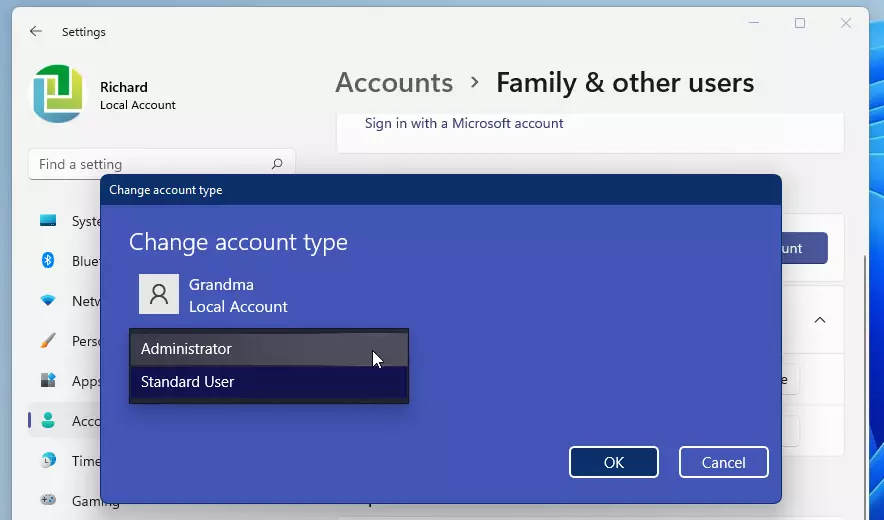
- Choose Standard User or Administrator from the dropdown menu, then click OK.
- Close Settings when you’re done.
You can change an account type in Windows 11 easily using the Settings app. First, open Settings by pressing ⊞ Win+I. Then, go to Accounts, select Other users, find the account you want to change, and click on it to expand its options. Finally, select ‘Change account type’, choose ‘Standard User’ or ‘Administrator’ from the list, and click OK.
Option 2Change Account Type Using Control Panel
For those familiar with older Windows versions, changing an account type in Windows 11 can also be done through the Control Panel. This method requires accessing the ‘User Accounts’ section, selecting the specific account, and then choosing the desired account type, either Standard User or Administrator.Option 3Change Account Type Using netplwiz (User Accounts Window)
- Press Win + R, type
netplwiz, and press Enter to open the User Accounts window. - If available, make sure the box Users must enter a user name and password to use this computer is checked.
- Select the user account you want to change, then click Properties.
- Go to the Group Membership tab.
- Select either Standard User or Administrator, then click OK.
- Click OK again to close the User Accounts window.
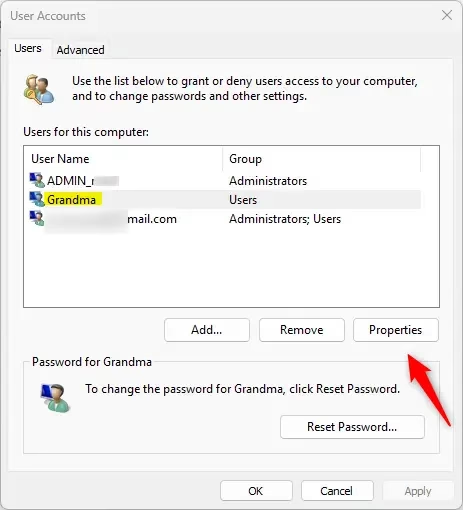

The netplwiz tool, also known as the User Accounts window, offers another way to change an account type in Windows 11. Press ⊞ Win+R, type netplwiz, and hit Enter. Make sure the box ‘Users must enter a user name and password to use this computer’ is checked if you see it. Select the user, click Properties, go to the Group Membership tab, choose Standard User or Administrator, and click OK.
Option 4Change Account Type Using Command Prompt or PowerShell
For users who prefer using commands, you can change an account type in Windows 11 with Command Prompt or PowerShell. This method lets you precisely manage account privileges. To start, open Windows Terminal as an administrator by right-clicking the Start button and selecting ‘Windows Terminal (Admin)’ or ‘Command Prompt’.
- Right-click the Start button and select Windows Terminal (Admin) or Command Prompt (Admin).
- To see which users are in each group, type these commands and press Enter after each:Code
net localgroup users
net localgroup administrators - To make someone a Standard User, type:Code
net localgroup users "UserName" /addReplace
UserNamewith the actual user name (for example, “Brink2”).
- To make someone an Administrator, type:Code
net localgroup administrators "UserName" /add - To remove a user from a group (for example, if you want to remove admin rights), type:Code
net localgroup administrators "UserName" /delete
net localgroup users "UserName" /delete
net localgroup guests "UserName" /delete - Close the terminal when done.
Summary
- Standard User accounts are for regular PC use without full control.
- Administrator accounts have full control and can change system settings.
- You can change account types in many ways: Settings, Control Panel, netplwiz, or Command Prompt.
- You must be signed in as an administrator to make these changes.
- Always keep at least one administrator account active on your PC.
- Managing accounts carefully helps keep your PC safe and running smoothly.
Standard User accounts are for everyday PC use without full system control, while Administrator accounts offer complete power over settings and installations. You can change account types in Windows 11 using the Settings app, the netplwiz tool, or Command Prompt/PowerShell. Importantly, you must be signed in as an administrator to make these changes, and always keep at least one administrator account active.
Is 🪟 Windows 11 a single user or multi user?
highlight} Note: Some of the multi-user operating systems are: Windows 2000, Linux, Ubuntu, Unix, Mac OS X, Windows 10, Windows 11, etc.
Was this guide helpful?

About the Author
Richard
Tech Writer, IT Professional
Richard, a writer for Geek Rewind, is a tech enthusiast who loves breaking down complex IT topics into simple, easy-to-understand ideas. With years of hands-on experience in system administration and enterprise IT operations, he’s developed a knack for offering practical tips and solutions. Richard aims to make technology more accessible and actionable. He's deeply committed to the Geek Rewind community, always ready to answer questions and engage in discussions.


No comments yet — be the first to share your thoughts!