How to Find and Manage Your Advertising ID Settings in Windows 11


Step 2Go to Privacy & Security
Navigating to Privacy & security in your Windows 11 settings gives you control over your personal data and your windows 11 advertising id. Look at the menu on the left side of the window and click on Privacy & security to open the right panel. Once the Settings window is open, look at the list on the left side. Find and click on Privacy & security. This menu controls your personal data settings.
Step 3Access Recommendations & offers Settings
Inside the “Privacy & security” section, click on “Recommendations & offers“. The “Recommendations & offers” page hosts multiple privacy controls affecting the entire operating system environment. Advertising ID management tools reside on this screen.Step 4Control Your Advertising ID
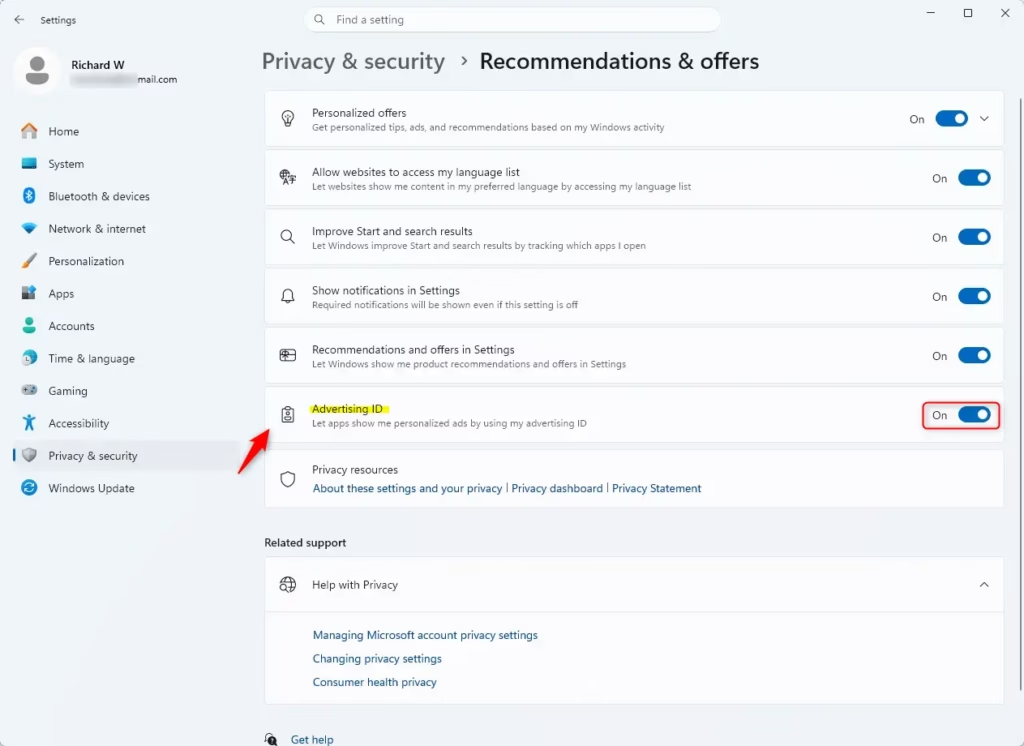
Controlling your windows 11 advertising id lets you stop apps from showing you personalized ads. Find the toggle switch next to the option that lets apps use your advertising id, and click it to turn the feature off. The correct configuration menu is now active. On the “Recommendations & offers” settings page, find the option that says: Let apps show my personalized ads by using my advertising ID. A dedicated toggle switch sits adjacent to the text.-
- To turn it OFF: Click the switch. It will move to the left and turn gray. This means apps can no longer use your Advertising ID for personalized ads.
-
- To turn it ON: Click the switch. It will move to the right and turn blue (or your computer’s accent color). This allows your Advertising ID to be used for personalized ads.
Summary
Managing your windows 11 advertising id takes just a few clicks through your privacy settings. Turning off this tracking feature stops apps from using your personal data for targeted ads, giving you more privacy while you use your computer. Your Advertising ID in Windows 11 is a unique number apps and advertisers use for personalized ads. Management occurs via Settings Privacy & security General. Toggling the “Let apps show my personalized ads by using my advertising ID” option on or off affects how targeted ads are. Deactivating the toggle ensures ads lose specific relevance, though visual placement remains unchanged. “`Frequently asked questions
What does resetting your advertising ID do?
Resetting your advertising ID generates a new tracking code for your device. Apps start building a fresh profile of your interests from that point forward, so advertisers lose the history they collected before the reset. You'll still see ads, but they won't be based on your previous activity.
(adsbygoogle=window.adsbygoogle||[]).push({});How do I turn off my advertising ID?
Open Settings , go to Privacy & security, then select General. Toggle off the switch next to "Let apps show me personalized ads by using my advertising ID." When it's off, apps can't access your advertising ID to track your activity or show targeted ads.
Where do I find ad settings?
Open Settings and select Privacy & security. Scroll down to find General, where you'll see the advertising ID toggle. You can also manage ad preferences for individual apps in the same section by adjusting permissions for specific applications.
How do I get rid of ads that keep popping up on my computer?
Pop-up ads typically come from websites or apps, not Windows itself. In your browser, check privacy settings and block pop-ups. If ads appear in installed apps, remove programs you don't recognize, turn off notifications, or disable location and microphone permissions those apps don't need.
Still have a question?
Answered by AI from this guide. Good questions may be added to this page — please don't include personal details.
Step 1Open Windows Settings
Opening Settings in Windows 11 lets you access your windows 11 advertising id controls and other privacy options. Press the Win+I on your keyboard at the same time to launch the main settings menu right away. Press Win+I on your keyboard to open Settings. You can also click the Start button and select the gear-shaped Settings icon.-
- Click the Start button on your taskbar . It looks like the Windows logo.
-
- In the Start menu , click the Settings icon. It looks like a gear.
-
- Or, press the Win+I on your keyboard at the same time. This is a fast shortcut many people use.
Step 2Go to Privacy & Security
Navigating to Privacy & security in your Windows 11 settings gives you control over your personal data and your windows 11 advertising id. Look at the menu on the left side of the window and click on Privacy & security to open the right panel. Once the Settings window is open, look at the list on the left side. Find and click on Privacy & security. This menu controls your personal data settings.Step 3Access Recommendations & offers Settings
Inside the “Privacy & security” section, click on “Recommendations & offers“. The “Recommendations & offers” page hosts multiple privacy controls affecting the entire operating system environment. Advertising ID management tools reside on this screen.Step 4Control Your Advertising ID
Controlling your windows 11 advertising id lets you stop apps from showing you personalized ads. Find the toggle switch next to the option that lets apps use your advertising id, and click it to turn the feature off. The correct configuration menu is now active. On the “Recommendations & offers” settings page, find the option that says: Let apps show my personalized ads by using my advertising ID. A dedicated toggle switch sits adjacent to the text.-
- To turn it OFF: Click the switch. It will move to the left and turn gray. This means apps can no longer use your Advertising ID for personalized ads.
-
- To turn it ON: Click the switch. It will move to the right and turn blue (or your computer’s accent color). This allows your Advertising ID to be used for personalized ads.
Summary
Managing your windows 11 advertising id takes just a few clicks through your privacy settings. Turning off this tracking feature stops apps from using your personal data for targeted ads, giving you more privacy while you use your computer. Your Advertising ID in Windows 11 is a unique number apps and advertisers use for personalized ads. Management occurs via Settings Privacy & security General. Toggling the “Let apps show my personalized ads by using my advertising ID” option on or off affects how targeted ads are. Deactivating the toggle ensures ads lose specific relevance, though visual placement remains unchanged. “`What does resetting your advertising ID do?
Resetting your advertising ID generates a new tracking code for your device. Apps start building a fresh profile of your interests from that point forward, so advertisers lose the history they collected before the reset. You'll still see ads, but they won't be based on your previous activity.
How do I turn off my advertising ID?
Open Settings, go to Privacy & security, then select General. Toggle off the switch next to "Let apps show me personalized ads by using my advertising ID." When it's off, apps can't access your advertising ID to track your activity or show targeted ads.
Where do I find ad settings?
Open Settings and select Privacy & security. Scroll down to find General, where you'll see the advertising ID toggle. You can also manage ad preferences for individual apps in the same section by adjusting permissions for specific applications.
How do I get rid of ads that keep popping up on my computer?
Pop-up ads typically come from websites or apps, not Windows itself. In your browser, check privacy settings and block pop-ups. If ads appear in installed apps, remove programs you don't recognize, turn off notifications, or disable location and microphone permissions those apps don't need.
Step 4Control Your Advertising ID
Controlling your windows 11 advertising id lets you stop apps from showing you personalized ads. Find the toggle switch next to the option that lets apps use your advertising id, and click it to turn the feature off. The correct configuration menu is now active. On the "Recommendations & offers" settings page, find the option that says: Let apps show my personalized ads by using my advertising ID. A dedicated toggle switch sits adjacent to the text.-
- To turn it OFF: Click the switch. It will move to the left and turn gray. This means apps can no longer use your Advertising ID for personalized ads.
-
- To turn it ON: Click the switch. It will move to the right and turn blue (or your computer's accent color). This allows your Advertising ID to be used for personalized ads.
Summary
Managing your windows 11 advertising id takes just a few clicks through your privacy settings. Turning off this tracking feature stops apps from using your personal data for targeted ads, giving you more privacy while you use your computer. Your Advertising ID in Windows 11 is a unique number apps and advertisers use for personalized ads. Management occurs via Settings Privacy & security General. Toggling the "Let apps show my personalized ads by using my advertising ID" option on or off affects how targeted ads are. Deactivating the toggle ensures ads lose specific relevance, though visual placement remains unchanged. ```Step 1Open Windows Settings
Opening Settings in Windows 11 lets you access your windows 11 advertising id controls and other privacy options. Press the Windows key + I on your keyboard at the same time to launch the main settings menu right away. Press Windows + I on your keyboard to open Settings. You can also click the Start button and select the gear-shaped Settings icon.-
- Click the Start button on your taskbar. It looks like the Windows logo.
-
- In the Start menu, click the Settings icon. It looks like a gear.
-
- Or, press the Windows key + I on your keyboard at the same time. This is a fast shortcut many people use.
Step 2Go to Privacy & Security
Navigating to Privacy & security in your Windows 11 settings gives you control over your personal data and your windows 11 advertising id. Look at the menu on the left side of the window and click on Privacy & security to open the right panel. Once the Settings window is open, look at the list on the left side. Find and click on Privacy & security. This menu controls your personal data settings.Step 3Access Recommendations & offers Settings
Inside the "Privacy & security" section, click on "Recommendations & offers". The "Recommendations & offers" page hosts multiple privacy controls affecting the entire operating system environment. Advertising ID management tools reside on this screen.Step 4Control Your Advertising ID
Controlling your windows 11 advertising id lets you stop apps from showing you personalized ads. Find the toggle switch next to the option that lets apps use your advertising id, and click it to turn the feature off. The correct configuration menu is now active. On the "Recommendations & offers" settings page, find the option that says: Let apps show my personalized ads by using my advertising ID. A dedicated toggle switch sits adjacent to the text.-
- To turn it OFF: Click the switch. It will move to the left and turn gray. This means apps can no longer use your Advertising ID for personalized ads.
-
- To turn it ON: Click the switch. It will move to the right and turn blue (or your computer's accent color). This allows your Advertising ID to be used for personalized ads.
Summary
Managing your windows 11 advertising id takes just a few clicks through your privacy settings. Turning off this tracking feature stops apps from using your personal data for targeted ads, giving you more privacy while you use your computer. Your Advertising ID in Windows 11 is a unique number apps and advertisers use for personalized ads. Management occurs via Settings Privacy & security General. Toggling the "Let apps show my personalized ads by using my advertising ID" option on or off affects how targeted ads are. Deactivating the toggle ensures ads lose specific relevance, though visual placement remains unchanged. ```What does resetting your advertising ID do?
Resetting your advertising ID generates a new tracking code for your device. Apps start building a fresh profile of your interests from that point forward, so advertisers lose the history they collected before the reset. You'll still see ads, but they won't be based on your previous activity.
How do I turn off my advertising ID?
Open Settings, go to Privacy & security, then select General. Toggle off the switch next to "Let apps show me personalized ads by using my advertising ID." When it's off, apps can't access your advertising ID to track your activity or show targeted ads.
Where do I find ad settings?
Open Settings and select Privacy & security. Scroll down to find General, where you'll see the advertising ID toggle. You can also manage ad preferences for individual apps in the same section by adjusting permissions for specific applications.
How do I get rid of ads that keep popping up on my computer?
Pop-up ads typically come from websites or apps, not Windows itself. In your browser, check privacy settings and block pop-ups. If ads appear in installed apps, remove programs you don't recognize, turn off notifications, or disable location and microphone permissions those apps don't need.
Step 2Go to Privacy & Security
Navigating to Privacy & security in your Windows 11 settings gives you control over your personal data and your windows 11 advertising id. Look at the menu on the left side of the window and click on Privacy & security to open the right panel. Once the Settings window is open, look at the list on the left side. Find and click on Privacy & security. This menu controls your personal data settings.Step 3Access Recommendations & offers Settings
Inside the "Privacy & security" section, click on "Recommendations & offers". The "Recommendations & offers" page hosts multiple privacy controls affecting the entire operating system environment. Advertising ID management tools reside on this screen.Step 4Control Your Advertising ID
Controlling your windows 11 advertising id lets you stop apps from showing you personalized ads. Find the toggle switch next to the option that lets apps use your advertising id, and click it to turn the feature off. The correct configuration menu is now active. On the "Recommendations & offers" settings page, find the option that says: Let apps show my personalized ads by using my advertising ID. A dedicated toggle switch sits adjacent to the text.-
- To turn it OFF: Click the switch. It will move to the left and turn gray. This means apps can no longer use your Advertising ID for personalized ads.
-
- To turn it ON: Click the switch. It will move to the right and turn blue (or your computer's accent color). This allows your Advertising ID to be used for personalized ads.
Summary
Managing your windows 11 advertising id takes just a few clicks through your privacy settings. Turning off this tracking feature stops apps from using your personal data for targeted ads, giving you more privacy while you use your computer. Your Advertising ID in Windows 11 is a unique number apps and advertisers use for personalized ads. Management occurs via Settings Privacy & security General. Toggling the "Let apps show my personalized ads by using my advertising ID" option on or off affects how targeted ads are. Deactivating the toggle ensures ads lose specific relevance, though visual placement remains unchanged. ```Step 1Open Windows Settings
Opening Settings in Windows 11 lets you access your windows 11 advertising id controls and other privacy options. Press the Windows key + I on your keyboard at the same time to launch the main settings menu right away. Press Windows + I on your keyboard to open Settings. You can also click the Start button and select the gear-shaped Settings icon.-
- Click the Start button on your taskbar. It looks like the Windows logo.
-
- In the Start menu, click the Settings icon. It looks like a gear.
-
- Or, press the Windows key + I on your keyboard at the same time. This is a fast shortcut many people use.
Step 2Go to Privacy & Security
Navigating to Privacy & security in your Windows 11 settings gives you control over your personal data and your windows 11 advertising id. Look at the menu on the left side of the window and click on Privacy & security to open the right panel. Once the Settings window is open, look at the list on the left side. Find and click on Privacy & security. This menu controls your personal data settings.Step 3Access Recommendations & offers Settings
Inside the "Privacy & security" section, click on "Recommendations & offers". The "Recommendations & offers" page hosts multiple privacy controls affecting the entire operating system environment. Advertising ID management tools reside on this screen.Step 4Control Your Advertising ID
Controlling your windows 11 advertising id lets you stop apps from showing you personalized ads. Find the toggle switch next to the option that lets apps use your advertising id, and click it to turn the feature off. The correct configuration menu is now active. On the "Recommendations & offers" settings page, find the option that says: Let apps show my personalized ads by using my advertising ID. A dedicated toggle switch sits adjacent to the text.-
- To turn it OFF: Click the switch. It will move to the left and turn gray. This means apps can no longer use your Advertising ID for personalized ads.
-
- To turn it ON: Click the switch. It will move to the right and turn blue (or your computer's accent color). This allows your Advertising ID to be used for personalized ads.
Summary
Managing your windows 11 advertising id takes just a few clicks through your privacy settings. Turning off this tracking feature stops apps from using your personal data for targeted ads, giving you more privacy while you use your computer. Your Advertising ID in Windows 11 is a unique number apps and advertisers use for personalized ads. Management occurs via Settings Privacy & security General. Toggling the "Let apps show my personalized ads by using my advertising ID" option on or off affects how targeted ads are. Deactivating the toggle ensures ads lose specific relevance, though visual placement remains unchanged. ```What does resetting your advertising ID do?
Resetting your advertising ID generates a new tracking code for your device. Apps start building a fresh profile of your interests from that point forward, so advertisers lose the history they collected before the reset. You'll still see ads, but they won't be based on your previous activity.
How do I turn off my advertising ID?
Open Settings, go to Privacy & security, then select General. Toggle off the switch next to "Let apps show me personalized ads by using my advertising ID." When it's off, apps can't access your advertising ID to track your activity or show targeted ads.
Where do I find ad settings?
Open Settings and select Privacy & security. Scroll down to find General, where you'll see the advertising ID toggle. You can also manage ad preferences for individual apps in the same section by adjusting permissions for specific applications.
How do I get rid of ads that keep popping up on my computer?
Pop-up ads typically come from websites or apps, not Windows itself. In your browser, check privacy settings and block pop-ups. If ads appear in installed apps, remove programs you don't recognize, turn off notifications, or disable location and microphone permissions those apps don't need.
Step 4Control Your Advertising ID
Controlling your windows 11 advertising id lets you stop apps from showing you personalized ads. Find the toggle switch next to the option that lets apps use your advertising id, and click it to turn the feature off. The correct configuration menu is now active. On the "Recommendations & offers" settings page, find the option that says: Let apps show my personalized ads by using my advertising ID. A dedicated toggle switch sits adjacent to the text.-
- To turn it OFF: Click the switch. It will move to the left and turn gray. This means apps can no longer use your Advertising ID for personalized ads.
-
- To turn it ON: Click the switch. It will move to the right and turn blue (or your computer's accent color). This allows your Advertising ID to be used for personalized ads.
Summary
Managing your windows 11 advertising id takes just a few clicks through your privacy settings. Turning off this tracking feature stops apps from using your personal data for targeted ads, giving you more privacy while you use your computer. Your Advertising ID in Windows 11 is a unique number apps and advertisers use for personalized ads. Management occurs via Settings Privacy & security General. Toggling the "Let apps show my personalized ads by using my advertising ID" option on or off affects how targeted ads are. Deactivating the toggle ensures ads lose specific relevance, though visual placement remains unchanged. ```Step 2Go to Privacy & Security
Navigating to Privacy & security in your Windows 11 settings gives you control over your personal data and your windows 11 advertising id. Look at the menu on the left side of the window and click on Privacy & security to open the right panel. Once the Settings window is open, look at the list on the left side. Find and click on Privacy & security. This menu controls your personal data settings.Step 3Access Recommendations & offers Settings
Inside the "Privacy & security" section, click on "Recommendations & offers". The "Recommendations & offers" page hosts multiple privacy controls affecting the entire operating system environment. Advertising ID management tools reside on this screen.Step 4Control Your Advertising ID
Controlling your windows 11 advertising id lets you stop apps from showing you personalized ads. Find the toggle switch next to the option that lets apps use your advertising id, and click it to turn the feature off. The correct configuration menu is now active. On the "Recommendations & offers" settings page, find the option that says: Let apps show my personalized ads by using my advertising ID. A dedicated toggle switch sits adjacent to the text.-
- To turn it OFF: Click the switch. It will move to the left and turn gray. This means apps can no longer use your Advertising ID for personalized ads.
-
- To turn it ON: Click the switch. It will move to the right and turn blue (or your computer's accent color). This allows your Advertising ID to be used for personalized ads.
Summary
Managing your windows 11 advertising id takes just a few clicks through your privacy settings. Turning off this tracking feature stops apps from using your personal data for targeted ads, giving you more privacy while you use your computer. Your Advertising ID in Windows 11 is a unique number apps and advertisers use for personalized ads. Management occurs via Settings Privacy & security General. Toggling the "Let apps show my personalized ads by using my advertising ID" option on or off affects how targeted ads are. Deactivating the toggle ensures ads lose specific relevance, though visual placement remains unchanged. ```Step 1Open Windows Settings
Opening Settings in Windows 11 lets you access your windows 11 advertising id controls and other privacy options. Press the Windows key + I on your keyboard at the same time to launch the main settings menu right away. Press Windows + I on your keyboard to open Settings. You can also click the Start button and select the gear-shaped Settings icon.-
- Click the Start button on your taskbar. It looks like the Windows logo.
-
- In the Start menu, click the Settings icon. It looks like a gear.
-
- Or, press the Windows key + I on your keyboard at the same time. This is a fast shortcut many people use.
Step 2Go to Privacy & Security
Navigating to Privacy & security in your Windows 11 settings gives you control over your personal data and your windows 11 advertising id. Look at the menu on the left side of the window and click on Privacy & security to open the right panel. Once the Settings window is open, look at the list on the left side. Find and click on Privacy & security. This menu controls your personal data settings.Step 3Access Recommendations & offers Settings
Inside the "Privacy & security" section, click on "Recommendations & offers". The "Recommendations & offers" page hosts multiple privacy controls affecting the entire operating system environment. Advertising ID management tools reside on this screen.Step 4Control Your Advertising ID
Controlling your windows 11 advertising id lets you stop apps from showing you personalized ads. Find the toggle switch next to the option that lets apps use your advertising id, and click it to turn the feature off. The correct configuration menu is now active. On the "Recommendations & offers" settings page, find the option that says: Let apps show my personalized ads by using my advertising ID. A dedicated toggle switch sits adjacent to the text.-
- To turn it OFF: Click the switch. It will move to the left and turn gray. This means apps can no longer use your Advertising ID for personalized ads.
-
- To turn it ON: Click the switch. It will move to the right and turn blue (or your computer's accent color). This allows your Advertising ID to be used for personalized ads.
Summary
Managing your windows 11 advertising id takes just a few clicks through your privacy settings. Turning off this tracking feature stops apps from using your personal data for targeted ads, giving you more privacy while you use your computer. Your Advertising ID in Windows 11 is a unique number apps and advertisers use for personalized ads. Management occurs via Settings Privacy & security General. Toggling the "Let apps show my personalized ads by using my advertising ID" option on or off affects how targeted ads are. Deactivating the toggle ensures ads lose specific relevance, though visual placement remains unchanged. ```What does resetting your advertising ID do?
Resetting your advertising ID generates a new tracking code for your device. Apps start building a fresh profile of your interests from that point forward, so advertisers lose the history they collected before the reset. You'll still see ads, but they won't be based on your previous activity.
How do I turn off my advertising ID?
Open Settings, go to Privacy & security, then select General. Toggle off the switch next to "Let apps show me personalized ads by using my advertising ID." When it's off, apps can't access your advertising ID to track your activity or show targeted ads.
Where do I find ad settings?
Open Settings and select Privacy & security. Scroll down to find General, where you'll see the advertising ID toggle. You can also manage ad preferences for individual apps in the same section by adjusting permissions for specific applications.
How do I get rid of ads that keep popping up on my computer?
Pop-up ads typically come from websites or apps, not Windows itself. In your browser, check privacy settings and block pop-ups. If ads appear in installed apps, remove programs you don't recognize, turn off notifications, or disable location and microphone permissions those apps don't need.
The Advertising ID in Windows 11 is a unique tracking code that apps use to show you targeted ads based on your activity. Windows generates this random 32-character string automatically during setup, but you can turn it off or reset it at any time in your Privacy & security settings.
Turning off this feature stops apps from building a profile on your habits and cuts down on unwanted personalized ads across your device. It does not remove ads from apps. You will still see ads, but they will be generic rather than based on your activity.
Open Settings, select Privacy & security, then General, and switch off Let apps show me personalized ads by using my advertising ID. The change takes effect immediately without requiring a restart, and apps will no longer track your activity for targeted ads.
What is an Advertising ID?
The Windows 11 Advertising ID is a unique tracking number assigned to your device profile. App makers and advertisers use it to learn about your habits, and companies use it to show you targeted ads based on your personal usage patterns.
Before you change anything, it helps to know what this feature does. Windows assigns the identifier to your user profile. Apps that request it can read it and share it with their advertising partners. Those partners link your activity across different apps to build a picture of your interests, then use that picture to choose which ads to show you.
It works much like a tracking cookie in a web browser. The difference is that a cookie follows you across websites, while the Advertising ID follows you across the apps installed on your Windows computer.
Here is a simple example. Say you search for shoes in one app. Another app that uses the Advertising ID may then show you sports apparel promotions. The goal is to make ads feel relevant to you, but the cost is that your activity is tracked to do it.
Turning the feature off takes effect as soon as you change the setting. You do not need to restart your PC or sign out.
How to Find and Manage Your Advertising ID Settings
The controls sit in the Settings app, under Privacy & security. Once you know where to look, the whole process takes less than a minute. The steps below apply to current versions of Windows 11, both Home and Pro.
- Open the Start menu and select Settings. You can also press the Windows key and I together. The Settings window opens with a list of categories on the left.
- Select Privacy & security in the left-hand list. The right pane now shows privacy options grouped under Windows permissions and App permissions.
- Under Windows permissions, select General. This page lists a handful of switches that control how Windows and apps use your information.
- Find the switch labeled Let apps show me personalized ads by using my advertising ID. If it reads On, your Advertising ID is active.
- Click the switch to set it to Off. The change applies immediately, and Windows does not ask you to confirm it.
To check that the change stuck, close Settings and reopen it, then go back to the same page. The switch should still read Off.
To undo the change, return to the same page and set the switch back to On. When you turn the feature on again, Windows generally issues a fresh identifier rather than restoring the old one. That makes an off-and-on cycle a practical way to reset your ID if you want to break the link with your earlier activity.
If the switch is greyed out or you see a message saying some settings are managed by your organization, your PC is controlled by a work or school policy. That is most common on Windows 11 Pro, Enterprise and Education devices. In that case only your administrator can change the setting. On a personal Home or Pro PC, the switch should work normally.
Keep in mind that this setting applies to your user account. If other people sign in to the same PC with their own accounts, each of them has to adjust it for their own profile.
Summary
Managing your windows 11 advertising id takes just a few clicks through your privacy settings. Turning off this tracking feature stops apps from using your personal data for targeted ads, giving you more privacy while you use your computer. Your Advertising ID in Windows 11 is a unique number apps and advertisers use for personalized ads. Management occurs via Settings Privacy & security General. Toggling the "Let apps show my personalized ads by using my advertising ID" option on or off affects how targeted ads are. Deactivating the toggle ensures ads lose specific relevance, though visual placement remains unchanged. ```Step 4Control Your Advertising ID
Controlling your windows 11 advertising id lets you stop apps from showing you personalized ads. Find the toggle switch next to the option that lets apps use your advertising id, and click it to turn the feature off. The correct configuration menu is now active. On the "Recommendations & offers" settings page, find the option that says: Let apps show my personalized ads by using my advertising ID. A dedicated toggle switch sits adjacent to the text.-
- To turn it OFF: Click the switch. It will move to the left and turn gray. This means apps can no longer use your Advertising ID for personalized ads.
-
- To turn it ON: Click the switch. It will move to the right and turn blue (or your computer's accent color). This allows your Advertising ID to be used for personalized ads.
Summary
Managing your windows 11 advertising id takes just a few clicks through your privacy settings. Turning off this tracking feature stops apps from using your personal data for targeted ads, giving you more privacy while you use your computer. Your Advertising ID in Windows 11 is a unique number apps and advertisers use for personalized ads. Management occurs via Settings Privacy & security General. Toggling the "Let apps show my personalized ads by using my advertising ID" option on or off affects how targeted ads are. Deactivating the toggle ensures ads lose specific relevance, though visual placement remains unchanged. ```Step 2Go to Privacy & Security
Navigating to Privacy & security in your Windows 11 settings gives you control over your personal data and your windows 11 advertising id. Look at the menu on the left side of the window and click on Privacy & security to open the right panel. Once the Settings window is open, look at the list on the left side. Find and click on Privacy & security. This menu controls your personal data settings.Step 3Access Recommendations & offers Settings
Inside the "Privacy & security" section, click on "Recommendations & offers". The "Recommendations & offers" page hosts multiple privacy controls affecting the entire operating system environment. Advertising ID management tools reside on this screen.Step 4Control Your Advertising ID
Controlling your windows 11 advertising id lets you stop apps from showing you personalized ads. Find the toggle switch next to the option that lets apps use your advertising id, and click it to turn the feature off. The correct configuration menu is now active. On the "Recommendations & offers" settings page, find the option that says: Let apps show my personalized ads by using my advertising ID. A dedicated toggle switch sits adjacent to the text.-
- To turn it OFF: Click the switch. It will move to the left and turn gray. This means apps can no longer use your Advertising ID for personalized ads.
-
- To turn it ON: Click the switch. It will move to the right and turn blue (or your computer's accent color). This allows your Advertising ID to be used for personalized ads.
Summary
Managing your windows 11 advertising id takes just a few clicks through your privacy settings. Turning off this tracking feature stops apps from using your personal data for targeted ads, giving you more privacy while you use your computer. Your Advertising ID in Windows 11 is a unique number apps and advertisers use for personalized ads. Management occurs via Settings Privacy & security General. Toggling the "Let apps show my personalized ads by using my advertising ID" option on or off affects how targeted ads are. Deactivating the toggle ensures ads lose specific relevance, though visual placement remains unchanged. ```Step 1Open Windows Settings
Opening Settings in Windows 11 lets you access your windows 11 advertising id controls and other privacy options. Press the Windows key + I on your keyboard at the same time to launch the main settings menu right away. Press Windows + I on your keyboard to open Settings. You can also click the Start button and select the gear-shaped Settings icon.-
- Click the Start button on your taskbar. It looks like the Windows logo.
-
- In the Start menu, click the Settings icon. It looks like a gear.
-
- Or, press the Windows key + I on your keyboard at the same time. This is a fast shortcut many people use.
Step 2Go to Privacy & Security
Navigating to Privacy & security in your Windows 11 settings gives you control over your personal data and your windows 11 advertising id. Look at the menu on the left side of the window and click on Privacy & security to open the right panel. Once the Settings window is open, look at the list on the left side. Find and click on Privacy & security. This menu controls your personal data settings.Step 3Access Recommendations & offers Settings
Inside the "Privacy & security" section, click on "Recommendations & offers". The "Recommendations & offers" page hosts multiple privacy controls affecting the entire operating system environment. Advertising ID management tools reside on this screen.Step 4Control Your Advertising ID
Controlling your windows 11 advertising id lets you stop apps from showing you personalized ads. Find the toggle switch next to the option that lets apps use your advertising id, and click it to turn the feature off. The correct configuration menu is now active. On the "Recommendations & offers" settings page, find the option that says: Let apps show my personalized ads by using my advertising ID. A dedicated toggle switch sits adjacent to the text.-
- To turn it OFF: Click the switch. It will move to the left and turn gray. This means apps can no longer use your Advertising ID for personalized ads.
-
- To turn it ON: Click the switch. It will move to the right and turn blue (or your computer's accent color). This allows your Advertising ID to be used for personalized ads.
Summary
Managing your windows 11 advertising id takes just a few clicks through your privacy settings. Turning off this tracking feature stops apps from using your personal data for targeted ads, giving you more privacy while you use your computer. Your Advertising ID in Windows 11 is a unique number apps and advertisers use for personalized ads. Management occurs via Settings Privacy & security General. Toggling the "Let apps show my personalized ads by using my advertising ID" option on or off affects how targeted ads are. Deactivating the toggle ensures ads lose specific relevance, though visual placement remains unchanged. ```What does resetting your advertising ID do?
Resetting your advertising ID generates a new tracking code for your device. Apps start building a fresh profile of your interests from that point forward, so advertisers lose the history they collected before the reset. You'll still see ads, but they won't be based on your previous activity.
How do I turn off my advertising ID?
Open Settings, go to Privacy & security, then select General. Toggle off the switch next to "Let apps show me personalized ads by using my advertising ID." When it's off, apps can't access your advertising ID to track your activity or show targeted ads.
Where do I find ad settings?
Open Settings and select Privacy & security. Scroll down to find General, where you'll see the advertising ID toggle. You can also manage ad preferences for individual apps in the same section by adjusting permissions for specific applications.
How do I get rid of ads that keep popping up on my computer?
Pop-up ads typically come from websites or apps, not Windows itself. In your browser, check privacy settings and block pop-ups. If ads appear in installed apps, remove programs you don't recognize, turn off notifications, or disable location and microphone permissions those apps don't need.
Did this guide fix your problem?

About the Author
Richard
Tech Writer, IT Professional
Richard is a writer at Geek Rewind who turns complex IT tasks into clear, step-by-step guides. He draws on years of hands-on experience in system administration and enterprise IT operations, focusing on Windows, Linux and WordPress: the problems people actually run into, and the fixes that work. His server and WordPress guides come from systems he runs himself. Richard builds and maintains the platform behind Geek Rewind, from its Ubuntu servers and Nginx configuration to its custom WordPress plugins. Many new tutorials start with readers' questions, and he's always glad to answer them in the comments.
No comments yet — be the first to share your thoughts!