How to Allow Windows Hello Secure Sign-in to Windows 11 Using a Fingerprint

Windows Hello fingerprint sign-in lets you unlock your Windows 11 PC with a touch of your finger instead of typing a password. This built-in security feature reads your fingerprint and matches it against data saved on a hardware security chip inside your computer. Your fingerprint is not stored as an image, and it does not leave the device.
Setting up this fast login takes less than two minutes in the Windows Settings app, as long as your laptop or desktop has a built-in fingerprint reader or an external USB fingerprint scanner. If your PC has no reader, the fingerprint option will not appear at all. That is normal and does not mean something is broken.
Open Registry Editor by pressing Win+R, typing regedit, and pressing Enter. Navigate to 🗝️HKEY_LOCAL_MACHINE\
What is Windows Hello?
Windows Hello offers a secure and fast way to sign into Windows computers. Instead of a password, authentication relies on fingerprints, facial recognition, or a PIN. Fingerprint and face sign-in each need compatible hardware. A PIN works on any PC.
Windows Hello is available in both Windows 11 Home and Pro. The Settings steps and the registry method in this tutorial work the same way on both editions.
Alternative hardware tokens like small USB security keys also work for login purposes, though they require separate configuration. Treat them as a separate setup. They do not replace the fingerprint reader, and they are not covered by the steps below.
Why Turn Fingerprint Sign-In On or Off?
Windows Hello fingerprint sign-in lets you unlock your computer quickly using your finger instead of typing a password. You might want to turn it on to save time at login. You might turn it off if your fingerprint reader stops working or you prefer using a standard PIN.
The registry method below works as an on/off switch for the feature. Removing the setting restores the default behavior, so the change is easy to undo.
Failing fingerprint readers or personal preference often prompt users to turn off this security feature. Restoring manual login methods provides a reliable fallback when biometric sensors malfunction.
You will need one of them to get back in.
How to Enable or Disable Fingerprint Sign-In
Proceeding with caution prevents unintended system instability.
- Change only the one entry described here and leave everything else alone.
- If you want a safety net, back up first. In Registry Editor, choose File, then Export, and save a copy of the registry to a location you can find later.
- Double-check each name and value before you click OK.
Step 1Open Windows Registry Editor
Administrator rights are required for this modification. If you sign in with a standard account, Windows will ask for an administrator's credentials when you open Registry Editor. If you do not have them, ask the person who manages the PC to make the change.
- Press the Windows key and R on the keyboard at the same time. The Run dialog box opens in the lower-left corner of the screen.
- Type
regeditin the Open box. - Press Enter. Windows will now ask for permission to continue, as described below.
- Look for the User Account Control prompt asking for permission to let the app make changes to your device.
- Click Yes to continue. Registry Editor opens.
If the prompt asks for a password instead, enter the administrator account's credentials.
Step 2Find the Fingerprint Setting
In Registry Editor, use the left sidebar to navigate to this folder:
Click the small arrow next to each folder to expand it, working down the path one level at a time. When you reach the last folder, click its name once. Its contents appear in the right pane.
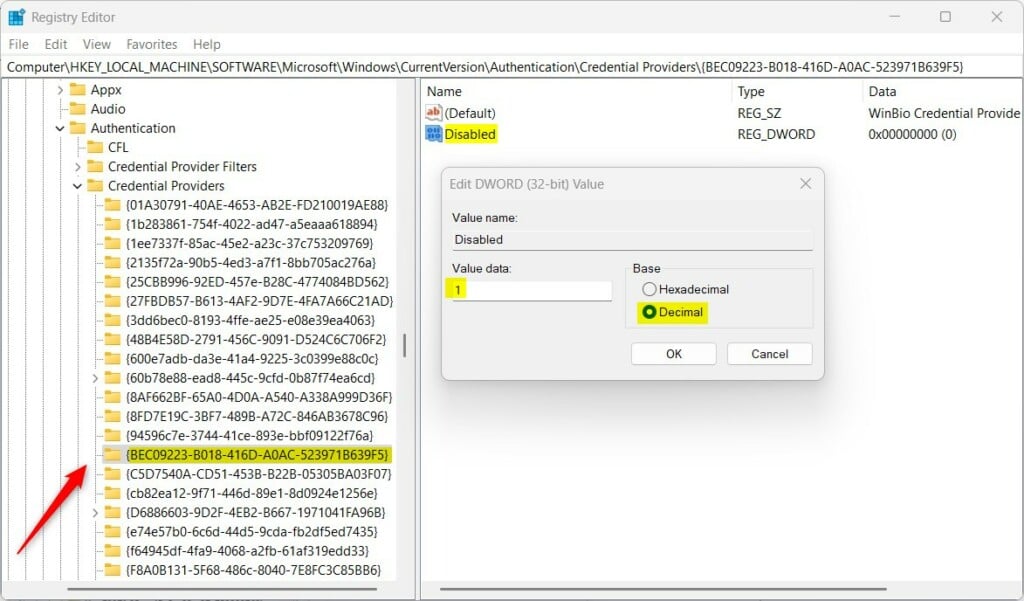
HKEY_LOCAL_MACHINE\SOFTWARE\Microsoft\Windows\CurrentVersion\Authentication\Credential Providers\{BEC09223-B018-416D-A0AC-523971B639F5}Step 3Change the Fingerprint Sign-In Option
Registry Editor (a tool for advanced system settings) lets you turn Windows Hello fingerprint sign-in on or off by editing a specific registry value. Changing this setting requires you to either modify an entry value or delete it entirely, depending on whether you want to block or allow fingerprint access.
The entry is named Disabled. If you do not see it in the right pane, it has not been created yet. That usually means fingerprint sign-in is currently allowed.
To disable fingerprint sign-in:
- Double-click the entry named Disabled. The edit window opens.
- Change its value to
1. - Click OK. The entry now shows the new value in the right pane.
If the Disabled entry does not exist yet, create it first using the steps in the section further down.
To enable fingerprint sign-in:
- Find the Disabled entry in the right pane.
- Right-click it and choose Delete.
- Confirm the deletion if Windows asks. The entry disappears from the list.
You do not need to set the value to anything else. Removing the entry is what allows fingerprint sign-in again.
Managing custom registry values controls feature availability across the profile. If the Disabled entry is not there and you want to turn fingerprint sign-in off, create it:
- Right-click an empty spot in the right pane of Registry Editor.
- Select New, then DWORD (32-bit) Value. A new entry appears with its name ready to edit.
- Name it Disabled and press Enter.
- Double-click the new entry and set its value to 1.
- Click OK.
Deleting the Disabled entry re-enables fingerprint sign-in.
Step 4Restart Your Computer
- Close Registry Editor.
- Restart the computer to apply the updates. Use Start, then Power, then Restart. A full restart is better than shutting down and powering on, because Windows 11 may use fast startup and keep some settings in memory.
After the restart, check that the change took effect. On the sign-in screen, see whether the fingerprint option is offered. You can also open Settings, go to Accounts, then Sign-in options, and look at the fingerprint recognition entry. If the result is not what you expected, reopen Registry Editor and check that the Disabled entry is present or absent as intended.
Need More Help?
Review the official Microsoft documentation covering Windows sign-in options and account protection for additional details. It is the best place to check hardware requirements and any changes in newer Windows 11 builds.
Summary
- You can easily turn fingerprint sign-in on or off depending on your needs. Your PIN or password keeps working either way.
- Changing this setting requires using the Registry Editor, so be careful. Back up the registry first if you are unsure.
- Fingerprint sign-in adds security but may not work on all devices. You need a built-in or USB fingerprint reader.
- Always restart your PC after making changes.
Was this guide helpful?
100% of readers found this helpful (1 votes)

About the Author
Richard
Tech Writer, IT Professional
Richard is a writer at Geek Rewind who turns complex IT tasks into clear, step-by-step guides. He draws on years of hands-on experience in system administration and enterprise IT operations, focusing on Windows, Linux and WordPress: the problems people actually run into, and the fixes that work. His server and WordPress guides come from systems he runs himself. Richard builds and maintains the platform behind Geek Rewind, from its Ubuntu servers and Nginx configuration to its custom WordPress plugins. Many new tutorials start with readers' questions, and he's always glad to answer them in the comments.




No comments yet — be the first to share your thoughts!