How to Enable or Disable Windows Hello Biometrics for Domain Users

Open Local Group Policy Editor by pressing Win+R, typing gpedit.msc, and pressing Enter. Navigate to Computer Configuration Administrative Templates Windows Components Biometrics, double-click Allow domain users to log on using biometrics, and select Enabled to allow or Disabled to block biometric sign-in for domain accounts. Restart your PC for the change to take effect.
Turn On or Off Windows Hello Biometrics Using Local Group Policy Editor
The Local Group Policy Editor is the cleanest way to control whether Windows Hello biometrics work for domain users. One policy covers face and fingerprint sign-in for domain accounts, and you can switch it on or off in a few clicks.
Two things to know before you start. You need administrator rights on the PC. And if your PC is joined to a domain, a domain Group Policy Object (GPO) can override what you set locally. If your change doesn’t stick, ask your domain administrator whether a GPO manages this setting.
Step 1Open Local Group Policy Editor
- Press the Win+R together to open the Run box.
- Type gpedit.msc and press Enter.
- If a User Account Control prompt appears, click Yes. The Local Group Policy Editor window should now open.
The Local Group Policy Editor is included in Windows 11 Pro and Enterprise (and Education). Windows 11 Home does not have it. If Windows says it can’t find gpedit.msc, you are most likely on Home, so use the Registry Editor method further down.
For other ways to open the tool, see the “How to Open Local Group Policy Editor in Windows 11” guide.
Step 2Find the Biometrics Settings
The biometric policies sit in their own category in the left-hand tree. Follow these steps to reach it:
- In the left pane, expand Computer Configuration.
- Expand Administrative Templates, then Windows Components.
- Click Biometrics. The right pane should now list the biometric policies.
The full path is:
Computer Configuration Administrative Templates Windows Components Biometrics
Step 3Change the Setting
The policy named Allow domain users to log on using biometrics decides whether people signing in with a domain account can use their face or fingerprint. Enabled or Not Configured lets them use biometrics. Disabled blocks biometric sign-in for domain accounts entirely.
To open it, double-click the policy name in the right pane. A settings window with the three options will appear.
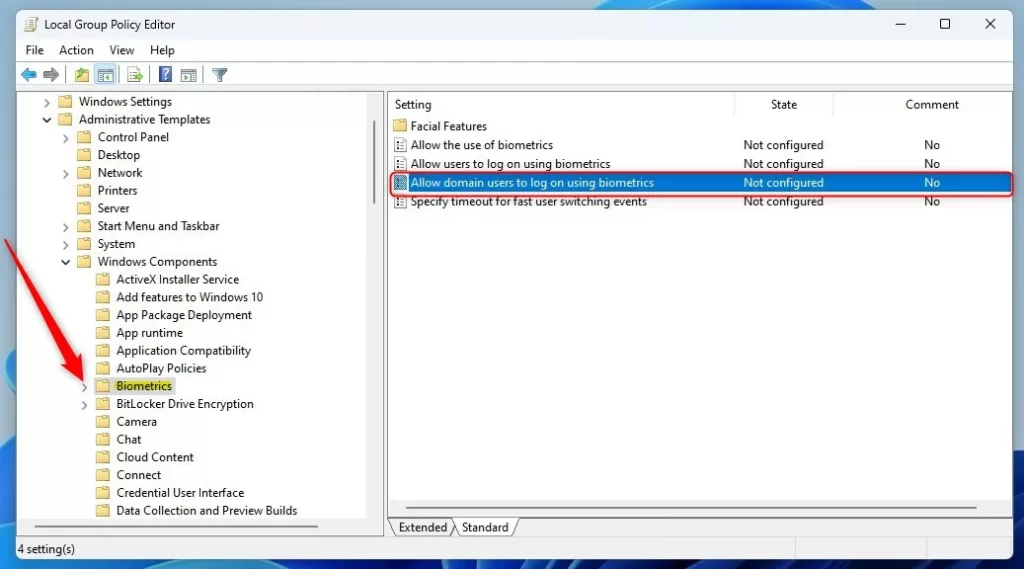
Make sure the name matches exactly before you change anything, because the Biometrics category holds several similar-looking policies.
In the policy window, select one of these options:
- Not Configured – This means biometrics are allowed. This is the default, and it is also how you undo a change you made earlier.
- Enabled – Biometrics will be allowed for domain users.
- Disabled – Biometrics will NOT be allowed for domain users.
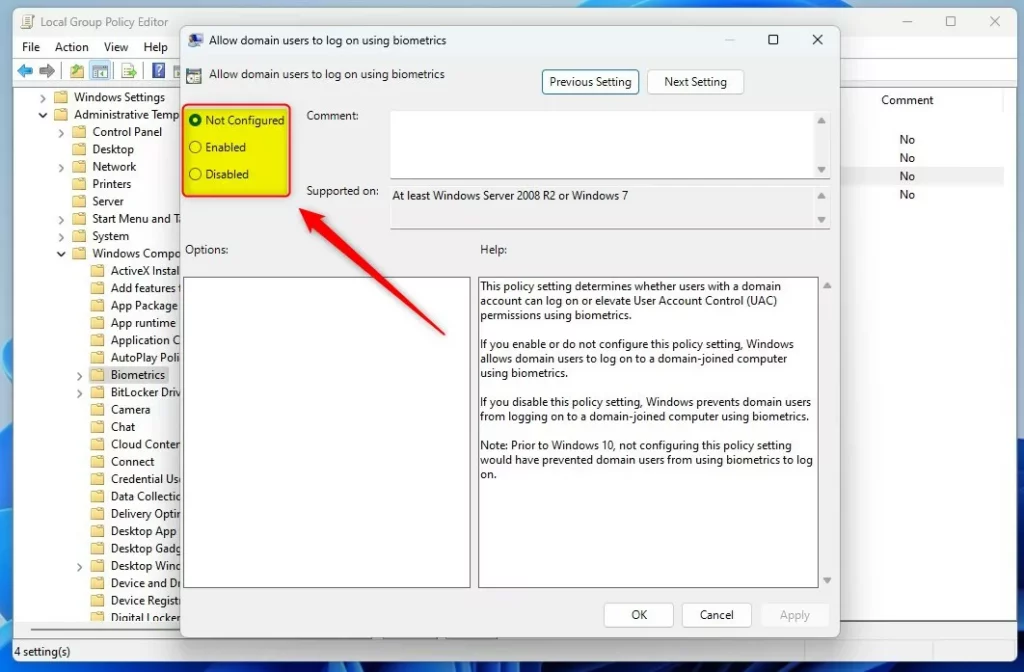
The screenshot above shows the policy window with the option buttons. Your choice applies to every domain user who signs in to this PC. A PIN is not a biometric, so this policy does not affect PIN sign-in.
- Click OK to save the setting. The window closes and the policy list shows the new state.
- Restart your computer so the new policy takes effect.
To reverse the change later, open the same policy and set it back to Not Configured, then restart again.
Turn On or Off Windows Hello Biometrics Using Registry Editor
Windows 11 Home has no Local Group Policy Editor, so you make the same change through the Windows Registry. This works on any edition, but on a domain-joined PC a domain GPO can still override it.
Back up your registry before proceeding. In Registry Editor, you can do this with File Export, choosing All as the export range and saving the file somewhere safe. Double-clicking that file later restores the saved settings.
Step 1Open Registry Editor
The Registry Editor handles these changes if Group Policy isn't available.
- Press the Windows key + R together.
- Type regedit and press Enter.
- Click Yes on the User Account Control prompt. The Registry Editor window should open with the registry tree on the left.
For more ways to open it, see "How to Open Registry Editor in Windows 11". Registry Editor changes system settings directly, so check each name and value before you confirm it.
Step 2Navigate to the Biometrics Key
The policy needs a Biometrics key. Open Registry Editor and go to HKEY_LOCAL_MACHINE\SOFTWARE\Microsoft. Look under Microsoft for a key named Biometrics. If it is already there, you can skip the creation steps below. If it is not, create it.
The Biometrics key has to exist before you can add the value in the next section. Creating it requires administrator rights, which you already have if Registry Editor opened without errors.
- Right-click on Microsoft New Key. A new key appears under Microsoft with its name highlighted for editing.
- Name the new key Biometrics and press Enter.
Step 3Create or Edit the "Enabled" Value
A value named Enabled inside the Biometrics key controls the setting. Set its value data to 1 to turn on face and fingerprint sign-in for network accounts, or to 0 to turn it off.
To create the value, click the Biometrics key, then right-click an empty area in the right pane and choose New DWORD (32-bit) Value. A new value appears with its name ready to edit.
Name this new value Enabled.
Double-click the Enabled value. In the window that opens, set the Base to Decimal. Then set the Value data to:
- 1 to turn ON biometrics for domain users.
- 0 to turn OFF biometrics for domain users.
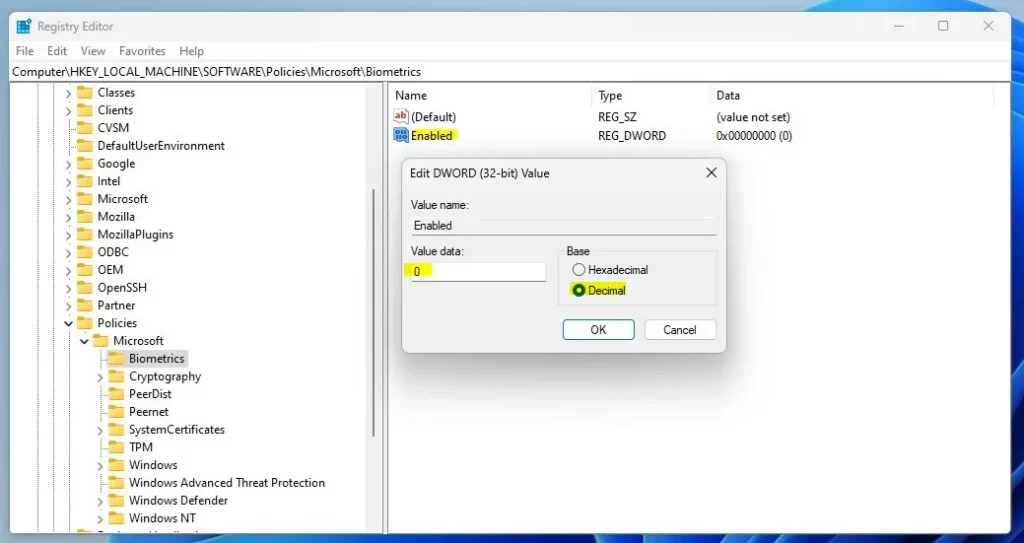
The screenshot above shows the Edit DWORD window with the Base and Value data fields. Check that Decimal is selected before you type the number.
Click OK and close the Registry Editor. The Enabled value should now show your number in the Data column.
Restart your computer to apply these changes. To undo them, open the same value, set it back, or delete the Enabled value, and restart again. If you made a registry backup, you can also restore it.
Summary
Windows Hello domain settings let network administrators control face and fingerprint sign-in. Work and school domains often turn these features off by default, and you can turn them back on with the methods above when your organization allows it.
Use the Local Group Policy Editor on Pro, Enterprise and Education editions. Use the Registry Editor on Home. Either one lets you enable or disable Windows Hello biometrics for domain users. If a setting keeps reverting after a restart, a domain policy is almost certainly managing it, and your administrator will need to change it.
Remember to restart your computer after making any changes.
Consult these helpful guides to learn more about Windows Hello features:
How to Sign In with a PIN in Windows 11
Have a question about this guide?
Answered by AI from this guide. Good questions may be added to this page — please don't include personal details.
Did this guide fix your problem?

About the Author
Richard
Tech Writer, IT Professional
Richard is a writer at Geek Rewind who turns complex IT tasks into clear, step-by-step guides. He draws on years of hands-on experience in system administration and enterprise IT operations, focusing on Windows, Linux and WordPress: the problems people actually run into, and the fixes that work. His server and WordPress guides come from systems he runs himself. Richard builds and maintains the platform behind Geek Rewind, from its Ubuntu servers and Nginx configuration to its custom WordPress plugins. Many new tutorials start with readers' questions, and he's always glad to answer them in the comments.
No comments yet — be the first to share your thoughts!