Enable Windows Hello Sign-In with a Google Account

Windows 11 does not let you sign in to the PC with a Google account, so Windows Hello can’t be linked to one. Windows Hello is the feature that signs you in with your face, fingerprint or PIN.
The quickest fix is to use your Gmail address as a Microsoft account and set up Windows Hello on that. The other option is to save a Google passkey, a sign-in key stored on your device that replaces your password. With a passkey, Windows Hello signs you in to Google.
Which route you need depends on what you mean by “sign in with Google”. This article covers both. It also covers what to check if your PC is a work or school PC run through Google Workspace, Google’s account service for businesses and schools.
You cannot add a standalone Google account to Windows Hello on Windows 11, so the fix depends on your goal. To sign in to Windows with your Gmail address, use it as the email for a Microsoft account, then set up a Windows Hello PIN in Settings Accounts Sign-in options To sign in to google.com with Windows Hello, save a Google passkey on the PC.
What Windows Hello Can and Cannot Do with a Google Account
Windows Hello protects the account you use to sign in to Windows. On a home PC, that is a Microsoft account or a local account (an account that exists only on this PC, with no online link). On a work or school PC, it is an account managed by the organisation. A standalone Google account is not one of the options on the Windows sign-in screen.
That leaves three practical routes. Pick the one that matches your goal:
- You want to sign in to Windows with your Gmail address. Use the Gmail address as the email for a Microsoft account, then set up Windows Hello. See “Use Your Gmail Address as a Microsoft Account”.
- You want to sign in to google.com with your face, fingerprint or PIN. Create a Google passkey that Windows Hello unlocks. See “Sign In to Your Google Account with Windows Hello and a Passkey”.
- Your employer or school uses Google Workspace on Windows PCs. Your administrator controls the sign-in method. See “Google Workspace and Work PCs”.
Before You Start
Check these first. They explain most failed attempts.
- Windows 11. Menu names below match current Windows 11. Windows 10 uses similar names, but the layout differs.
- A PIN is required first. Windows Hello face and fingerprint sign-in both need a Windows Hello PIN as a backup. You set the PIN up first in every case.
- Compatible hardware for face or fingerprint. Face sign-in needs an infrared camera (a camera that uses infrared light, so it can recognise your face in low light). An ordinary webcam does not work. An ordinary webcam does not work. Fingerprint sign-in needs a fingerprint reader. Without these, only the PIN option is available. This is normal.
- Administrator rights. Setting up Windows Hello for your own account does not need them. Creating a new user account on the PC does.
- Windows edition. Home and Pro both support Windows Hello. Windows 11 Home requires a Microsoft account during setup. Pro lets you create a local account instead.
Set Up Windows Hello in 🪟 Windows 11
Do this section whichever route you choose. Both routes depend on Windows Hello already working on the PC. If it already works, skip to the route you need.
Set Up a Windows Hello PIN
The PIN is the base sign-in method. It is tied to this one PC, so it is not sent to Microsoft or Google the way a password is.
- Open Settings and go to Settings Accounts Sign-in options
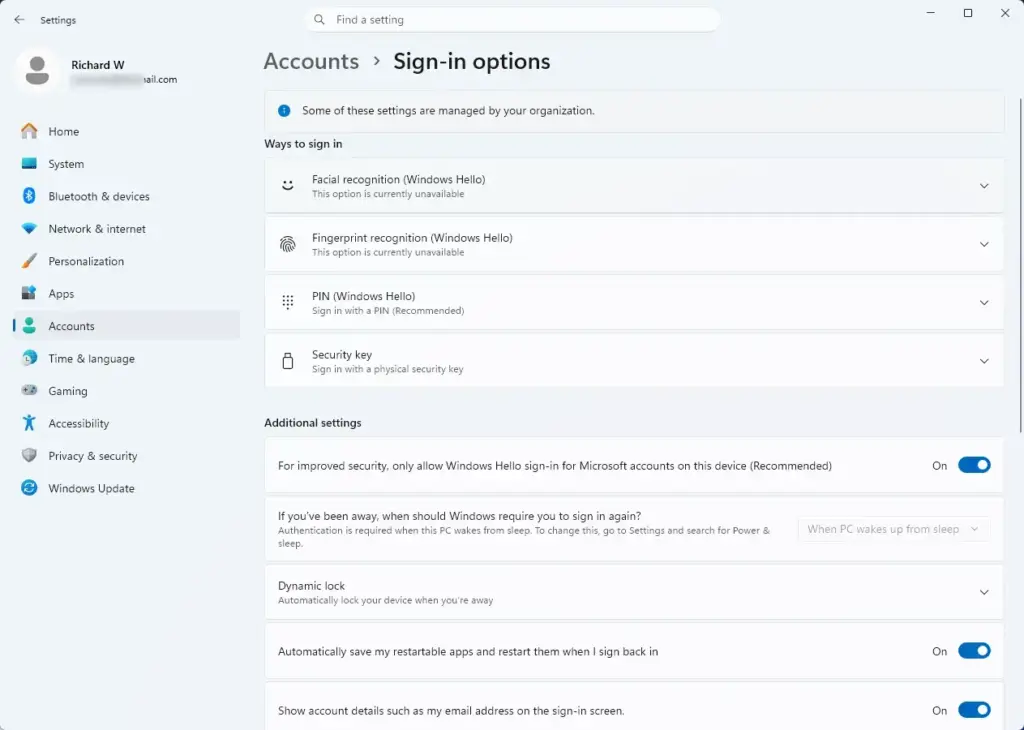
Settings › Accounts › Sign-in options - Select PIN (Windows Hello) to expand it, then select Set up. If you see Change PIN instead, a PIN already exists.
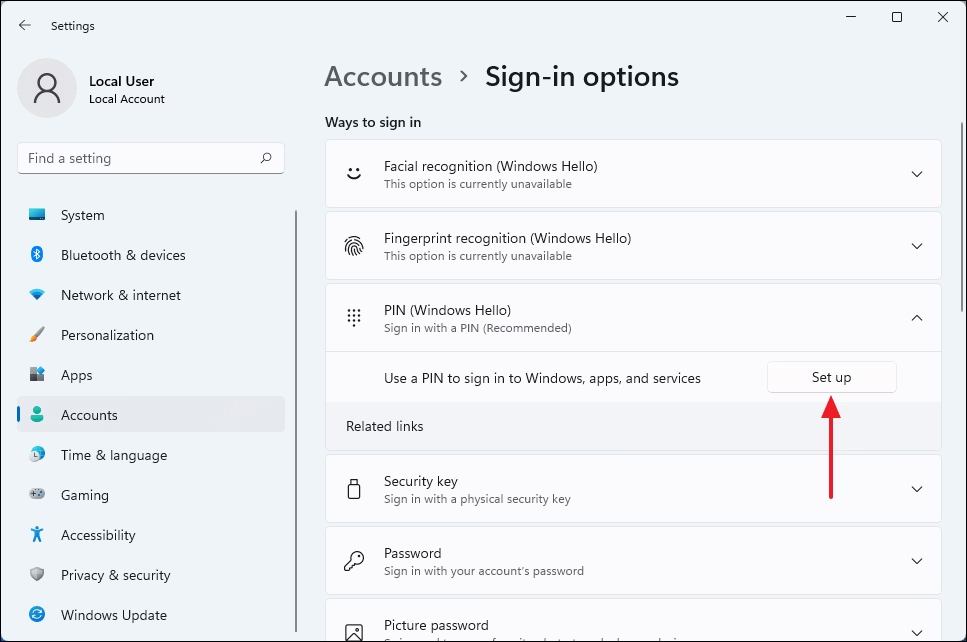
- Enter your account password when Windows asks you to confirm who you are. You now see a box for the new PIN.
- Type a PIN in both boxes. To use letters and symbols, tick Include letters and symbols first.
- Select OK. The PIN is active, and the PIN (Windows Hello) entry now offers Change PIN and Remove.
Lock the PC with Windows key + L. The sign-in screen now asks for your PIN.
Add Face or Fingerprint Sign-In
Skip this if your PC has no compatible camera or reader. If the options are missing or greyed out, the PC probably lacks the hardware. This is expected.
- Go to Settings Accounts Sign-in options
- Select Facial recognition (Windows Hello) or Fingerprint recognition (Windows Hello), then select Set up.
- Select Get started and enter your PIN when asked.
- For face sign-in, look at the camera until the scan finishes. For fingerprint sign-in, touch the reader repeatedly, shifting your finger slightly each time, until Windows says setup is complete.
- Select Close. Windows may offer Improve recognition. Use it if the sign-in fails in dim light or when you wear glasses.
Use Your Gmail Address as a Microsoft Account
A Microsoft account can use any email address, including a Gmail address. This is the closest you can get to signing in to Windows with a Google identity. The account is a Microsoft account that uses your Gmail address as its name. It does not use your Google password, and it does not link to your Google account. Changing your Google password later does not change your Windows password.
Switching the sign-in account changes how Windows signs you in. It is easy to undo, but make sure you know your current local password first. Make sure you know your current local password before you start.
Switch a Local Account to a Microsoft Account
Use this if you already sign in to Windows with a local account.
- Open Settings and go to Settings Accounts Your info
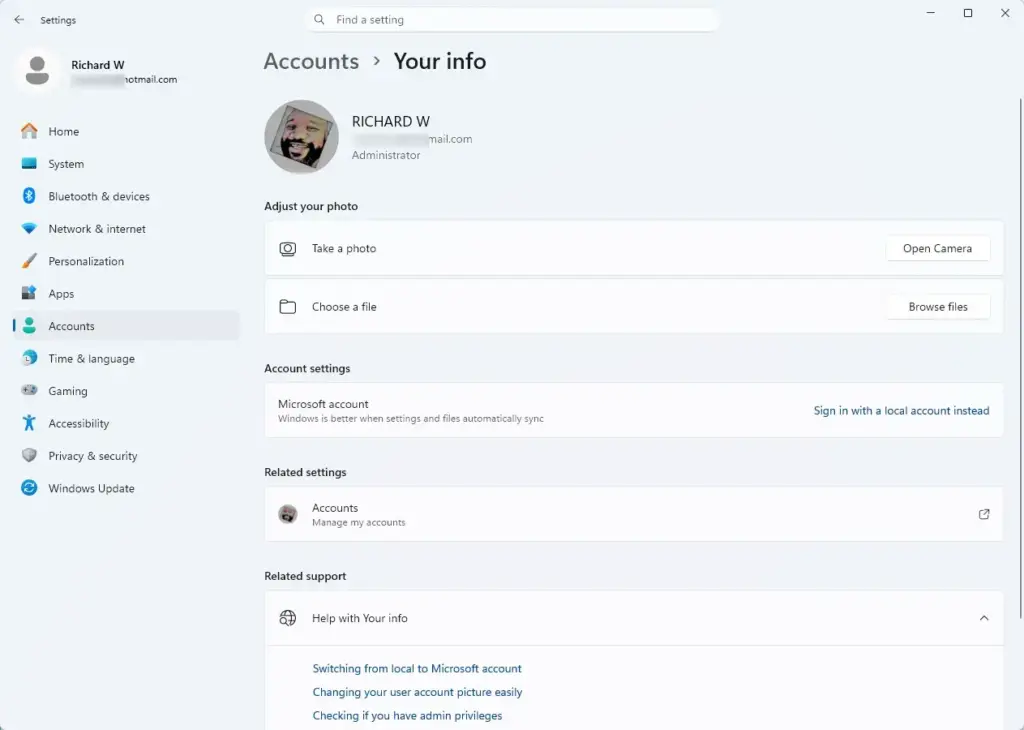
Settings › Accounts › Your info - Select Sign in with a Microsoft account instead. If you see Sign in with a local account instead, you already use a Microsoft account, so skip to the next section.
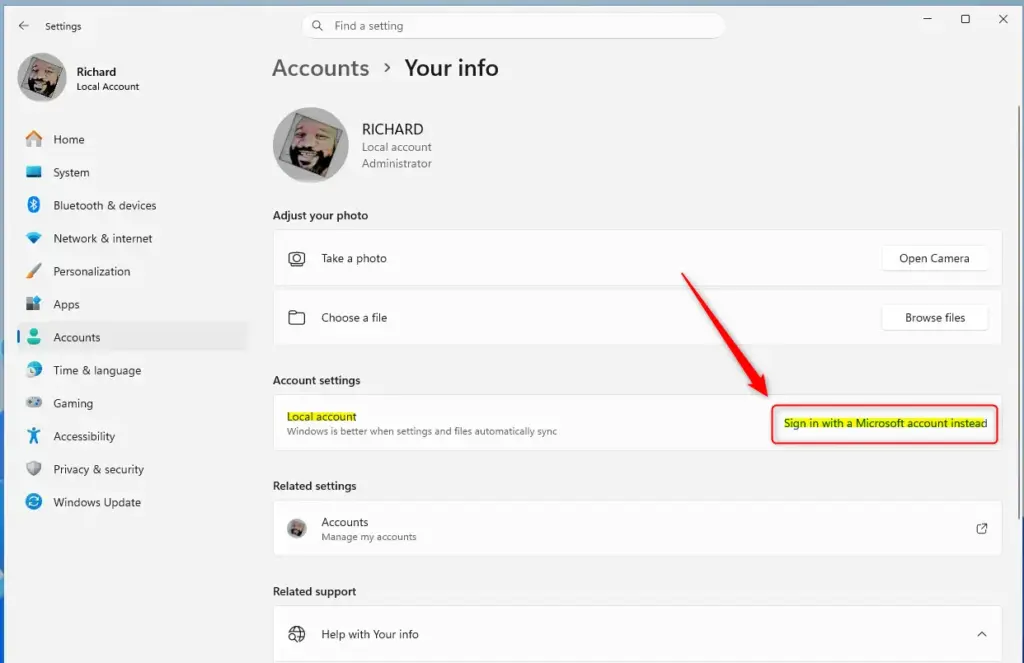
Windows 11 prompt to sign in with a Microsoft account. - Type your Gmail address, for example
user@example.com, and select Next. If a Microsoft account already exists for that address, Windows asks for its password. If not, Windows offers to create one. - Follow the prompts. When Microsoft asks you to verify the address, open your Gmail inbox, find the message with a security code, and enter it. You now see the account confirmed on screen.
- Enter your current Windows password when asked. Windows then walks you through creating a PIN.
After the switch, Settings Accounts Your info shows your Gmail address under your name, and the sign-in screen accepts your new PIN. Add face or fingerprint sign-in using the steps above.
Create the Account on the Microsoft Website First
If the in-Windows flow stalls, create the Microsoft account in a browser first. Go to the Microsoft account sign-up page, choose to use an existing email address, and enter your Gmail address. Microsoft sends a verification code to your Gmail inbox. Once the account exists, repeat the steps above. Windows then recognises it and asks for the password.
Add a Microsoft Account as a New User
This step requires administrator privileges. Use it if you want a separate profile instead of changing your current one.
- Go to Settings Accounts Other users
- Select Add account next to Add other user.
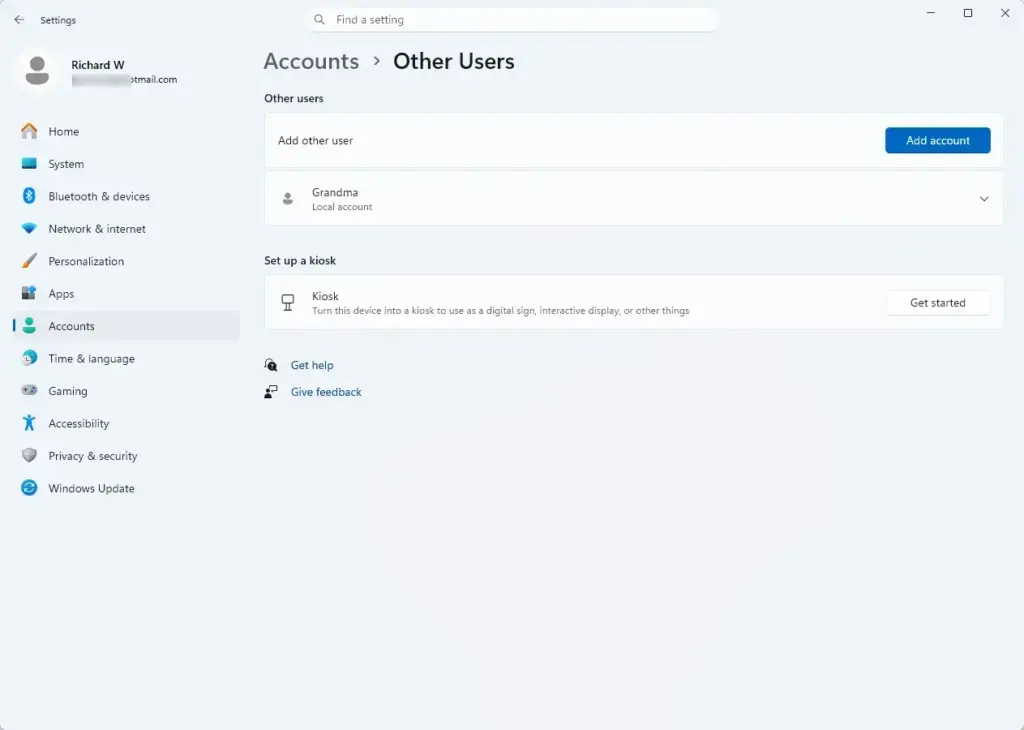
Settings › Accounts › Other users - Type the Gmail address and select Next, then follow the prompts.
- Sign out, select the new account on the sign-in screen, and sign in. Windows takes you through PIN setup the first time.
Sign In to Your Google Account with Windows Hello and a Passkey
If you only want to stop typing your Google password, a passkey is the correct tool. When you sign in to Google, Windows shows a Windows Security prompt, and you approve it with your face, fingerprint or PIN. Google never sees your face or fingerprint data. Your PC unlocks the passkey locally.
A passkey saved this way belongs to this PC. Keep another sign-in method on your Google account, such as your password or phone, in case you lose access to the PC.
Create the Passkey
- Confirm that Windows Hello works on this PC. Lock the PC with Windows key + L and check that you can sign in with your PIN, face or fingerprint.
- Open Microsoft Edge or Google Chrome and go to
g.co/passkeys. Sign in to your Google account if asked. The page lists your existing passkeys. - Select Create a passkey, then select Continue.
- If the browser asks where to save the passkey, choose the option that uses Windows Hello or this device. If you choose Google Password Manager, the passkey syncs across your devices instead, and Windows Hello may not be the thing that unlocks it.
- Approve the Windows Security prompt with your face, fingerprint or PIN. Google then confirms that the passkey was created.
Sign In with the Passkey
- Go to the Google sign-in page and enter your Gmail address.
- Choose the passkey option if Google offers it. Google may offer it automatically.
- Approve the Windows Security prompt with Windows Hello. You land in your Google account without typing a password.
If Google asks for your password instead, the passkey is not available in that browser or profile. Check that you are signed in to the same Windows account where you created it, and that you are using a browser that supports passkeys.
Google Workspace and Work PCs
Some organisations let staff sign in to Windows with a Google Workspace account using the Google Credential Provider for Windows, a Google tool that an administrator installs on managed PCs. You cannot install or enable it for a personal Gmail account. It is not confirmed here whether Windows Hello works on a PC signed in this way. Ask your IT administrator, who controls both the sign-in method and the Windows Hello settings. Ask your IT administrator, because they control both the sign-in method and the Windows Hello policy on the PC.
On a work PC, Windows Hello setup is usually managed centrally. If Settings Accounts Sign-in options is missing options, your organisation may have restricted them.
If Windows Hello Options Are Missing or Greyed Out
Check these causes in order:
- Face or fingerprint is missing. The PC lacks a compatible infrared camera or fingerprint reader. Only the PIN option works. Check in Device Manager whether a biometric device is listed, and install the latest driver from the PC maker if it is not.
- Options are greyed out and say they are managed. A work or school policy controls them. Contact your administrator.
- Set up does nothing, or the PIN fails. Restart the PC and try again. If you recently changed your password, sign out and back in first.
- You use a local account and expect cloud features. A local account supports a Windows Hello PIN on the PC, but it has no online account attached. Switch to a Microsoft account as described above if you want one.
- The sign-in screen does not offer your PIN. Select Sign-in options on the sign-in screen and choose the PIN icon.
You may also see the setting For improved security, only allow Windows Hello sign-in for Microsoft accounts on this device under Settings Accounts Sign-in options When on, it hides the password sign-in option on the sign-in screen. If you need the password option back, turn the setting off.
How to Undo the Changes
- Remove the PIN. Go to Settings Accounts Sign-in options, expand PIN (Windows Hello) and select Remove. Windows asks for your password to confirm. Windows Hello face and fingerprint sign-in stop working when the PIN goes.
- Remove face or fingerprint. Expand the entry under Settings Accounts Sign-in options and select Remove.
- Switch back to a local account. Go to Settings Accounts Your info and select Sign in with a local account instead. Follow the prompts. You need to create a local password.
- Delete the Google passkey. Go to
g.co/passkeys, sign in, and remove the passkey from the list. On recent builds of Windows 11, passkeys saved on the device may also be listed under Settings Accounts Passkeys If you do not see that page, your build does not have it. Update Windows to check again.
What to Do Next
Add a second sign-in method on your Windows account, such as a fingerprint alongside your PIN, so a problem with one method does not lock you out. For the Google side, open your Google account's security settings and confirm you have a recovery phone number or email in case you lose access to the PC that holds your passkey. If you sign in on more than one PC, repeat the passkey steps on each one, since a Windows Hello passkey belongs to a single device.
Was this guide helpful?

About the Author
Richard
Tech Writer, IT Professional
Richard is a writer at Geek Rewind who turns complex IT tasks into clear, step-by-step guides. He draws on years of hands-on experience in system administration and enterprise IT operations, focusing on Windows, Linux and WordPress: the problems people actually run into, and the fixes that work. His server and WordPress guides come from systems he runs himself. Richard builds and maintains the platform behind Geek Rewind, from its Ubuntu servers and Nginx configuration to its custom WordPress plugins. Many new tutorials start with readers' questions, and he's always glad to answer them in the comments.




No comments yet — be the first to share your thoughts!