How to Clear Saved Sign-in Passkeys in Windows 11 Accounts Passkeys Settings

Clearing saved sign-in passkeys in Windows 11 removes outdated or unwanted credentials from your device, your browser, your password manager or a hardware key. A passkey is unlocked with Windows Hello (your face, fingerprint or PIN). When you create one, you choose where it is stored: locally on the PC, on a hardware security key, or in a cloud account such as your Microsoft account.
Where the passkey lives decides how you delete it. Local passkeys are removed in the Windows Settings app. Passkeys held by a browser or password manager are removed in that app. Passkeys on a security key are removed from the key itself. Before you delete anything, make sure you have another way into the account, such as a password, an email code or a recovery code. Otherwise you can lock yourself out.
Open Settings , select Accounts, click Passkeys, find the service whose passkey you want to remove, click the three-dot menu next to it and select Delete passkey. Verify with Windows Hello if prompted, then confirm. The passkey is permanently removed.
Method 1Managing Passkeys via Windows Settings
This is the main place to manage passkeys stored by Windows itself. The Passkeys page is in current Windows 11 releases (23H2 and later). If you do not see it, run Windows Update and check again. Passkeys saved by your browser or a password manager will not appear here. Those are covered in the next sections.
- Press Win+I to open Settings.

Windows 11 Start menu with Settings gear icon highlighted. - Select Accounts in the left-hand menu.
- Click Passkeys. You should see a list of the sites and apps that have a passkey saved on this PC.
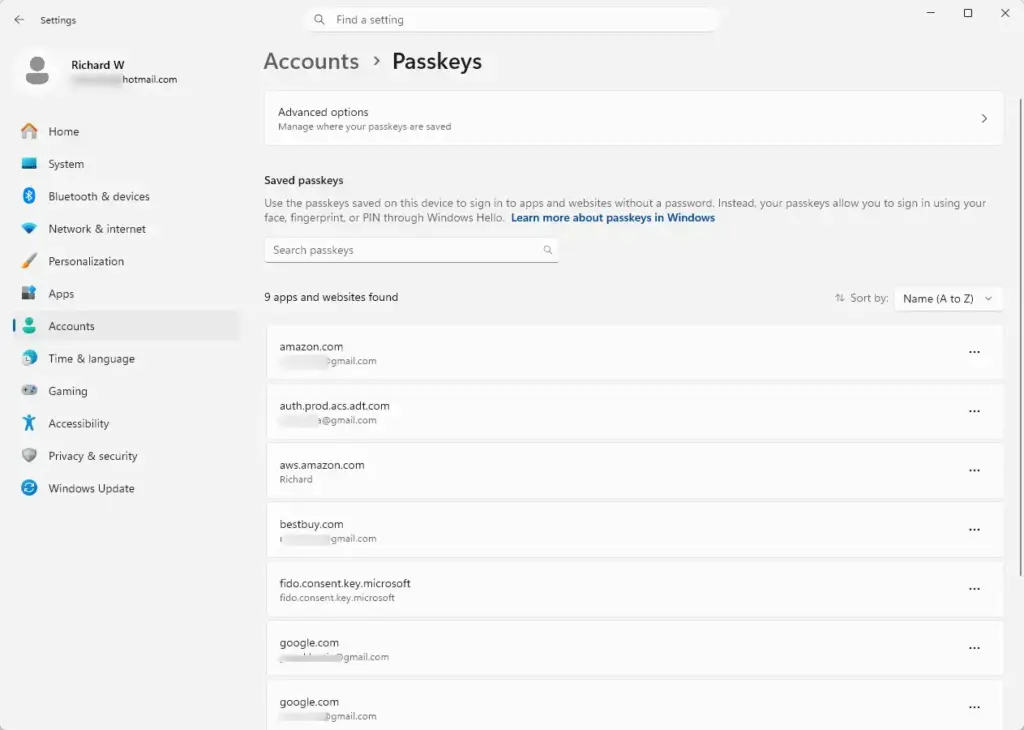
Settings › Accounts › Passkeys - Find the service whose passkey you want to remove. If the list is long, use the search box if your build shows one.
- Click the three-dot menu next to the entry and select Delete passkey.
- Verify yourself with Windows Hello if asked, then confirm the prompt. The entry should disappear from the list.
Deleting a passkey cannot be undone. To use a passkey for that site again, you have to create a new one from the site’s own security settings.
Method 2Removing Passkeys from Web Browsers
Many browsers keep passkeys in their own encrypted profile or sync them through the browser account instead of using the Windows store. If you cannot find a credential in the Windows Passkeys page, your browser is probably holding it. Menu names differ between browsers and versions, so use the closest match to what is below.
- Open your browser (Google Chrome, Microsoft Edge or Mozilla Firefox).
- Click the three-dot menu in the upper-right corner and select Settings.
- Go to Autofill and passwords or Privacy and security, depending on the browser. In Edge, look for Profiles and then Passwords.
- Click Passkeys or Passwords to open the credential manager. You may need to confirm with Windows Hello or your PIN first.
- Search for the account you want to remove.
- Click the delete or remove button for that entry and confirm.
If the browser syncs passkeys to your account, the deletion usually syncs to your other signed-in devices. Give it a minute, then check one of them.
Method 3Clearing Third-Party Password Manager Passkeys
If you use a third-party vault such as Bitwarden, Dashlane or 1Password, it often stores passkeys on its own, separately from Windows Hello. You have to clear them from the extension or desktop app.
- Open your password manager's app or browser extension.
- Unlock the vault with your master password or a biometric prompt.
- Search for the vault item for the service you want to clean up.
- Open the item and click its edit option. Look for the passkey field or section.
- Delete the passkey, or remove the credential data entirely if the app does not offer a separate passkey delete.
- Save your changes. The deletion should sync to your other connected devices.
The layout differs between these apps and between versions. If you cannot find the passkey field, check the app's help pages for the current steps.
Method 4Clearing Hardware Security Key Passkeys
Hardware security keys, such as FIDO2 USB tokens, store passkeys on the physical device. Windows can reset the whole key, which wipes everything on it. If you only want to delete one passkey, use the manufacturer's companion software instead, if it supports that.
- Plug your security key into a USB port.
- Open Settings, go to Accounts, then select Sign-in options.
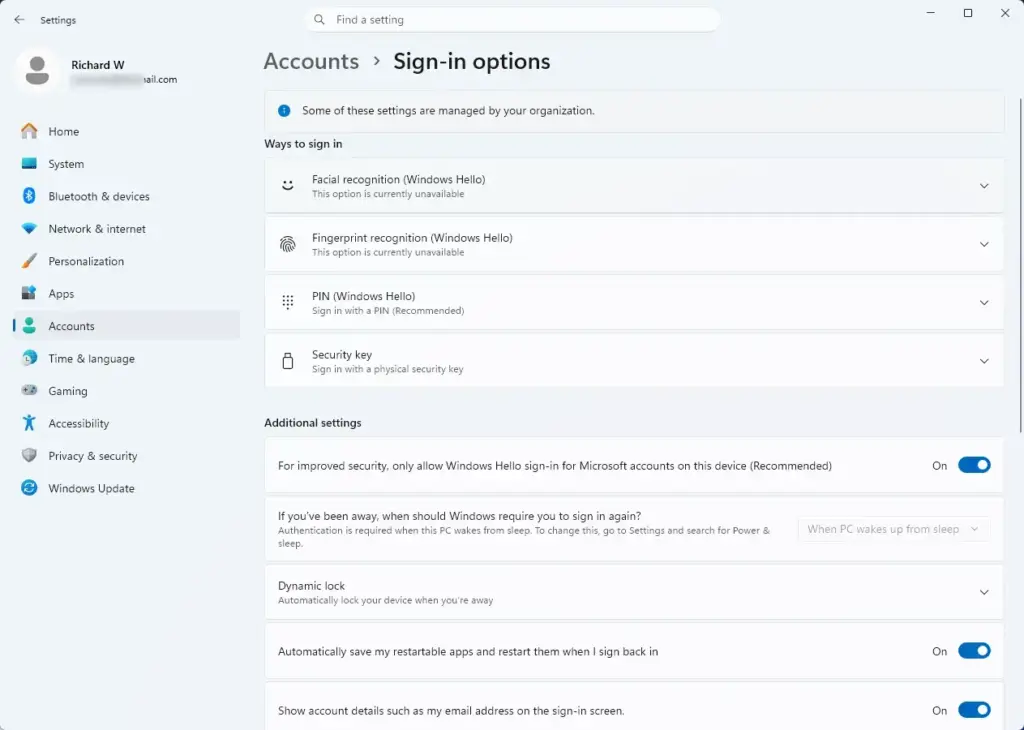
Settings › Accounts › Sign-in options - Click Security key to expand it.
- Click Manage. A security key window opens.
- Follow the on-screen prompts. You will usually be asked to touch the gold contact on the key. You may also be asked to remove and reinsert the key.
- Choose the option to reset or erase the key. Windows warns you that this removes all data on it. Confirm.
Keys also usually accept a reset only shortly after you plug them in, so if it fails, unplug the key and try again.
Verifying Passkey Removal
After deleting, check that the passkey is really gone. Go to the site and try to sign in with the passkey option. Windows should no longer offer that credential, and the site should ask for another method, such as a password or an email code.
Also return to Settings Accounts Passkeys and confirm the entry is no longer listed. If the same passkey still appears at sign-in, it is stored somewhere else, such as your browser, a password manager or a security key. Go back through the matching section above.
Deleting a passkey from your PC does not remove it from the website's side of the account. The site still lists it as a registered sign-in method. For a tidy cleanup, open the site's security settings and remove the old passkey there too. This matters most for a lost or retired device.
Advanced PowerShell Cleanup for Orphaned Credentials
When the graphical menus will not remove a corrupted credential entry, some administrators turn to PowerShell, which is a command-line shell and scripting language. Be careful with this route. I am not giving a command here, because Windows has no simple built-in PowerShell command that lists or deletes individual passkeys.
- Right-click the Start button and select Terminal (Admin). On some builds it is called Windows PowerShell (Admin). Approve the User Account Control prompt. This requires administrator rights.
- Only run commands from a source you trust, such as Microsoft documentation or your organisation's IT team. The Get-Credential cmdlet only asks you for a username and password. It does not show cached session tokens, so it will not help here.
- If the corrupted entry is a Windows Hello container, a fix through a credential management module should come from that same trusted source. Try the Settings methods above first.
- Restart your computer after any deep clean so the credential services reload cleanly.
If the entry still will not go, removing and re-adding your Windows Hello PIN under Settings Accounts Sign-in options is a safer next step than scripting. Make sure you can sign in with your account password first.
Preventing Unauthorized Passkey Creation on Shared PCs
If you share your Windows 11 PC with family or coworkers, you may want to limit who can add passkeys to it. Windows has no single switch that blocks passkey creation. In practice you control it with separate accounts and Windows Hello settings. Passkeys are tied to the signed-in user, so a person using their own account cannot see yours.
- Press Windows key + I to open Settings.
- Go to Accounts and select Sign-in options.
Settings › Accounts › Sign-in options - Scroll to the Additional settings section and review what is available on your build, such as when Windows asks you to sign in again after you have been away.
- Set up Windows Hello (face, fingerprint or PIN) for your account. Passkeys use it to verify you each time one is used, so a passkey cannot be used without it.
- Create a separate user account for each person who uses the PC, under Accounts Other users. They should not sign in to your profile, because anyone who can sign in as you can use your saved passkeys.
Do not share your PIN or leave your PC signed in and unlocked. Those are the easiest ways for someone else to end up using your credentials.
Was this guide helpful?

About the Author
Richard
Tech Writer, IT Professional
Richard is a writer at Geek Rewind who turns complex IT tasks into clear, step-by-step guides. He draws on years of hands-on experience in system administration and enterprise IT operations, focusing on Windows, Linux and WordPress: the problems people actually run into, and the fixes that work. His server and WordPress guides come from systems he runs himself. Richard builds and maintains the platform behind Geek Rewind, from its Ubuntu servers and Nginx configuration to its custom WordPress plugins. Many new tutorials start with readers' questions, and he's always glad to answer them in the comments.




No comments yet — be the first to share your thoughts!