How to Manage Passkey Security Keys in Windows 11 Accounts Settings

Passkeys in Windows 11 replace passwords with a cryptographic key pair. The private key stays on your hardware. The public key is registered with the online service. When you sign in, Windows 11 asks Windows Hello (your PIN, fingerprint or face) to confirm it is you. Windows Hello uses the TPM (Trusted Platform Module, a security chip on your motherboard) to protect the key. No password crosses the internet.
The private key stays on your device, so a data breach at a website you use cannot expose it. Windows 11 keeps these keys in the system credential vault and locks them behind your local device PIN or biometric sign-in. Only someone who can pass that check can use them.
One caveat before you start. The Passkeys page is only present in recent Windows 11 builds, and menu wording can shift slightly between updates. If a step below does not match your screen, run Windows Update and check again.
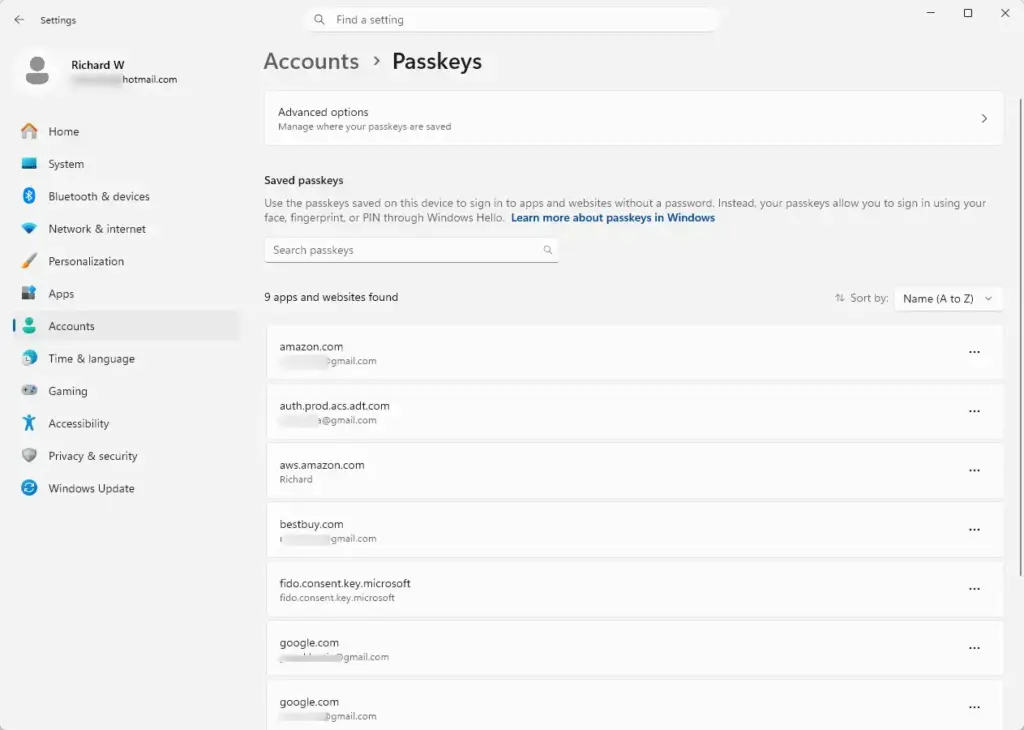
Press Win+I to open Settings , select Accounts, then click Passkeys to view your saved credentials. Click an entry to see details, or select the three-dot menu next to any passkey and choose Delete passkey to remove it from your device.
How to Open Passkey Settings in 🪟 Windows 11
The Passkeys page lists the passkeys saved on this PC. It sits under Accounts, with the other settings that control how you sign in.
- Press Win+I to open Settings.

Windows 11 Start menu with Settings gear icon highlighted. - Select Accounts in the left-hand menu. The account options appear on the right.
- Click Passkeys. You should now see a list of saved credentials and the tools to manage them.
Settings › Accounts › Passkeys
If you do not see Passkeys in the list, your Windows 11 build is probably too old to have the page. Install the latest updates and restart the PC. Both Home and Pro editions show this page when the build supports it.
How to View Existing Passkeys on Your Device
Review your saved passkeys now and then. It shows which services are tied to your Windows profile and lets you spot entries for accounts you no longer use.
- Open Settings, go to Accounts, then select Passkeys.
Settings › Accounts › Passkeys - Read through the list. Each entry shows the website or application name, along with the creation date or storage location.
- Click an entry to open its details. These include the exact origin URL and whether the key is stored locally on this machine or in your Microsoft account.
Look for sites you have closed accounts with, and for names you do not recognize. Anything you do not recognize deserves a closer look before you decide what to do with it.
How to Delete a Passkey in 🪟 Windows 11
After that you cannot sign in with it. You can only get back in by creating a new passkey, or by using another sign-in method the site still offers. Before deleting a passkey for a site you still use, make sure you have another way in, such as a password or a second passkey.
- Open Settings, go to Accounts, and click Passkeys.
Settings › Accounts › Passkeys - Find the passkey you want to remove in the list.
- Click the three-dot menu icon next to the passkey name. A short menu opens.
- Select Delete passkey. A warning dialog appears.
- Confirm the deletion in the dialog. You may be asked to verify with Windows Hello first. The entry then disappears from the list.
Deleting here removes the passkey on your side only. If the website still lists it in its own security settings, remove it there too so the entry does not linger.
Managing Passkeys Stored in Your Microsoft Account
Passkeys can sync across your devices if they are stored in your Microsoft account instead of locally on one machine. Those cloud-linked credentials are managed from the Microsoft account website, not from the Settings app. Doing it there lets you sign in on several Windows 11 PCs and revoke a credential everywhere in one go.
- Open a web browser and sign in to your Microsoft account management dashboard.
- Click the Security tab in the top menu.
- Select Advanced security options, or look for the passkey management subsection. Microsoft rearranges this page from time to time, so the exact label may differ.
- Review your cloud-stored passkeys. Click Remove next to any credential you want to revoke across all synced devices.
Only do this when you are sure you no longer need it, or when a device has been lost or stolen.
Using Physical Security Keys with 🪟 Windows 11
Hardware security keys, such as FIDO2-compliant USB keys from Yubico or Feitian, add physical security. Someone has to hold the key, and know its PIN, to sign in. Windows 11 lets you register these keys directly.
- Plug your security key into a free USB port.
- Open Settings, go to Accounts, then Passkeys.
- Click Add a passkey, or follow the on-screen prompts to register a new security key.
- Enter the PIN when requested, then touch the button or contact area on the key to finish registration. If the key has no PIN yet, Windows will ask you to create one.
If Windows does not react when you plug the key in, try another USB port and check that the key supports FIDO2. Some older keys only support the older U2F standard. You can also change or reset a key's PIN under Accounts Sign-in options Security key. Be careful with a reset, because it erases every credential stored on that key.
Troubleshooting Common Passkey Issues in 🪟 Windows 11
If Windows 11 does not recognize a passkey, or throws an error during sign-in, work through these checks in order.
- Phone passkeys: if the passkey is stored on a smartphone, check that Bluetooth is on, on both the PC and the phone. Proximity verification needs an active Bluetooth connection.
- Windows Hello: make sure it is set up with a working PIN or biometric option. Windows requires local verification before it releases a passkey to an app or browser.
- Browser problems: if a website refuses your passkey, clear the browser cache or try an incognito window. This rules out cookie corruption.
If none of these helps, restart the PC and try again, then check Windows Update for a newer build.
Was this guide helpful?

About the Author
Richard
Tech Writer, IT Professional
Richard is a writer at Geek Rewind who turns complex IT tasks into clear, step-by-step guides. He draws on years of hands-on experience in system administration and enterprise IT operations, focusing on Windows, Linux and WordPress: the problems people actually run into, and the fixes that work. His server and WordPress guides come from systems he runs himself. Richard builds and maintains the platform behind Geek Rewind, from its Ubuntu servers and Nginx configuration to its custom WordPress plugins. Many new tutorials start with readers' questions, and he's always glad to answer them in the comments.



No comments yet — be the first to share your thoughts!