How to Configure Taskbar Behavior on Multiple Monitors in Windows 11

The Windows 11 taskbar can appear on every monitor or on only one, and you decide which taskbar shows each app’s button. The options sit in Settings Personalization Taskbar Taskbar behaviors The steps below apply to the current versions, 24H2 and 25H2.
The main setting is Show my taskbar on all displays. Once it is on, a second drop-down menu lets you show app buttons on every taskbar, only the main one, or only the taskbar where the app’s window is open. Changes apply immediately and need no restart.
Version 23H2 is out of support for Home and Pro editions, so update if you still run it. This guide covers turning the taskbar on for all displays, choosing where buttons go, and going back to a single-monitor taskbar. It also covers what to do when an option is missing or greyed out.
Open Settings Personalization Taskbar Taskbar behaviors and tick Show my taskbar on all displays. A taskbar appears on every connected monitor immediately, with no restart needed. Then pick where app buttons show using the “When using multiple displays” drop-down. If the option is missing, check that your monitors are in Extend mode, not Duplicate.
Before you start: check how your monitors are set up
The multi-monitor taskbar options appear only when Windows treats your screens as one extended desktop. Check this first, because it explains most “missing option” problems.
Check that Windows is extending the desktop
Duplicate mode (the same image on every screen) allows only one taskbar. Extend mode gives each screen its own space, and that is what you need.
- Press Win+P to open the projection menu. A short list of display modes appears at the side of the screen.
- Select Extend. Your desktop should now spread across both screens, and the mouse pointer can move from one to the other.
If a monitor stays black, check the cable and the monitor’s input source first. Then open Settings System Display and select Detect. It can be hidden under Multiple displays.
Identify which monitor is your main display
Windows treats one monitor as the main display. It gets the original taskbar, with the full system tray (the row of icons near the clock). The Start menu and new windows also open here by default. Find out which monitor it is before you change anything.
- Open Settings System Display
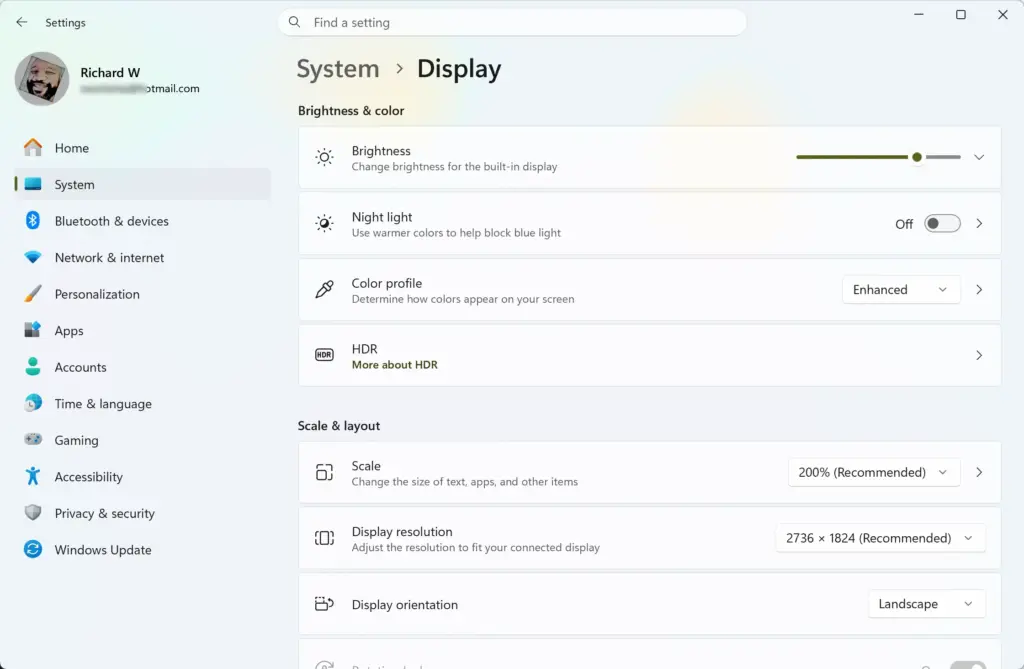
Settings › System › Display - Select Identify. A large number appears on each screen, matching the numbered boxes at the top of the page.
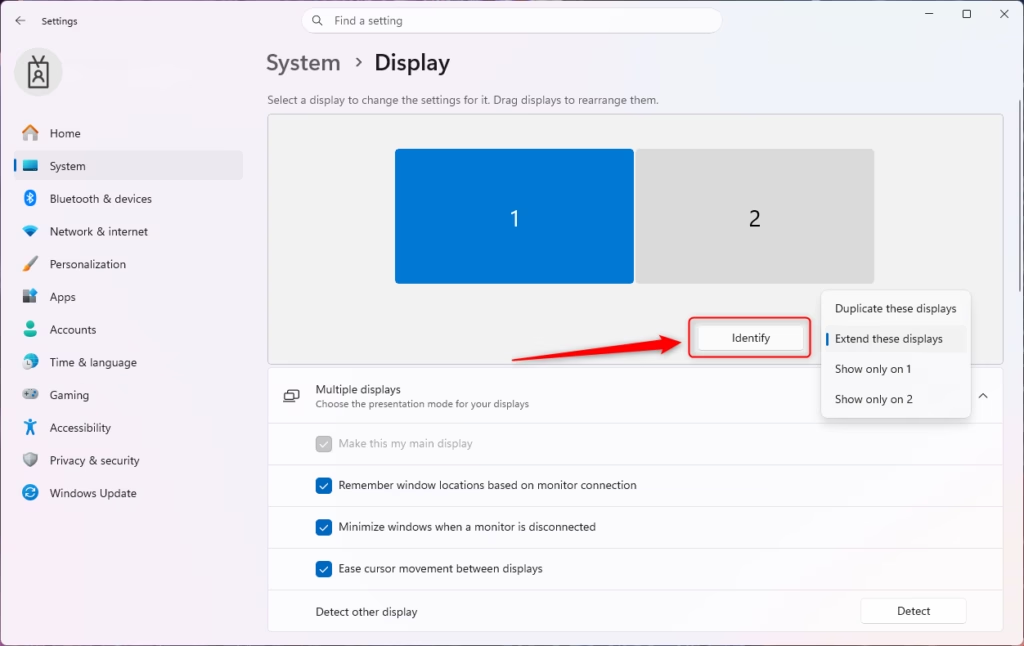
Windows 11 multiple displays identify screen numbers. - Select a numbered box to see that monitor’s settings.
- Expand Multiple displays and look at the Make this my main display checkbox. If it is ticked and greyed out, that monitor is already the main one.
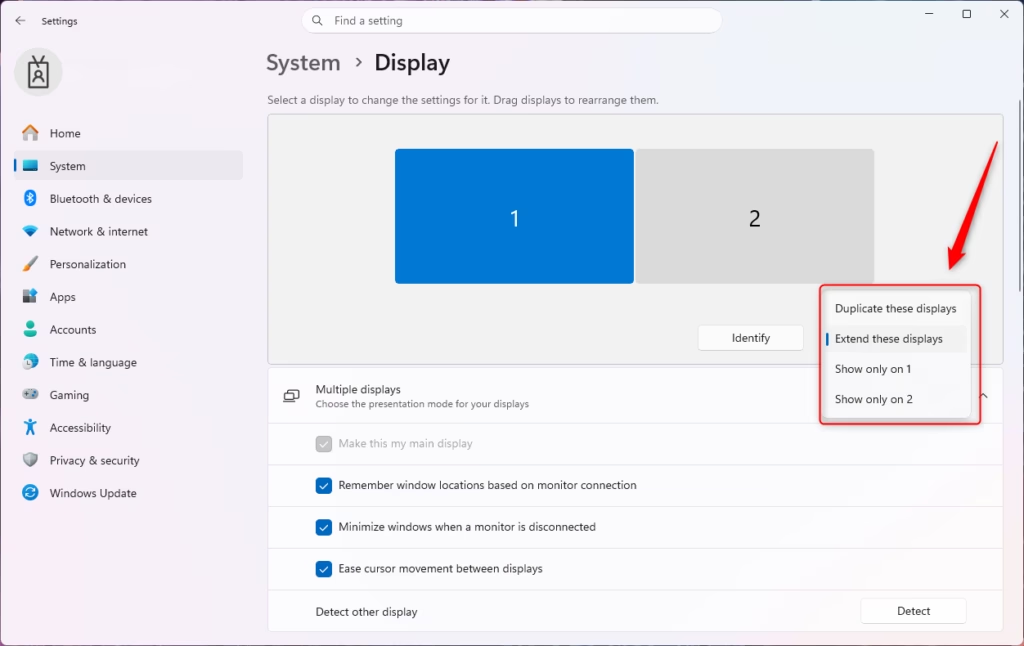
Windows 11 multiple displays project options for screen duplication.
While you are here, drag the numbered boxes to match the physical arrangement of your desk. If they are in the wrong order, your mouse pointer will cross from the wrong edge of the screen. Select Apply after you move them.
Show the taskbar on every monitor
This step adds a taskbar to each extended display, so you can reach the Start button and your open apps from any screen. It works the same on Windows 11 Home and Pro.
- Press Win+I to open Settings.

Windows 11 Start menu with Settings gear icon highlighted. - Select Personalization, then select Taskbar.
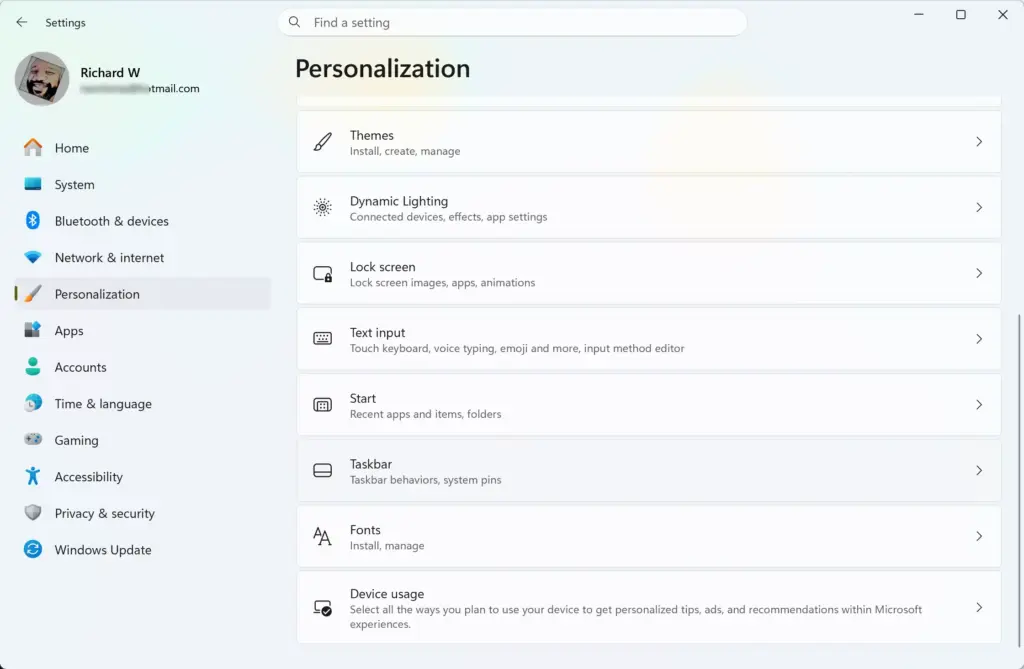
Settings › Personalization › Taskbar - Scroll down and select Taskbar behaviors to expand it. A list of checkboxes and drop-down menus appears.
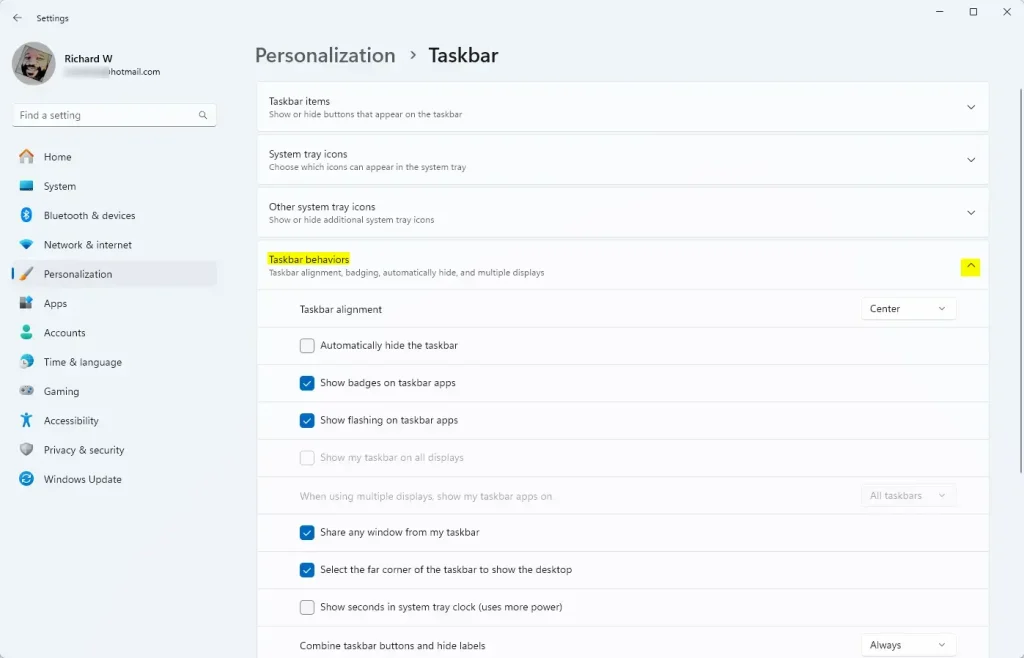
Expand Taskbar behaviors in Windows 11 Personalization settings. - Tick Show my taskbar on all displays. A taskbar appears on each connected monitor straight away.
If you cannot find Show my taskbar on all displays, you have only one active display or your screens are duplicated. See the troubleshooting section below.
To reverse this, clear the checkbox. The extra taskbars disappear and the main taskbar stays.
Choose where app buttons appear
Once the taskbar is on every screen, decide which taskbar shows each app’s button. This setting decides whether a multi-monitor desk feels organised or messy.
- In Taskbar behaviors, find the drop-down menu labelled When using multiple displays, show my taskbar apps on. It appears only after Show my taskbar on all displays is on.
Expand Taskbar behaviors in Windows 11 Personalization settings. - Select the drop-down menu. Three options appear: All taskbars, Main taskbar and taskbar where window is open, and Taskbar where window is open.
- Choose the option that suits your layout. The buttons rearrange at once.
Here is what each option does:
- All taskbars shows every open app on every taskbar. Use it if you want the same view on each screen.
- Main taskbar and taskbar where window is open shows every app on the main taskbar. Each secondary taskbar also shows the apps whose windows sit on that screen.
- Taskbar where window is open shows an app’s button only on the monitor that holds its window. This keeps each screen tidy, and it is the best choice if you keep different apps on different screens.
Drag an app window from one monitor to the other to test the change. With Taskbar where window is open, its button should follow the window to the new screen.
Combine or separate buttons on other taskbars
By default, Windows 11 groups several windows of the same app into one button. You can change this separately for the main taskbar and for the others.
- In Taskbar behaviors, find Combine taskbar buttons and hide labels. This controls the main taskbar.
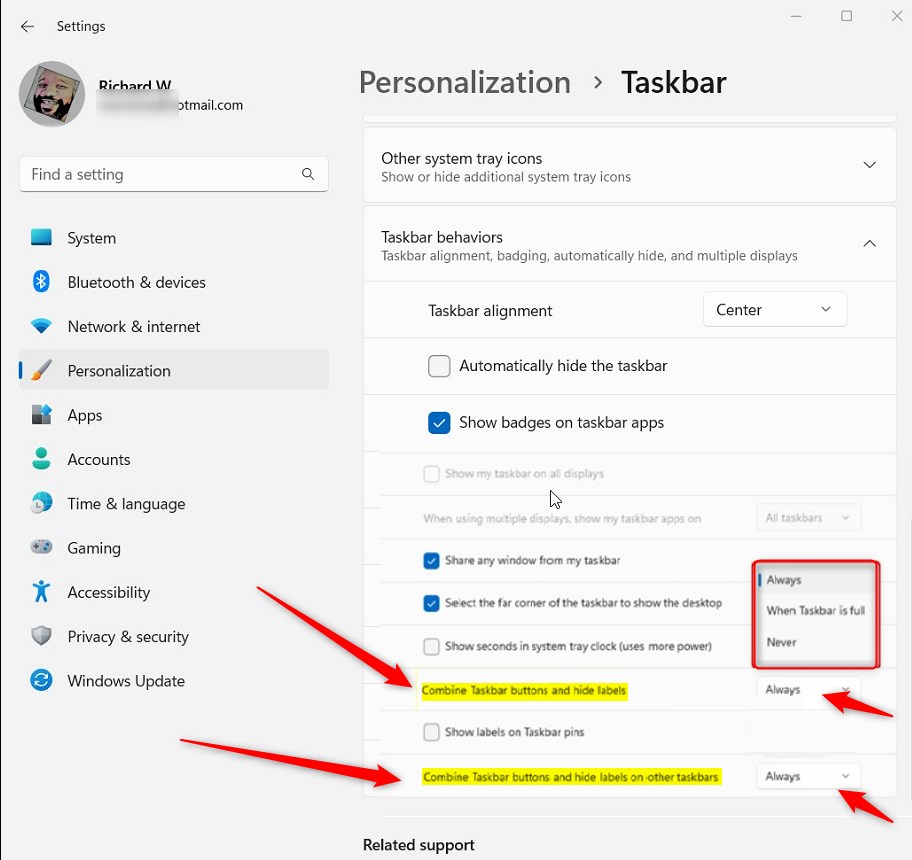
Taskbar - Find Combine taskbar buttons and hide labels on other taskbars. This controls every secondary taskbar.
- Choose Always, When taskbar is full or Never in each drop-down menu. Never shows each window as its own button with a text label.
Many people keep the main taskbar compact and set the other taskbars to Never. That way they can read window titles at a glance on a second screen.
If you do not see these two options, your copy of Windows 11 is missing a recent feature update. Open Settings Windows Update, select Check for updates, and install what is offered. The option to show labels was not part of the first Windows 11 release, and 23H2 no longer receives security fixes on Home and Pro, so moving to 24H2 or 25H2 is worth doing anyway.
Keep the taskbar on only one monitor
Windows 11 has no setting that lets you choose any monitor for the taskbar directly. The taskbar always lives on the main display, so to move it you change which monitor is the main one.
Check that you want all of that before you continue.
- Open Settings System Display
- Select the numbered box for the monitor that should hold the taskbar . Use Identify if you are unsure which is which.
- Expand Multiple displays and tick Make this my main display. The taskbar and any desktop icons move to that screen.
- Go to Settings Personalization Taskbar Taskbar behaviors
Expand Taskbar behaviors in Windows 11 Personalization settings. - Clear Show my taskbar on all displays. The other monitor now shows no taskbar.
To reverse this, tick Show my taskbar on all displays again. To move the main role back, select the original monitor in Display settings and tick Make this my main display for it.
If that is what you want, you need a third-party tool. Check that it supports your Windows 11 version before installing it.
What a secondary taskbar shows and leaves out
A secondary taskbar is not a full copy of the main one. Knowing the differences saves you from hunting for icons that are not there.
- It has a Start button and app buttons, following the rules you set above.
- Current versions of Windows 11 show the date and time on it. Selecting the clock opens the notification center and calendar.
- The system tray icons and Quick Settings (volume, network, battery) stay on the main taskbar only.
- Settings that affect the whole taskbar, such as Taskbar alignment and Automatically hide the taskbar, apply to every taskbar together. You cannot centre one and left-align another.
If you rely on tray icons, place your main display where you look most often. Otherwise, move the pointer to the main screen when you need them.
Troubleshooting multi-monitor taskbar problems
The "Show my taskbar on all displays" option is missing
This almost always means Windows sees only one display or is mirroring them. Press Windows key + P and choose Extend.
If the option is still missing, open Settings System Display and confirm that two numbered boxes appear. If only one does, reseat the cable and try another port. Then update the graphics driver from your PC maker or graphics card maker.
The taskbar settings are greyed out or locked
Two causes are common. If Windows is not activated, the Personalization pages can be locked and show a message about activating Windows. Activate it under Settings System Activation
On a work or school PC, you may see a note such as "Some settings are managed by your organization". In that case, ask your IT administrator, because a policy is controlling the setting. The same Settings pages are available in Windows 11 Home and Pro, so the edition is not the cause.
A taskbar disappears or looks broken after a change
Restart Windows Explorer (the process that draws the taskbar and desktop). It closes no apps, and your open windows stay in place.
- Press Ctrl + Shift + Esc to open Task Manager.
- On the Processes tab, find Windows Explorer. If you see only a short list, select More details first.
- Right-click Windows Explorer and select Restart. The screen flickers briefly and the taskbars come back.
Windows jump to the wrong screen after sleep or unplugging a monitor
When a monitor disconnects, Windows moves its windows to the remaining screen and the taskbar buttons follow. Reconnect the monitor, then check Settings System Display to confirm the arrangement and main display are still what you set.
Docking stations and laptop lids are common causes, because the screen layout is rebuilt each time you connect.
The taskbar is on the wrong monitor
With Show my taskbar on all displays off, the taskbar sits on the main display. Open Display settings and check which monitor has Make this my main display ticked. Change it if needed, as described above.
What to do next
If your windows still land on the wrong screen, adjust the monitor arrangement and the main display under Settings System Display, because the taskbar follows those choices. A major Windows update, a new graphics driver, or plugging in a different monitor can change the main display or reset the arrangement, so recheck it after any of them.
A good next task is learning the keyboard shortcuts that move windows between monitors, such as Windows key + Shift + Left arrow and Windows key + Shift + Right arrow.
Frequently asked questions
How do I enable the taskbar to function on multiple monitors in 🪟 Windows 11?
Open Settings Personalization Taskbar Taskbar behaviors. Turn on "Show my taskbar on all displays". Windows creates a taskbar on each monitor immediately. You can then choose whether app buttons appear where the app is open or only on your primary monitor.
How to change Display settings for multiple monitors in 🪟 Windows 11?
Open Settings System Display You'll see all connected monitors listed. Adjust the arrangement by dragging monitors into position, change resolution and refresh rate per monitor, or set which one is your primary display. Changes apply instantly.
How to stretch a taskbar across two monitors?
The taskbar cannot stretch across monitors. Instead, enable "Show my taskbar on all displays" in Settings Personalization Taskbar Taskbar behaviors to place a separate taskbar on each monitor. App buttons can show where the app is open or on your primary monitor only.
Why is the taskbar missing on my second monitor in 🪟 Windows 11?
Check Settings Personalization Taskbar Taskbar behaviors and turn on "Show my taskbar on all displays". If the option is greyed out or missing, verify your monitors are set to extend the desktop (not duplicate) in Settings System Display
Still have a question?
Answered by AI from this guide. Good questions may be added to this page — please don't include personal details.
Did this guide fix your problem?

About the Author
Richard
Tech Writer, IT Professional
Richard is a writer at Geek Rewind who turns complex IT tasks into clear, step-by-step guides. He draws on years of hands-on experience in system administration and enterprise IT operations, focusing on Windows, Linux and WordPress: the problems people actually run into, and the fixes that work. His server and WordPress guides come from systems he runs himself. Richard builds and maintains the platform behind Geek Rewind, from its Ubuntu servers and Nginx configuration to its custom WordPress plugins. Many new tutorials start with readers' questions, and he's always glad to answer them in the comments.
No comments yet — be the first to share your thoughts!