How to Add or Remove the Sign Out Button in Windows 11

The Sign Out button in Windows 11 lets you close your current account and return to the login screen.
You can add or remove this button to control who can sign out of your PC, which is helpful for security or convenience.
For example, on Windows 11 Pro and Enterprise, you can hide the Sign Out button completely using the Group Policy Editor. This prevents accidental logouts on shared computers.
Removing the button makes it disappear from both the Start menu and the power options.
You can add or remove the Sign Out button in Windows 11 using the Group Policy Editor or Registry Editor. Navigate to Start Menu and Taskbar settings in Group Policy or specific registry keys and modify the ‘Remove Logoff’ or ‘StartMenuLogOff’ values to enable or disable the button.
Alternative Ways to Sign Out
Even if the Sign Out button isn’t visible on your Start menu, you can still sign out of Windows 11. Several quick methods are available.
Keyboard shortcuts like Ctrl+Alt+Del or Alt+F4 offer fast sign-out options. You can also right-click the Start button and select ‘Sign out’ from the ‘Shut down or sign out’ submenu.
To use Ctrl+Alt+Del, press these keys together and then select ‘Sign out’ from the screen. Alternatively, on your desktop, pressing Alt+F4 opens the shutdown dialog, where you can select ‘Sign out’ from the dropdown menu.
For a dedicated shortcut, right-click your desktop, select ‘New’ > ‘Shortcut’, type `shutdown.exe -l`, name it ‘Sign Out’, and click ‘Finish’.
- Right-click the Start button: Hover over ‘Shut down or sign out’ to see the ‘Sign out’ option.
- Ctrl+Alt+Del: Press these keys together and select ‘Sign out’ from the screen.
- Alt+F4: On your desktop, press Alt+F4 to open the shutdown dialog and select ‘Sign out’ from the dropdown menu.
- Desktop Shortcut: Right-click your desktop, select New > Shortcut, and type
shutdown.exe /l. Name it ‘Sign Out’ and click Finish.
Using the Local Group Policy Editor
Adding or removing the sign out button in Windows 11 is possible using the Local Group Policy Editor, though you’ll need administrator privileges to make these changes. This tool lets you control how the Start menu appears, including the presence of the sign out option.
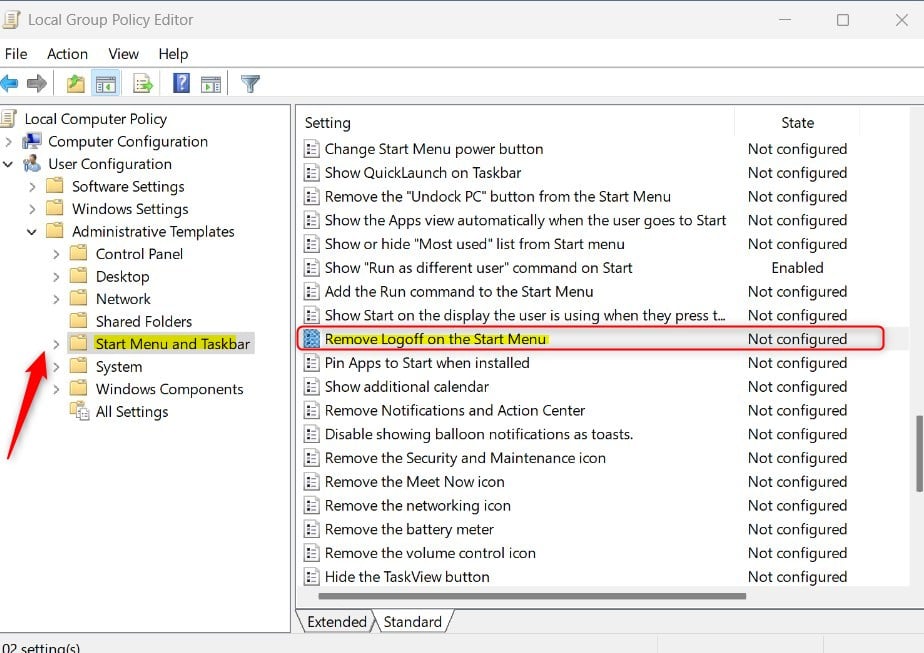
- Search for ‘Edit group policy’ in the Start menu and open it.
- Go to: User Configuration > Administrative Templates > Start Menu and Taskbar.
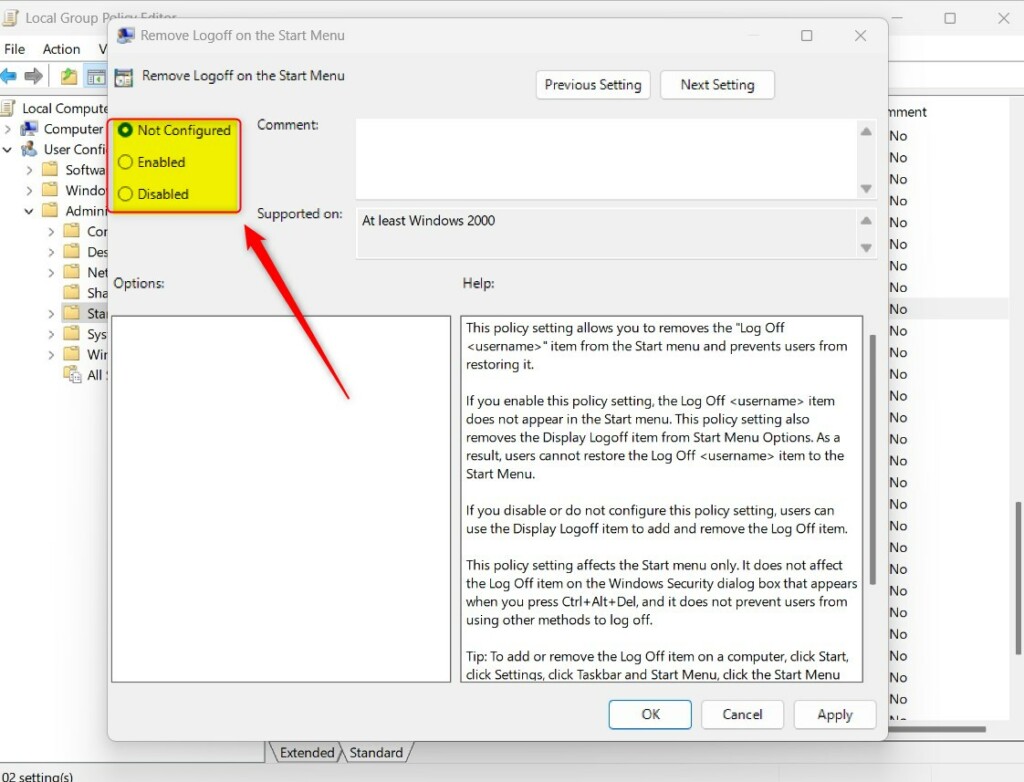
- Find ‘Remove Logoff on the Start Menu’ and double-click it.
Choose ‘Enabled’ to hide the button, or ‘Disabled’ to show it. Click OK.
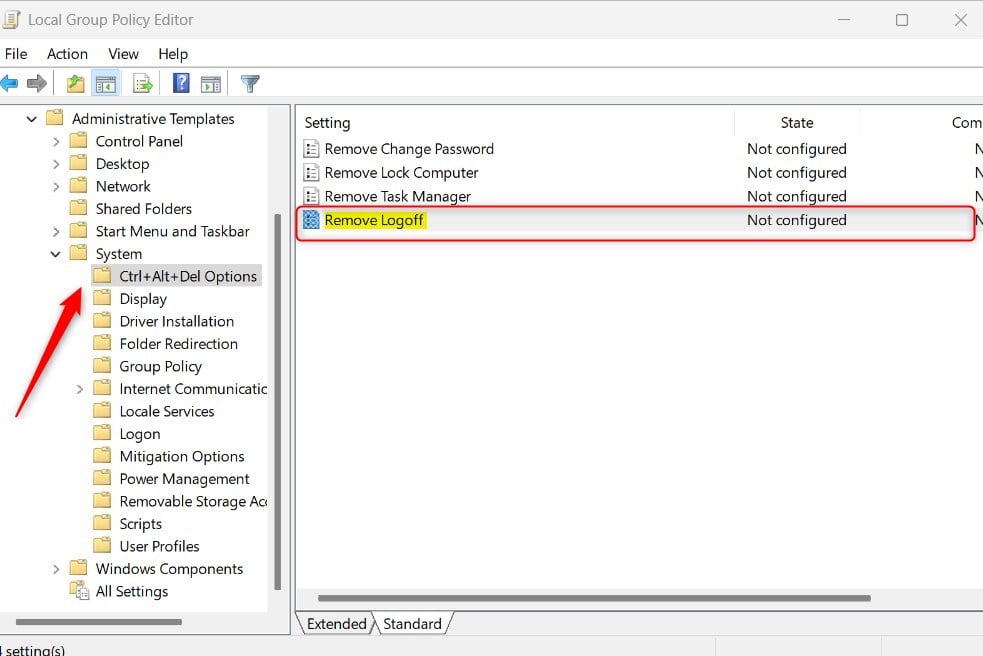
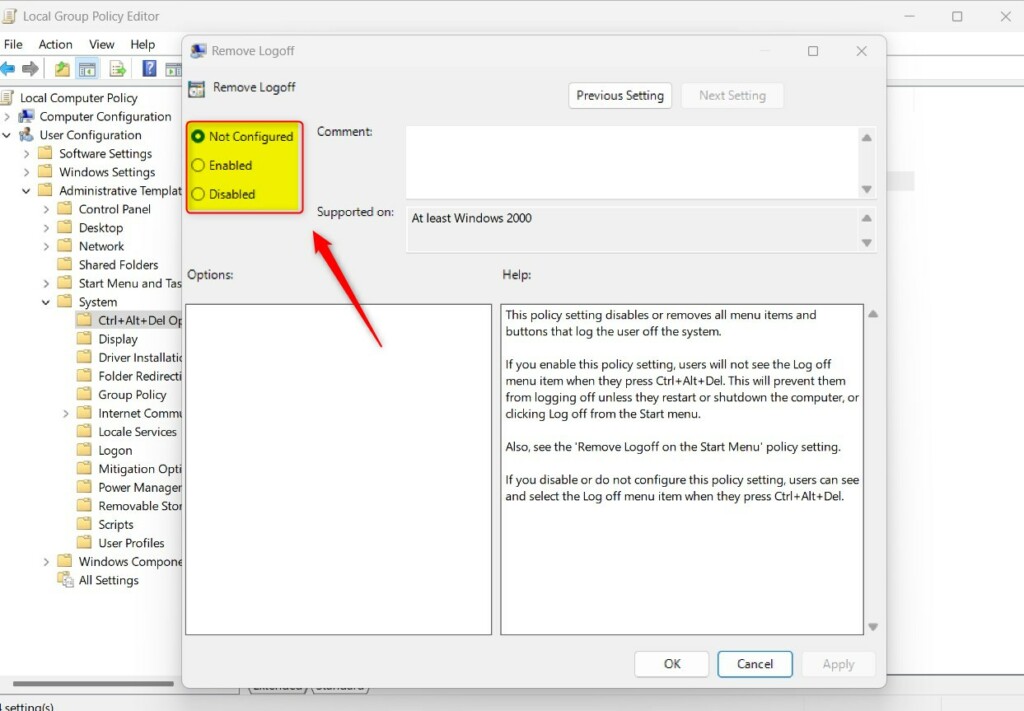
To change the sign-out option for the Ctrl+Alt+Del menu, go to: User Configuration > Administrative Templates > System > Ctrl+Alt+Del Options. Double-click ‘Remove Logoff’ and select your preferred setting.
Using the Windows Registry Editor
Modifying the Windows Registry allows you to add or remove the sign out button in Windows 11. Proceed with caution, as mistakes here can lead to system issues. You’ll also need administrator rights to access and edit these settings.
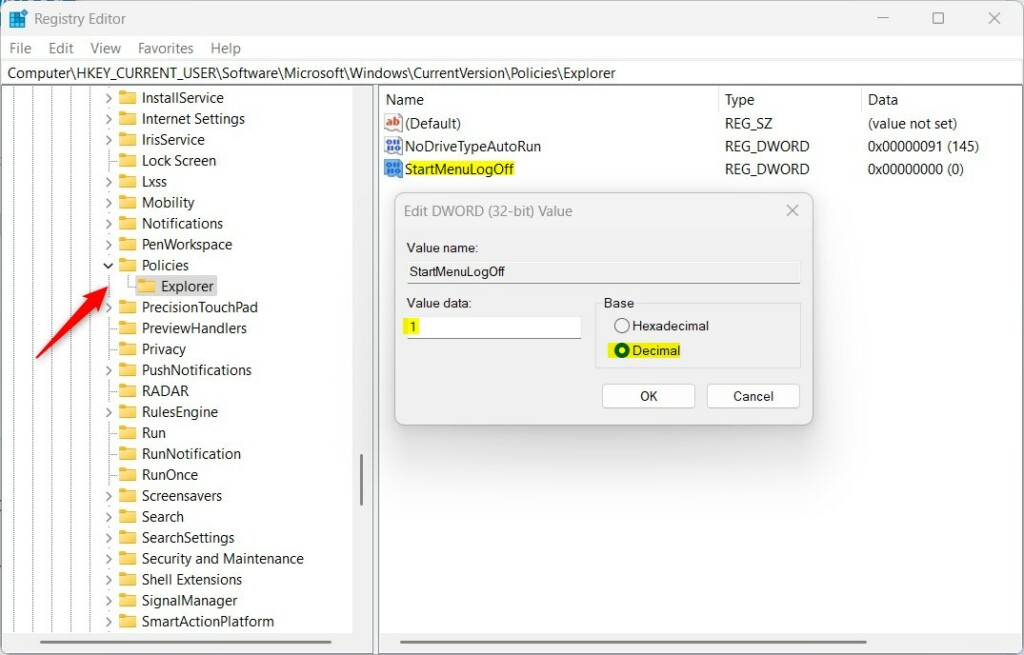
Navigate to: HKEY_CURRENT_USER\Software\Microsoft\Windows\CurrentVersion\Policies\Explorer (this is a path within the Windows Registry, a database storing your operating system’s settings).
Double-click StartMenuLogOff. Set the value to 1 to hide the button. If you don’t see this item, right-click a blank space, choose New, and then select DWORD (32-bit) Value. Name it StartMenuLogOff.
Next, go to: HKEY_CURRENT_USER\Software\Microsoft\Windows\CurrentVersion\Policies\Explorer
Double-click NoLogoff. Set the value to 1 to hide the button. If you don’t see it, create a new DWORD (32-bit) Value named NoLogoff. Restart your computer to apply changes.

Summary
You can manage the Sign out button on your Windows 11 Start menu using either the Group Policy Editor or Registry Editor, which gives you control over how users sign out.
Is removing the Sign Out option reversible without admin rights?
No, you’ll need administrator privileges to modify the Group Policy or Registry and hide the sign-out button. A standard user account cannot reverse these changes without the necessary permissions. Always ensure you have administrative access before attempting to modify system-level settings to avoid being locked out of configuration tools.
Does removing the Sign Out option prevent users from using other methods like Ctrl+Alt+Del?
No, simply removing the sign out button from the Start menu in Windows 11 doesn’t stop users from signing out using other methods like Ctrl+Alt+Del.
Can this be managed remotely via IT management software?
Yes, enterprise IT teams can manage these settings remotely using Group Policy Objects (GPO) or Mobile Device Management (MDM) tools like Microsoft Intune. This allows administrators to enforce sign-out restrictions across an entire organization’s fleet of computers simultaneously, ensuring consistent security policies are applied to all user accounts.
Was this guide helpful?

About the Author
Richard
Tech Writer, IT Professional
Richard, a writer for Geek Rewind, is a tech enthusiast who loves breaking down complex IT topics into simple, easy-to-understand ideas. With years of hands-on experience in system administration and enterprise IT operations, he’s developed a knack for offering practical tips and solutions. Richard aims to make technology more accessible and actionable. He's deeply committed to the Geek Rewind community, always ready to answer questions and engage in discussions.


No comments yet — be the first to share your thoughts!