How to Change Your Cellular Data Roaming Options in Windows 11
You adjust your cellular data roaming settings in Windows 11 to control whether your device uses your mobile carrier’s network when you’re outside your usual coverage area.
Cellular data roaming lets your Windows 11 PC or tablet connect to a different mobile network. This is often helpful when you’re traveling internationally or in a remote location, keeping you online.
This feature is key to managing extra costs because roaming rates can be very different from your regular plan. For instance, Windows 11 provides specific settings to enable or disable roaming on a per-connection basis.
You’ll find these options within the Network & Internet settings, under Cellular. Here, you can decide whether roaming is on or off, or sometimes choose to be prompted each time.
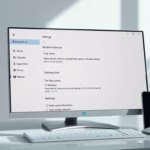
Open Settings, navigate to Network & internet, and select Cellular. Within Cellular settings, find and click Data roaming options to choose whether to enable or disable roaming.
Understanding Data Roaming Options
Windows 11 data roaming options let you control whether your device uses cellular data when it’s outside your usual network coverage area.
What is Data Roaming?
Data roaming in Windows 11 lets your computer use a different mobile network for internet access, typically when you travel outside your normal service area. Your device might connect to a local provider if you take your Windows 11 laptop abroad, which can affect your mobile data usage.
For example, if you take your Windows 11 laptop on a trip abroad, your device might automatically attempt to connect to a local cellular network there. If you don’t manage the settings, you could end up using a significant amount of data at a much higher price than you’re accustomed to.
Why You Need to Manage Roaming Settings
It’s important to manage your Windows 11 data roaming settings to avoid unexpected charges on your mobile bill and to control how your device uses cellular data away from your usual network. By adjusting these settings, you can prevent surprise costs and ensure you only use data when it’s necessary and affordable.
- Avoid High Charges: This is the most important benefit. You can turn off roaming completely to make sure you don’t get unexpected costs.
- Stay Connected When Necessary: If you need to be online while traveling and your plan lets you, you can turn on roaming, maybe with limits.
- Control Your Data Usage: Even if roaming is on, you might want to watch how much data you use to stay within your budget.
How to Access Data Roaming Options in 🪟 Windows 11
You can change your Windows 11 data roaming options by opening the Settings app. To do this, click the Start button and then select the Settings cogwheel icon, or simply press the Windows key and the ‘I’ key on your keyboard at the same time.
First, click the Start button (that’s the Windows icon on your taskbar) and then select the Settings cogwheel. Or, you can press Windows key + I to open Settings directly.
- Open Settings: Click the Start button (the Windows icon) on your taskbar. Then, click the Settings cogwheel icon. You can also press the
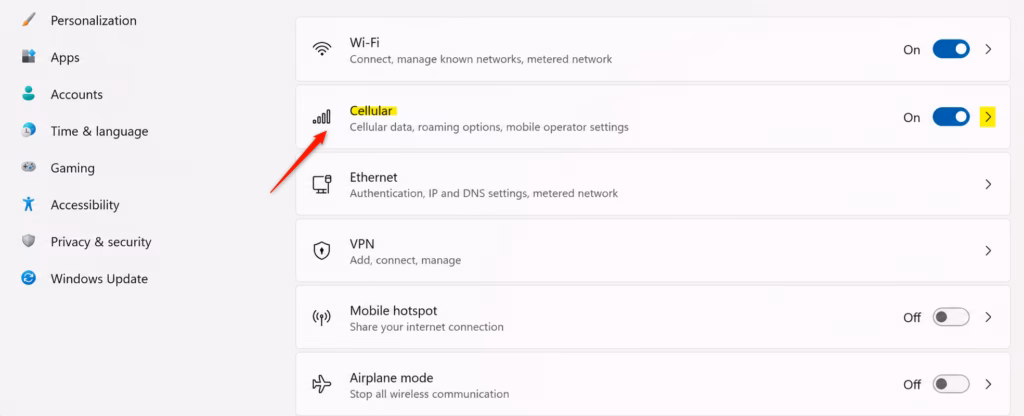
Windows key + Ikeys on your keyboard to open Settings directly. - Go to Network & internet: In the Settings window, click on Network & internet in the left sidebar.
- Find Cellular: Scroll down the options on the right side of the Network & internet window. Look for Cellular and click it.
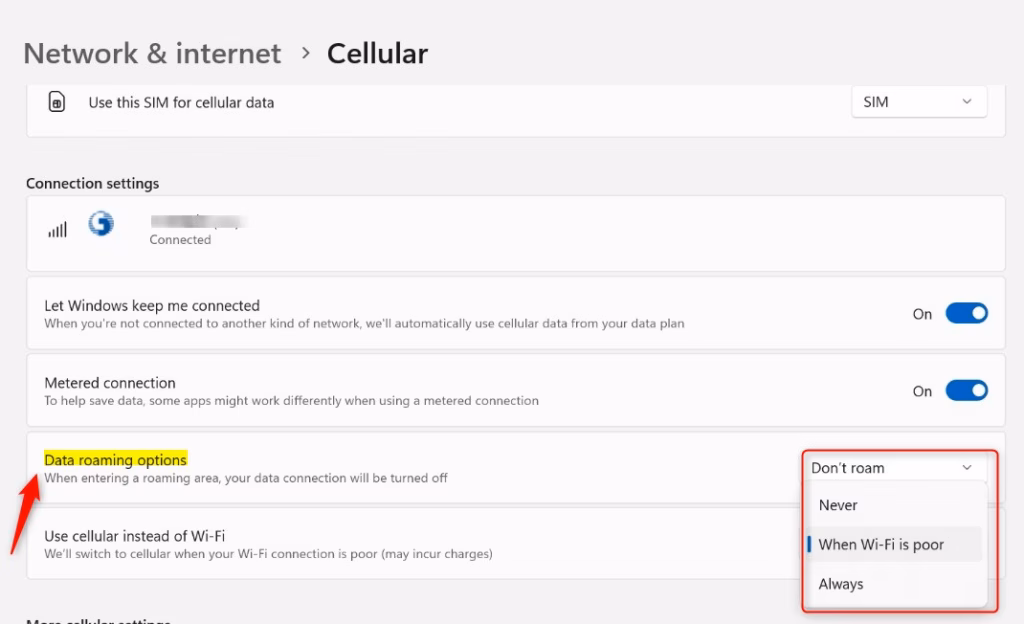
- Locate Data Roaming Options: Inside the Cellular settings, you’ll see different options. Find the section or option called Data roaming options and click it.
- Open Settings: Click the Start button (the Windows icon) on your taskbar. Then, click the Settings cogwheel icon. You can also press the
Windows key + Ikeys on your keyboard to open Settings directly. - Go to Network & internet: In the Settings window, click on Network & internet in the left sidebar.
- Find Cellular: Scroll down the options on the right side of the Network & internet window. Look for Cellular and click it.
- Locate Data Roaming Options: Inside the Cellular settings, you’ll see different options. Find the section or option called Data roaming options and click it.
Configuring Your Data Roaming Settings
Configuring your Windows 11 data roaming settings involves choosing whether to ‘Don’t roam’ to prevent extra charges or to allow roaming if you need internet access when you’re away from your normal network. Selecting ‘Don’t roam’ is the safest option to avoid any unexpected data costs when outside your usual service area.
- Don’t roam: This is the safest choice if you want to avoid any data charges when you’re outside your company’s network. If you pick this, your Windows 11 device will not use cellular data when it detects it is roaming. It will just disconnect from cellular data until it’s back in your home network’s area.
⚠️WarningChoosing “Don’t roam” means you won’t have internet using cellular data when you’re in a roaming area, even if you really need it. Make sure this works for your travel plans.
- Roam: If you choose this, your device can use cellular data when it’s outside your company’s network. This keeps you connected, but you must know about the possible costs. Your mobile company will charge you for the data used based on their roaming rates.
Good Tip: If you plan to roam, check with your mobile company before you travel. Ask them about their international data plans, roaming packages, or daily/monthly limits. Some companies offer special travel passes that can be cheaper than normal roaming rates.
- Don’t roam: This is the safest choice if you want to avoid any data charges when you’re outside your company’s network. If you pick this, your Windows 11 device will not use cellular data when it detects it is roaming. It will just disconnect from cellular data until it’s back in your home network’s area.
Warning: Choosing “Don’t roam” means you won’t have internet using cellular data when you’re in a roaming area, even if you really need it. Make sure this works for your travel plans.
- Roam: If you choose this, your device can use cellular data when it’s outside your company’s network. This keeps you connected, but you must know about the possible costs. Your mobile company will charge you for the data used based on their roaming rates.
Good Tip: If you plan to roam, check with your mobile company before you travel. Ask them about their international data plans, roaming packages, or daily/monthly limits. Some companies offer special travel passes that can be cheaper than normal roaming rates.
The exact wording might vary slightly depending on your version of Windows 11 and your mobile company’s configuration. However, the core choice will be between permitting or blocking data usage during roaming.
Reference:
Summary
Windows 11 data roaming lets your device connect to other cellular networks when you’re away from your provider’s coverage, keeping you online but potentially costing more.
How do I turn on data roaming on 🪟 Windows 11?
To enable data roaming in Windows 11, go to Settings > Network & Internet > Cellular. Under the ‘Cellular data’ section, find the roaming option and choose ‘On’ or ‘Ask each time’ to activate it. This permits your device to connect to other networks when you’re outside your usual coverage.
Do I need my data roaming on or off?
You should turn data roaming off in Windows 11 to prevent unexpected charges, unless you specifically need internet access while traveling and understand the potential costs involved.
How do I turn off roaming on my PC 🪟 Windows 11?
To disable roaming on your Windows 11 PC, go to Settings > Network & Internet > Cellular. Locate the ‘Cellular data’ settings and select the roaming option. Choose ‘Off’ to deactivate data roaming, stopping your device from connecting to external networks and incurring potential charges.
How to get to roaming 🪟 Windows 11?
To access roaming settings in Windows 11, open the ‘Settings’ app. Click on ‘Network & Internet,’ then select ‘Cellular.’ Here you’ll find the options to manage your cellular data roaming, allowing you to turn it on, off, or set it to prompt you each time.
Was this guide helpful?

About the Author
Richard
Tech Writer, IT Professional
Richard, a writer for Geek Rewind, is a tech enthusiast who loves breaking down complex IT topics into simple, easy-to-understand ideas. With years of hands-on experience in system administration and enterprise IT operations, he’s developed a knack for offering practical tips and solutions. Richard aims to make technology more accessible and actionable. He's deeply committed to the Geek Rewind community, always ready to answer questions and engage in discussions.


No comments yet — be the first to share your thoughts!