How to Disable UAC in Windows 11 for Standard Users
User Account Control (UAC) in Windows 11 manages permissions to prevent unauthorized changes to your PC. It appears as a prompt asking for your approval before a program makes significant alterations.
UAC acts like a digital security guard, protecting your system from malware and unwanted software. For standard users, who don’t have full admin rights, understanding UAC behavior is key to managing their PC safely.
This guide explains how to adjust UAC settings specifically for standard users in Windows 11. You can change how often UAC asks for permission, making your computer experience smoother while maintaining security.
To enable or disable UAC in Windows 11, open Control Panel, navigate to User Accounts, select Change User Account Control settings, and move the slider. For advanced users, modify the EnableLUA value in the registry at 🗝️HKEY_LOCAL_MACHINE\SOFTWARE\Microsoft\Windows\CurrentVersion\Policies\System.
Understanding User Account Control (UAC)
User Account Control, or UAC, is Windows’ built-in helper that protects your computer. It stops unwanted or harmful programs from making changes without your permission. When a program tries to do something important, like install software or change settings, UAC asks for your approval to keep your PC safe.
User Account Control (UAC) has varying levels of strictness that change based on whether you use an administrator or a standard user account. For standard users, UAC might block requests, require an administrator's password, or show a prompt on a dimmed screen called the "secure desktop." This guide focuses on adjusting these UAC settings for standard users.
Why Change UAC Behavior?
UAC prompts, which help keep your PC safe, can sometimes interrupt you. You can change UAC behavior for standard users if these prompts get in your way too often or if a program causes too many UAC notifications. Adjusting these settings in Windows 11 can make your computer experience smoother.
- Fewer Interruptions: If you often use a standard account and UAC prompts get in your way, you might choose a setting that needs less interaction.
- Specific App Needs: Sometimes, certain good programs might cause UAC prompts more often than usual. Changing UAC can make these work more smoothly.
- Better Security for Standard Users: In some cases, you might want to make sure standard users absolutely cannot get extra permissions without an administrator's password.
Changing User Account Control (UAC) settings can affect your computer's security. Always understand what each UAC setting does before you change the UAC setting. It is usually best to keep UAC on at a good level to protect your system. You need to be logged in as an administrator on your PC to make these UAC changes.
Change UAC Behavior Using Local Security Policy (🪟 Windows 11 Pro, Enterprise, Education)
If your Windows 11 PC has the Pro, Enterprise, or Education version, you can use a tool called Local Security Policy. This tool lets you adjust UAC settings precisely. It's like a special control panel for your PC's security rules.
Step 1Open Local Security Policy
To change UAC behavior using the Local Security Policy, you first need to open the tool. Press the Windows key and R together on your keyboard to bring up the Run box. Then, type 'secpol.msc' into the box and press Enter or click OK to launch the Local Security Policy window.
- Press the Windows key + R on your keyboard. This opens the Run box.
- Type
secpol.mscinto the box and press Enter or click OK.
This opens the Local Security Policy window. It might look a bit complex, but we only need to focus on one area.
Step 2Find the UAC Settings
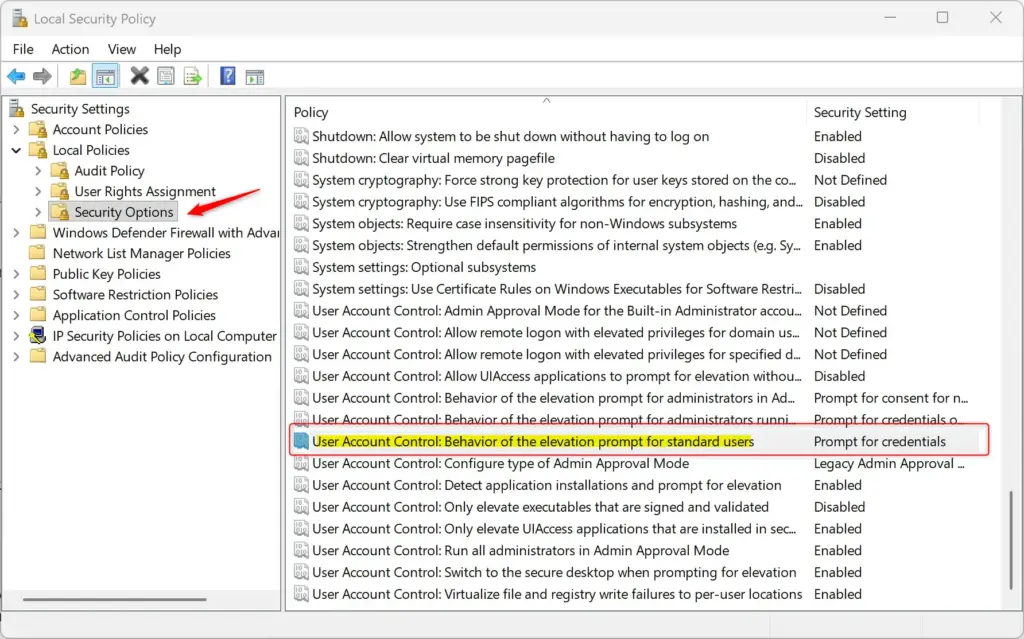
Once the Local Security Policy window is open, you need to find the specific UAC setting. On the left side, click 'Local Policies' to expand it, then click 'Security Options'. On the right side, scroll down the list of settings until you locate 'User Account Control: Behavior of the elevation prompt for standard user'.
- In the left side of the Local Security Policy window, find Local Policies and click it to open it up.
- Underneath Local Policies, click on Security Options.
- Look in the right side. You'll see a long list of security settings. Scroll down until you find the one named "User Account Control: Behavior of the elevation prompt for standard users".
Step 3Choose Your UAC Behavior
This step lets you decide how UAC acts for standard users needing extra permission. Double-click 'User Account Control: Behavior of the elevation prompt for standard users' to open its options. You will see choices like 'Automatically deny elevation requests,' which is the strictest setting, preventing programs from making changes without explicit approval.
A new User Account Control (UAC) window appears when a program tries to make changes requiring administrator permission. You'll see a list of options you can choose from to manage this security feature. These options control how Windows handles requests that could affect your computer's security.
- Automatically deny elevation requests: This is the strictest option. If a program needs administrator permission, UAC will block it with an "Access denied" message. The user won't see a prompt.
- Prompt for credentials on the secure desktop: The screen will dim (this is the "secure desktop"), and the user will be asked to type the username and password of an administrator account. If they enter it correctly, the program can run.
- Prompt for credentials (default): This is the normal setting. The user will be asked to enter an administrator username and password on the regular desktop.
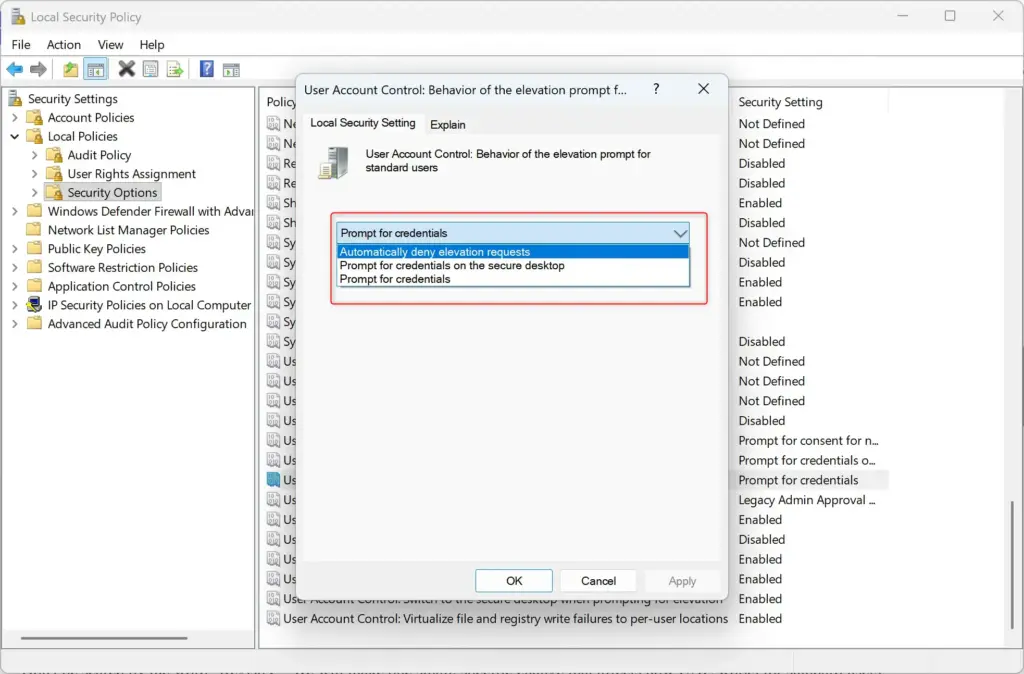
Pick the option that works best for you. Then, click OK to save your choice.
Step 4Close and Test
The UAC prompt will behave according to your chosen setting when you test it. After changing UAC settings, close the Local Security Policy window. Log in as a standard user and try to run a program needing administrator rights to test your changes. Windows 11 Home users must use the registry editor because the Local Security Policy method does not work on that edition.
Helpful Tip: If you don't see "Local Policies" or "Security Options" in the left menu, you might be using Windows 11 Home. Don't worry! You can still change UAC behavior using the next method, which involves editing the Windows Registry.
Change UAC Behavior Using the Windows Registry (All 🪟 Windows 11 Editions)
Step 1Open the Registry Editor
Let's get the tool ready.
- Press the Windows key + R on your keyboard.
- Type
regeditinto the Run box and press Enter or click OK. - If a User Account Control prompt appears asking if you want to allow the app to make changes, click Yes.
Step 2Go to the Correct Registry Location
To modify UAC settings via the Registry, you must navigate to the correct location. Open the Registry Editor and go to this exact path: HKEY_LOCAL_MACHINE\SOFTWARE\Microsoft\Windows\CurrentVersion\Policies\System. You can type this path into the address bar at the top or click through the folders on the left.
HKEY_LOCAL_MACHINE\SOFTWARE\Microsoft\Windows\CurrentVersion\Policies\System
You can type this path directly into the address bar at the top of the Registry Editor window and press Enter. Or, you can click through the folders on the left side. Make sure you select the System folder under the Policies key.
Step 3Change the 'ConsentPromptBehaviorUser' Value
Within the System folder in the Registry Editor, find the 'ConsentPromptBehaviorUser' item on the right side. If it's not there, create it by right-clicking in the empty space, selecting New DWORD (32-bit) Value, and naming it exactly 'ConsentPromptBehaviorUser'. Double-click it to change its value and set your desired UAC behavior.
Double-click on ConsentPromptBehaviorUser to change its value. A small window will pop up.
Here's what each number means for UAC behavior:
- 0: Automatically deny elevation requests.
- 1: Prompt for credentials on the secure desktop.
- 3: Prompt for credentials (this is the normal behavior).
You enter a number (0, 1, or 3) in the "Value data" box to choose how User Account Control behaves. Ensure the "Base" is set to Hexadecimal, which is typically the default setting.
Click OK when you're finished.
Step 4Optional - Change 'PromptOnSecureDesktop'
The PromptOnSecureDesktop setting controls the dimming of the secure desktop when a prompt appears. Double-click the PromptOnSecureDesktop item in the registry editor. Setting the 'Value data' to 1 keeps the secure desktop dimming active. Setting the 'Value data' to 0 turns off the dimming, making the prompt appear on the normal desktop.
- Set its "Value data" to 1 to turn on the secure desktop dimming.
- Set its "Value data" to 0 to turn off the secure desktop dimming (this means the prompt will show on the normal desktop, even when credentials are needed).
Click OK.
Step 5Close Registry Editor and Restart
After closing the Registry Editor window, it's essential to restart your computer for the UAC changes to take full effect. Once your PC has restarted, log in as a standard user and test the UAC prompts to confirm they are working as you intended. To revert to the default settings, simply go back to this registry location and reset the values.
Helpful Tip: If you ever want to go back to the default UAC behavior for standard users, just open the Registry Editor again, go to the same spot, and set the ConsentPromptBehaviorUser value back to 3. Then restart your PC.
Summary
This guide explained how to change User Account Control (UAC) behavior for standard users in Windows 11, acting as your PC's security guard. We covered using Local Security Policy for Pro, Enterprise, and Education editions to adjust elevation prompts, and using the Windows Registry Editor for all editions, including Home, to modify UAC's actions.
- Using Local Security Policy (for Windows 11 Pro, Enterprise, and Education editions) to adjust the elevation prompt behavior.
- Using the Windows Registry Editor (for all Windows 11 editions) to change the same settings by modifying specific values.
Remember to be careful when editing the registry and always understand the security implications of changing UAC settings.HKEY_LOCAL_MACHINE\SOFTWARE\Microsoft\Windows\CurrentVersion\Policies\System


I do these steps but when I restart the PC, it becomes enabled.
I have this issue with windows defender too.
when I disable these two, after restart they are enable again
[…] the ISO mount, and run the setup.exe file to start Windows 11 Setup. On the UAC prompt window, click […]
[…] Why are updates important? Microsoft finds security “holes” in the system and fixes them with updates. If you do not update, hackers can use those holes to sneak in. How to turn on UAC in Windows 11 […]