How to Improve Recall Snapshots Filtering on Windows 11

Recall snapshots in Windows 11 version 24H2 capture your screen every few seconds so you can search your past activity later. Recall filtering lets you keep specific apps and websites out of that history, so sensitive programs and private data are never saved. Recall runs on Copilot+ PCs and is opt-in. If you don’t see it on your PC, the device or the Windows build probably doesn’t support it.
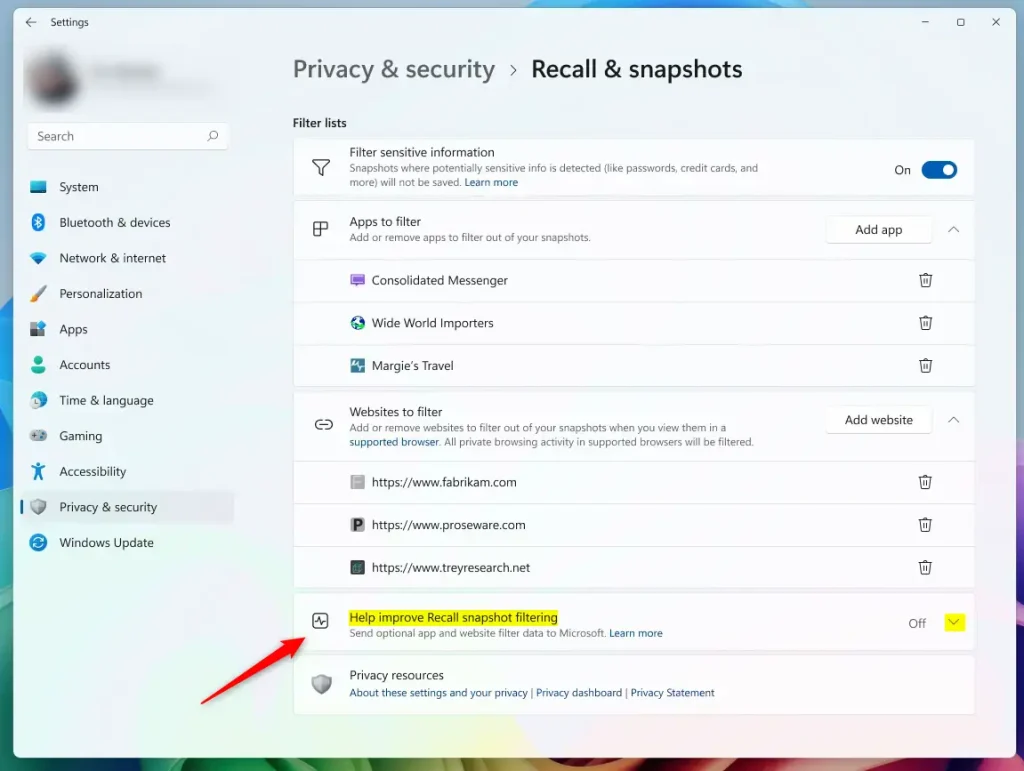
To improve Recall snapshots filtering on Windows 11, open Settings Privacy & security Recall & snapshots, then select the Help improve Recall snapshots filtering tile. Set the switch to On to share your anonymous block list with Microsoft, or Off to stop sharing. The change takes effect immediately, with no Save button needed.
What is Recall?
Recall builds a searchable timeline of what you have done on your PC from those periodic screenshots. You can look back and find something you saw or did earlier without remembering where it was.
You stay in control of it. When Recall is active, you can temporarily pause it, filter apps and websites, delete your snapshots, and manage your history.
How is your data kept safe?
Recall data stays on your own hardware. Windows stores the snapshots locally and protects them with device encryption features such as BitLocker. Nothing is uploaded to build your timeline.
When you block an app or site from Recall, Windows 11 can show a prompt titled “Help improve Recall snapshots filtering.” If you opt in, Windows anonymously shares the list of apps and sites you blocked from Recall with Microsoft. If you decline, nothing is shared and your filter still works.
Why help improve Recall snapshots filtering?
Microsoft uses these lists to learn which apps and websites people prefer to exclude. That helps improve the filtering so it works better for everyone. Sharing is optional, and you can change your answer at any time.
What happens when you are done?
Your changes save automatically. There is no Save or Apply button. Microsoft receives exclusion lists or stops receiving them based on the setting you chose.
How to change this in Settings
It works the same on Windows 11 Home and Pro. The path is Settings Privacy & security Recall & snapshots
- Open the Windows Settings app. Click the Start menu and select Settings, or press the Windows key + I to open Settings app. The Settings window opens.
- Click Privacy & security in the left menu. The privacy options appear on the right.

- On the right side, click the Recall & snapshots tile. Its settings page opens. If the tile is missing, your PC or Windows build doesn't support Recall.
- Turn on the "Save snapshots" feature. If it is already on, leave it as it is.
- Select the Help improve Recall snapshots filtering tile. The sharing options expand or open.
- Set the switch to On to share your anonymous block list, or Off to stop sharing it. The switch changes at once.
Close the Settings window when you are done. To undo the change later, come back to the same tile and flip the switch the other way.
How to change this using the Windows Registry
This is useful for administrators who need to manage the feature on a system, and it works on Home as well as Pro. Editing the registry can break things if you change the wrong value. Back up first by selecting File Export in the Registry Editor, or create a restore point.
Make the change through the Windows Registry editor with these steps:
- Open the Windows Registry and go to this path:
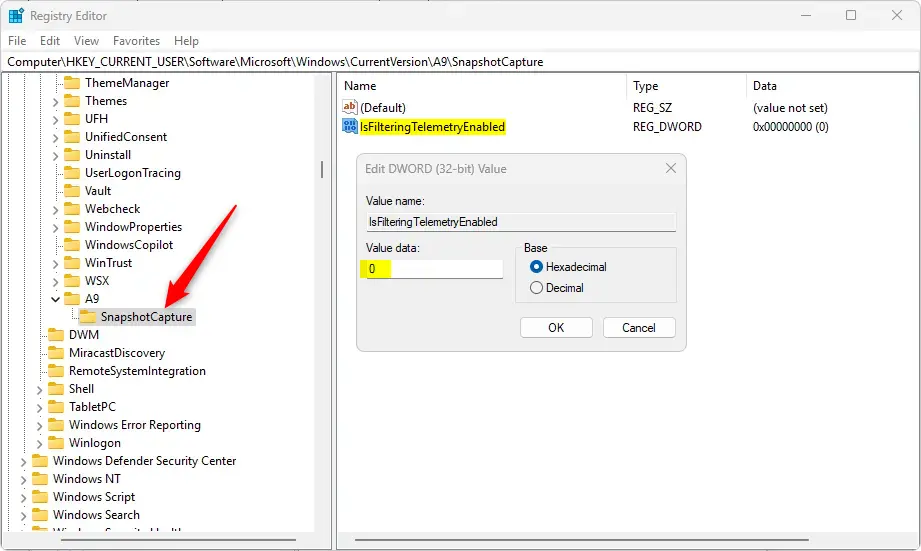
HKEY_CURRENT_USER\Software\Microsoft\Windows\CurrentVersion\A9SnapshotCapture - Right-click the SnapshotCapture key in the left pane.
- Select New, then select DWORD (32-bit) Value. A new value appears in the right pane with its name ready to edit.
- Name the new value
IsFilteringTelemetryEnabled. - Double-click
IsFilteringTelemetryEnabledand set the value data to 1 to turn it on, or 0 to turn it off. Click OK.
If the change doesn't show up in Settings, sign out and back in, or restart the PC. To undo it, set the value back or delete the value you created.
Summary
Recall Snapshots filtering controls which apps and sites your computer records, and whether you share that block list with Microsoft. You can configure it in the Settings app or the Windows Registry. Either way, your snapshots stay stored securely on your local hardware.
- What it does: It sends a list of the apps and sites you blocked from being recorded to Microsoft, if you opt in.
- How to change it: Use the Settings app for a quick change, or the Windows Registry if you manage the PC as an administrator.
- Your privacy: All snapshots stay on your device, and any data shared for improvement is anonymous.
Reference: Microsoft.com
Have a question about this guide?
Answered by AI from this guide. Good questions may be added to this page — please don't include personal details.
Did this guide fix your problem?

About the Author
Richard
Tech Writer, IT Professional
Richard is a writer at Geek Rewind who turns complex IT tasks into clear, step-by-step guides. He draws on years of hands-on experience in system administration and enterprise IT operations, focusing on Windows, Linux and WordPress: the problems people actually run into, and the fixes that work. His server and WordPress guides come from systems he runs himself. Richard builds and maintains the platform behind Geek Rewind, from its Ubuntu servers and Nginx configuration to its custom WordPress plugins. Many new tutorials start with readers' questions, and he's always glad to answer them in the comments.
No comments yet — be the first to share your thoughts!