How to Reset Windows Search in Windows 11

Resetting Windows Search in Windows 11 fixes missing files, blank panels, and slow results by rebuilding your search index. The index is the quick-reference map Windows uses to find items on your PC.
When search stops working properly in version 22H2 or 23H2, clearing this database forces Windows to map everything out again from scratch. Once the rebuild finishes, apps and documents show up quickly again. The steps are the same on Windows 11 Home and Pro.
Your personal files and photos stay safe during this process. Only the index is rebuilt, and Windows keeps running normally while it does the work in the background.
Open Windows Terminal as Administrator, then run PowerShell -ExecutionPolicy Unrestricted -File followed by the full path to the downloaded ResetWindowsSearchBox.ps1 script. Type R and press Enter to confirm. Windows rebuilds your search index in the background without restarting.
Steps to Reset Windows Search
Step 1Download the Reset Script
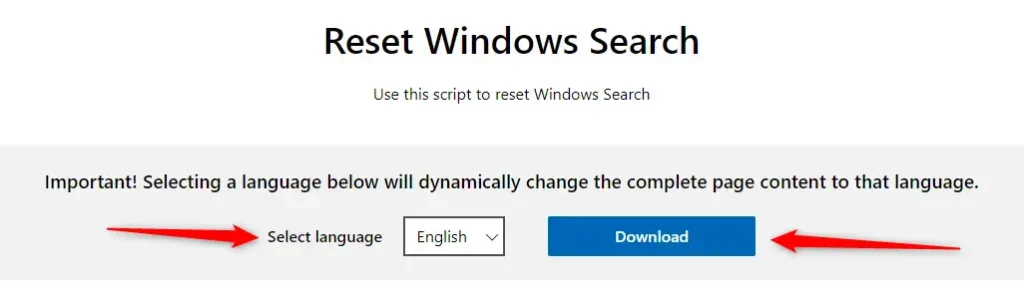
Microsoft provides a small program, known as a script, to reset Windows Search. It is a single file that you download first and run later from Windows Terminal. Click the link below to download it :
Download ResetWindowsSearchBox.ps1
Select your language on the download page, then save the file to your Desktop or Downloads folder. Pick a folder you can find easily, because you will need the file’s full path later. If your browser warns that the file may be unsafe, check that it came from the Microsoft link above before you keep it.
Step 2Open Windows Terminal as Administrator
A normal Terminal window will not be allowed to make these changes.
- Press the Windows key.
- Type Windows Terminal. On some builds the app is listed simply as Terminal.
- Right-click the result in the list and choose Run as administrator from the menu.
- Click Yes if a User Account Control prompt asks whether to allow the app to make changes to your device.
You should now see a Terminal window with “Administrator” in its title bar.
If you skip this, the script cannot reset the search service. Here’s how to do it:
- Click the Start button or press the Windows key. The Start menu opens with the search box ready for typing.
- Type Windows Terminal. The app appears at the top of the results.
- Right-click Windows Terminal and choose Run as administrator. Confirm with Yes if Windows asks for permission. If the option is missing, you are probably right-clicking a different entry, so check that you picked the app itself. If you use a work PC and your account has no admin rights, ask your IT team to run the script.
- If you want, you can also open Windows Terminal with admin rights by following this guide. Any of these methods works, as long as the window is elevated.
Step 3Run the Reset Script
Next, paste a specific command into the elevated Windows Terminal window. The command tells PowerShell to run the downloaded script. In Windows 11 22H2 and 23H2, Terminal opens PowerShell by default, so you can type it straight in.
- Type or paste PowerShell -ExecutionPolicy Unrestricted -File into the open window, followed by a space.
- Add the full file path of your downloaded script. To get it quickly, open the folder in File Explorer , select the file, press Ctrl+Shift+C to copy its path, then paste it into Terminal with Ctrl+V.
- If the path contains spaces, make sure it is wrapped in quotation marks. Copying it as above adds them for you.
- Press Enter to start the process.
The execution policy setting here applies only to this one run. It does not change the policy on your PC permanently.
PowerShell -ExecutionPolicy Unrestricted -File "<Full path of ResetWindowsSearchBox.ps1 file>"For example, if your file is in Downloads and your username is User01, type the command shown below. Your own command will differ in the username and the file name, so check both against what is on your PC:
PowerShell -ExecutionPolicy Unrestricted -File "C:\Users\User01\Downloads\ResetWindowsSearchBox.ps1"Step 4Confirm Running the Script
After you press Enter, a prompt appears in the window. Type R and press Enter to start the reset. The script then runs on its own, and you will see text scroll by while it works. If you get an error that the file cannot be found, the path is wrong, so run the command again with the corrected path.
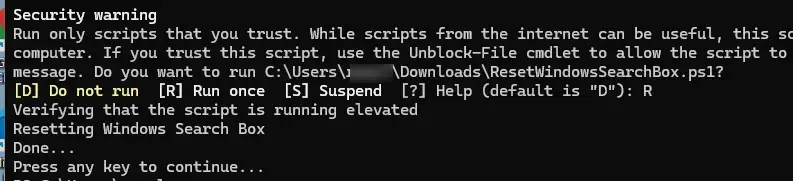
Once the script finishes, Windows Search will be reset, and you can close Windows Terminal. A restart is not normally required. It takes a little time for search to begin working normally again as it rebuilds the search index. Depending on how many files you have, this can take from a few minutes to a few hours. Leaving the PC on, and plugged in if it is a laptop, helps the rebuild finish sooner.
Why Reset Windows Search?
- Fixes problems like no search results showing up, including files and apps that you know are on the PC.
- Improves slow or laggy search performance once the index has been rebuilt.
- Corrects wrong or missing suggestions, such as results that point to items you have already moved or deleted.
Important Notes
- You must run the script as an administrator to reset Windows Search. If Terminal is not elevated, the reset will fail.
- Resetting will not delete your personal files. Only the search index is rebuilt.
- The search might feel a bit slow, or return incomplete results, right after resetting because Windows is rebuilding the search database. This is normal and goes away once the rebuild is done.
Where to Learn More
For official details and troubleshooting tips, visit Microsoft Support - Fix Windows Search Problems.
Need Help?
If problems persist or questions arise, leave a comment below or ask someone trusted for help. When you do, say which Windows 11 version you use and any error text that appeared in Terminal, so the problem is easier to track down.
Summary
Resetting Windows Search fixes problems like slow performance or search failure safely, without harming stored files. Download the script, run it from an administrator Terminal, and give Windows some time to rebuild the index.
Have a question about this guide?
Answered by AI from this guide. Good questions may be added to this page — please don't include personal details.
Did this guide fix your problem?

About the Author
Richard
Tech Writer, IT Professional
Richard is a writer at Geek Rewind who turns complex IT tasks into clear, step-by-step guides. He draws on years of hands-on experience in system administration and enterprise IT operations, focusing on Windows, Linux and WordPress: the problems people actually run into, and the fixes that work. His server and WordPress guides come from systems he runs himself. Richard builds and maintains the platform behind Geek Rewind, from its Ubuntu servers and Nginx configuration to its custom WordPress plugins. Many new tutorials start with readers' questions, and he's always glad to answer them in the comments.
No comments yet — be the first to share your thoughts!