How to Enable or Disable Recall in Windows 11
Recall in Windows 11 lets you control its screen snapshot feature.
This tool acts like a visual history of your PC, taking pictures of your activity. You can then search these snapshots to find things you saw earlier, like a webpage or document you forgot about.
Recall is available on specific Windows 11 devices, starting with Copilot+ PCs. These PCs have Snapdragon processors and run Windows 11 build 26120.2415 or newer. To turn Recall on, you must enable snapshot saving.
You can enable or disable Recall in Windows 11 via the Local Group Policy Editor or Registry Editor. Open gpedit.msc or regedit, navigate to the Windows AI settings, and modify the “Allow Recall to be enabled” or “AllowRecallEnablement” value accordingly.
How to Enable or Disable Recall for Users
To let users control Recall on their devices, you can use a Windows tool called the Local Group Policy Editor. This is particularly helpful for computers managed in workplaces or schools.
Step-by-Step to Enable or Disable Recall with Group Policy Editor
- Click the Start button and type
gpedit.msc, then press Enter to open the Local Group Policy Editor. ⚠️ Requires admin privileges - In the window, go to this folder path:
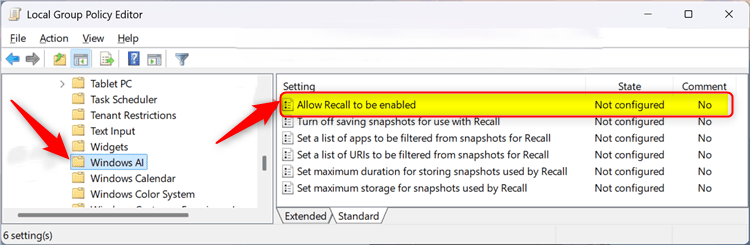
User Configuration > Administrative Templates > Windows Components > Windows AI - On the right side, find and double-click
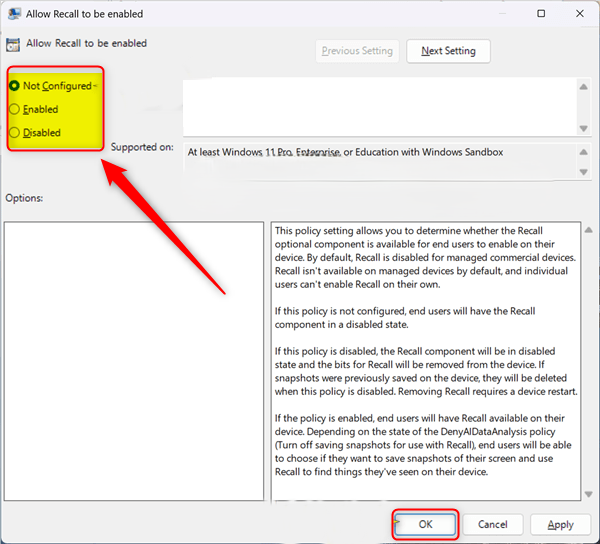
Allow Recall to be enabled. - In the window that opens, choose one of the options:
- Not Configured – Recall will be turned off for users.
- Enabled – Users can turn Recall on their device.
- Disabled – Recall will be completely turned off and removed.
- Click
OKto save your choice. - Restart your computer to make sure the setting works.
Turning Windows 11 Recall on or off is achievable using the Group Policy Editor. This method involves finding a specific setting within the editor to control whether Recall is allowed on your computer. Make sure you have administrator rights before you start.
And here are the options you can select:
How to Enable or Disable Recall Using the Windows Registry
If you prefer, you can also turn Recall on or off by editing the Windows Registry. Editing the Registry has immediate effects that can impact your system. It’s wise to back up your Registry beforehand.
Steps to Enable or Disable Recall via Registry
- Press ⊞ Win+R, type
regedit, and press Enter to open the Registry Editor. ⚠️ Requires admin privileges - Go to this path:
HKEY_LOCAL_MACHINE\SOFTWARE\Policies\Microsoft\Windows\WindowsAI - If you don’t see
WindowsAI, right-click onWindowsfolder, selectNew > Key, and name itWindowsAI. ⚠️ Requires admin privileges - Right-click inside the
WindowsAIfolder, selectNew > DWORD (32-bit) Value, and name itAllowRecallEnablement. ⚠️ Requires admin privileges - Double-click
AllowRecallEnablementand set the value to:1to enable Recall for managed users.0to disable Recall for everyone.
- If you want to allow Recall on Home devices, just delete the
AllowRecallEnablementvalue. ⚠️ Requires admin privileges - Close Registry Editor and restart your PC.
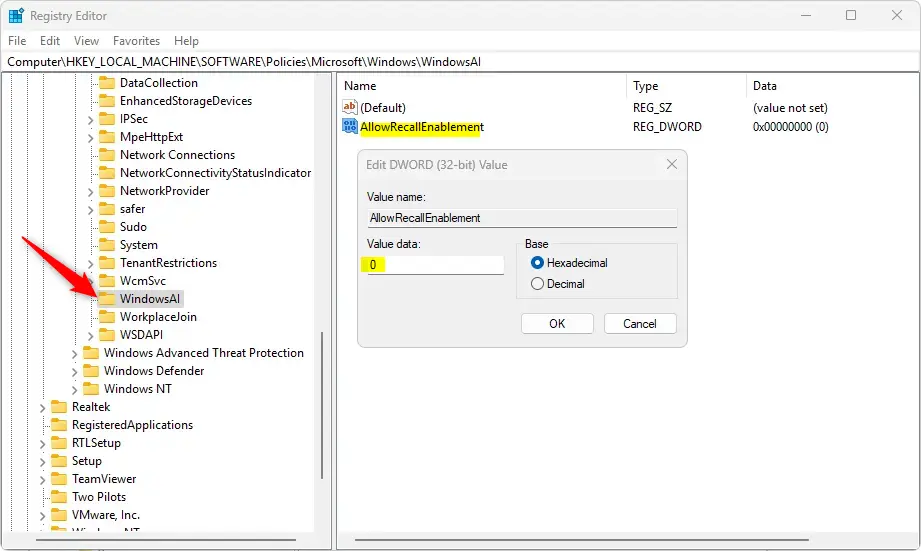
Windows 11 Recall settings can also be changed through the Registry Editor. This involves navigating to a specific location and creating or modifying a value to enable or disable Recall. Remember, you’ll need administrator privileges for these changes.
Summary
Windows 11 Recall takes snapshots of your screen to help you find past information easily. You can choose to turn this feature on or off using either the Group Policy Editor or the Registry Editor, depending on your preference and system access.Was this guide helpful?

About the Author
Richard
Tech Writer, IT Professional
Richard, a writer for Geek Rewind, is a tech enthusiast who loves breaking down complex IT topics into simple, easy-to-understand ideas. With years of hands-on experience in system administration and enterprise IT operations, he’s developed a knack for offering practical tips and solutions. Richard aims to make technology more accessible and actionable. He's deeply committed to the Geek Rewind community, always ready to answer questions and engage in discussions.


No comments yet — be the first to share your thoughts!