How to Delete System and Point-in-Time Restore Points in Windows 11

System Restore points save snapshots of your files and settings in Windows 11 so you can roll your PC back to a working state if a bad update breaks something. Windows uses standard System Restore points alongside point-in-time restore. Point-in-time restore is a newer feature that keeps backups of your entire system for about 72 hours, using reserved disk space.
Restore points pile up over time and take space on your drive. You can clear them with built-in Windows tools to get that space back. This guide covers five ways to do it, from deleting everything to deleting one single restore point.
Before you start, know that deleting restore points cannot be undone. Once they are gone, you cannot roll back to the state they saved. If your PC is working well, you can usually create a fresh restore point afterwards. If you are cleaning up because something is wrong, think twice before deleting.
Open Settings System About, click System protection, select a drive with protection on, click Configure, then click Del under Disk Space Usage and confirm. All restore points on that drive are removed immediately without requiring a restart.
Option 1Delete All Restore Points Using System Protection
It is the easiest option and works on both Windows 11 Home and Pro. You need an administrator account, or you must be able to enter an administrator’s password when asked.
- Open the Settings app by pressing Win+I. The Settings window opens.
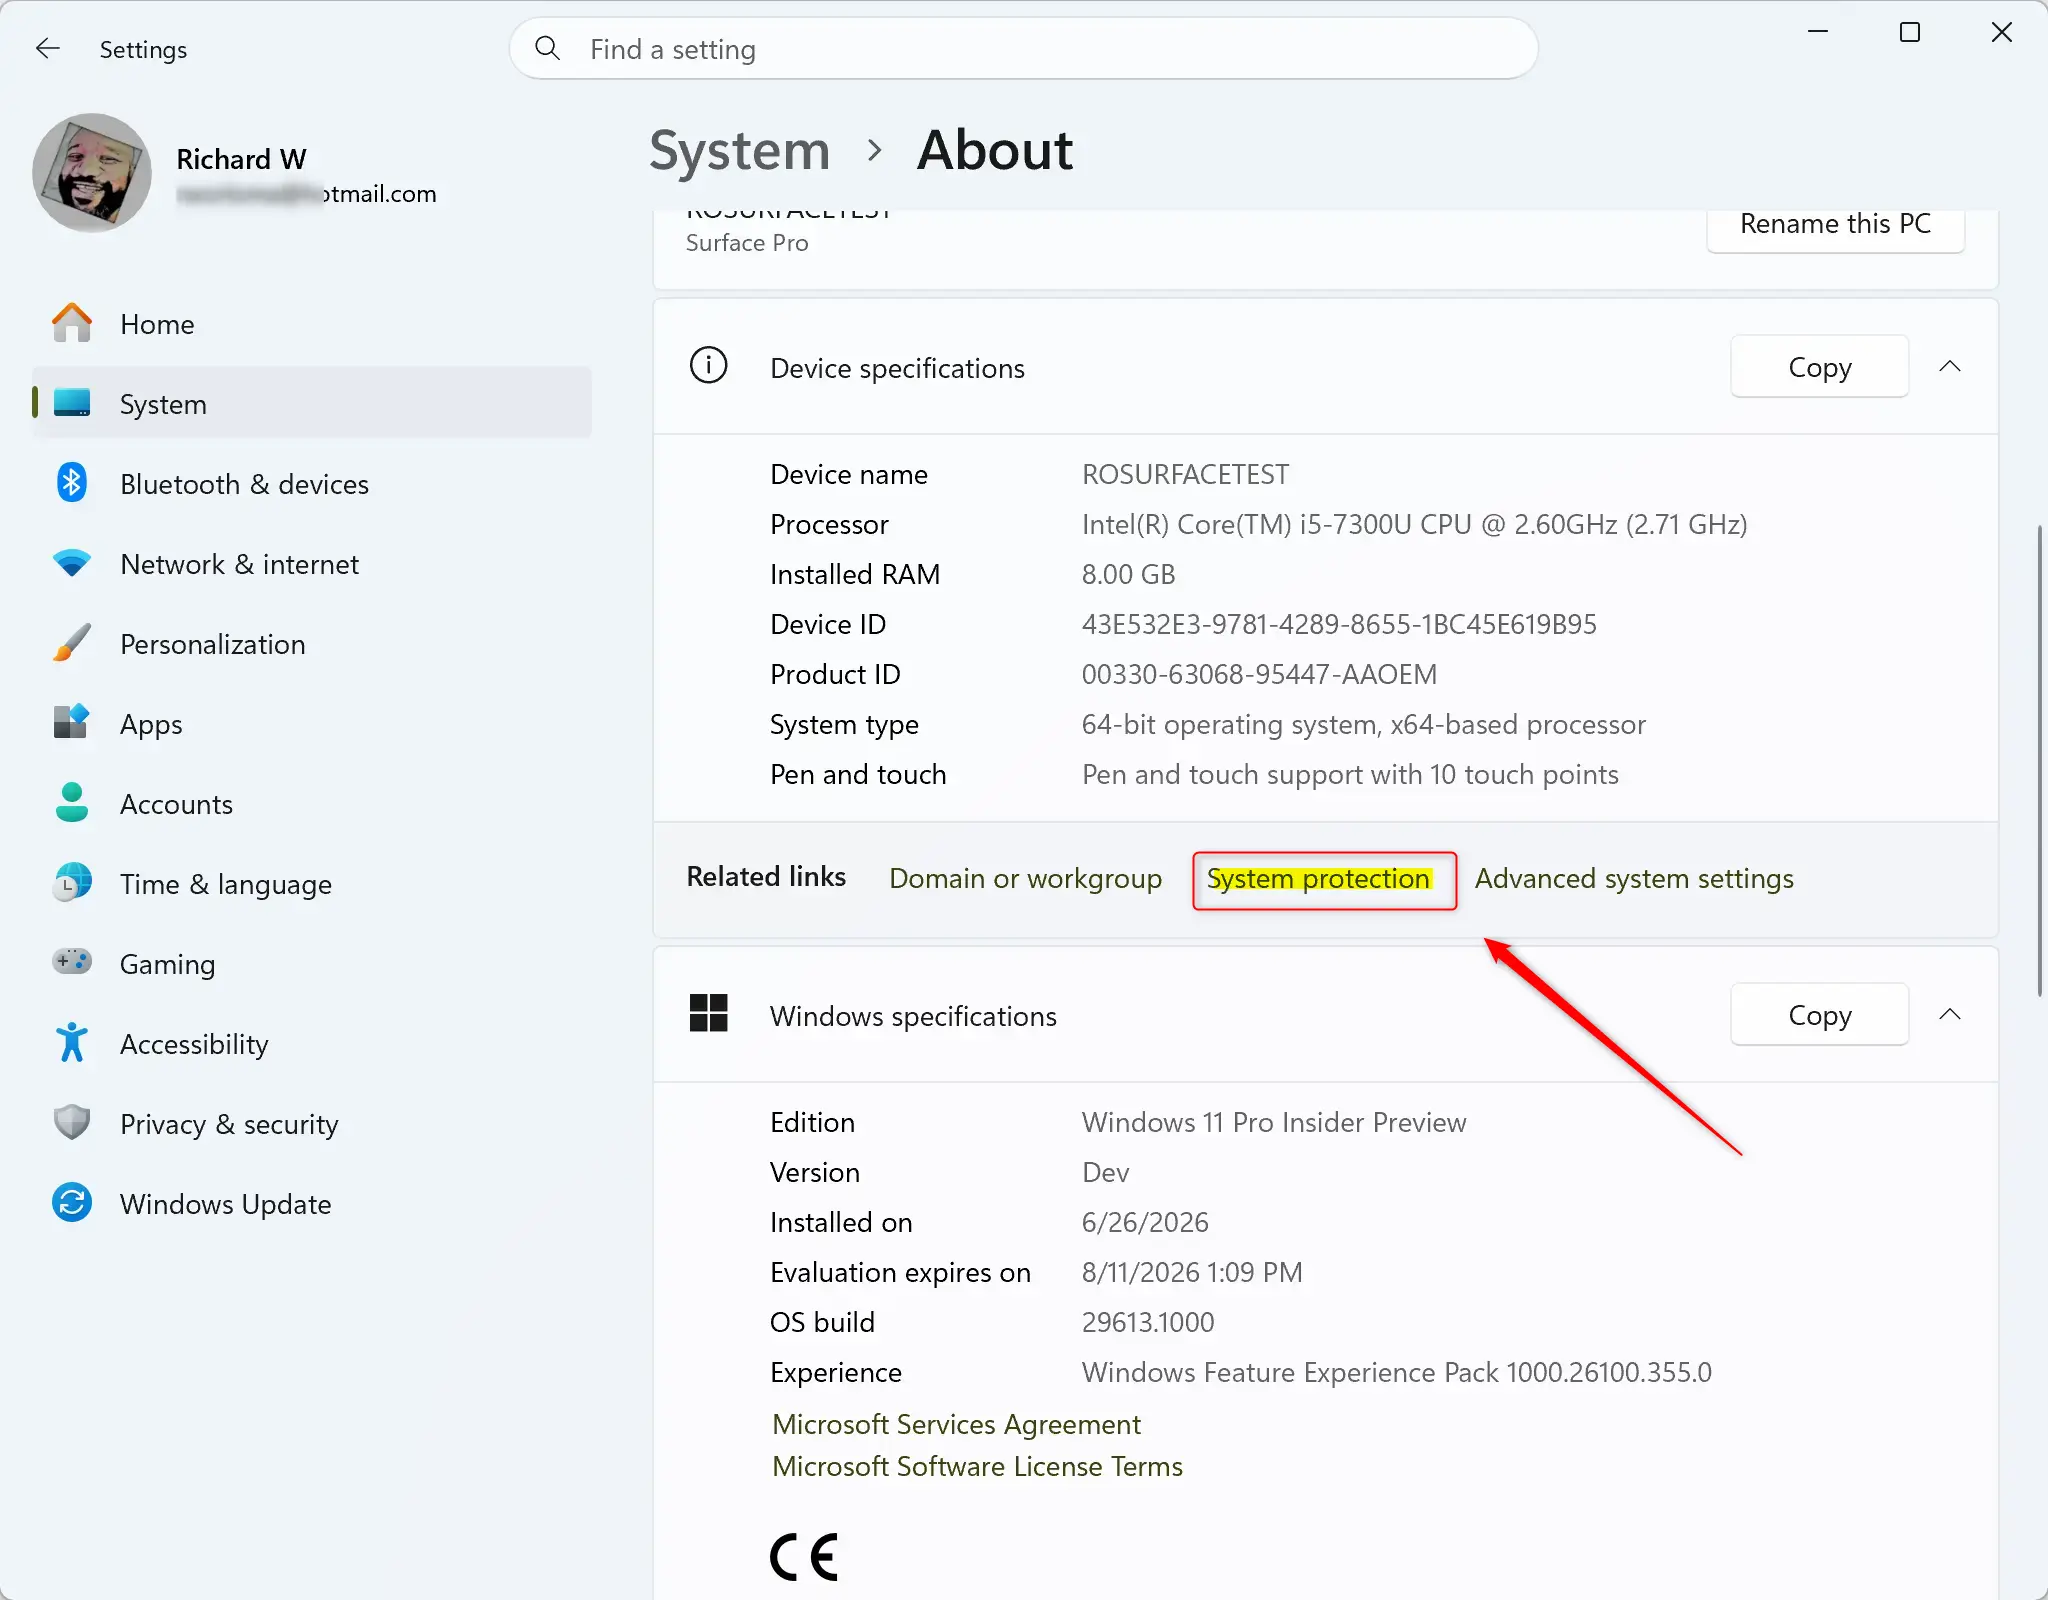
- Click System in the menu on the left. Then click About on the right side. You will see your device name and Windows specifications.
- Click the System protection link, found under the related links on the About page. The System Properties window opens on the System Protection tab. You can close the Settings app now if you wish.
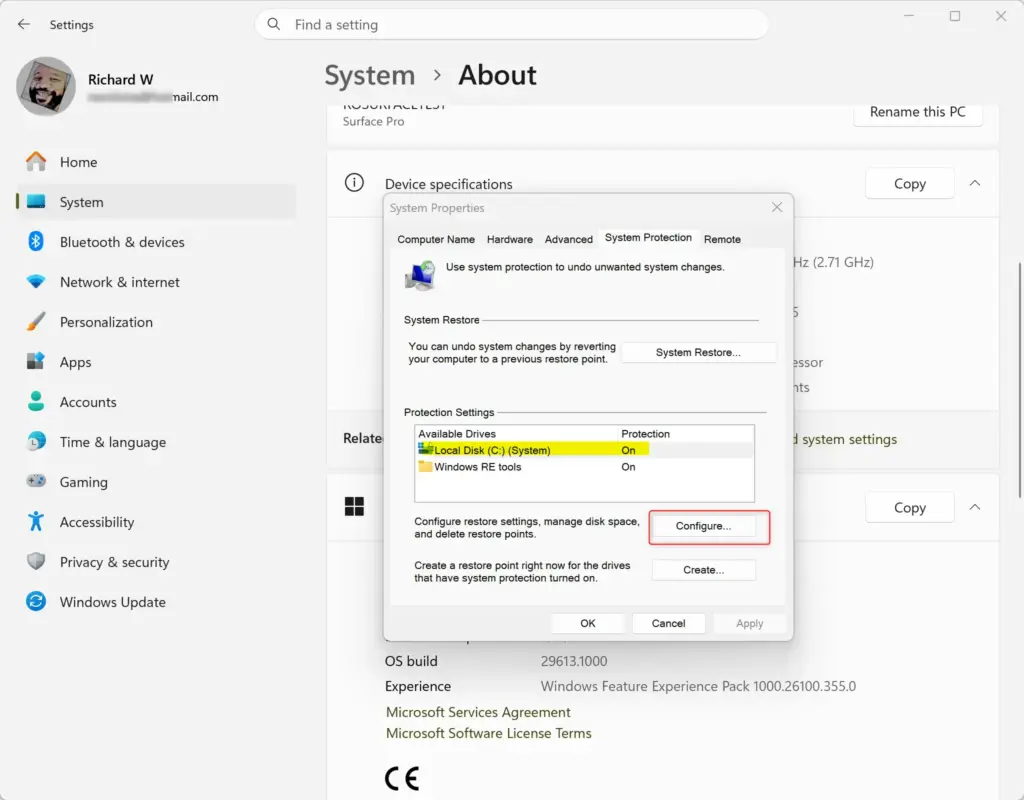
- Under Protection Settings, choose a drive that has protection turned on. This is the drive where you want to delete all restore points. Then click the Configure button.
- Restore points from Point-in-time restore are only on your main system drive (C:).
- Restore points from System Restore can be on any drive that has protection turned on.
- If a drive shows protection as Off, it has no System Restore points to delete, and the Configure button will not help you clear anything there.
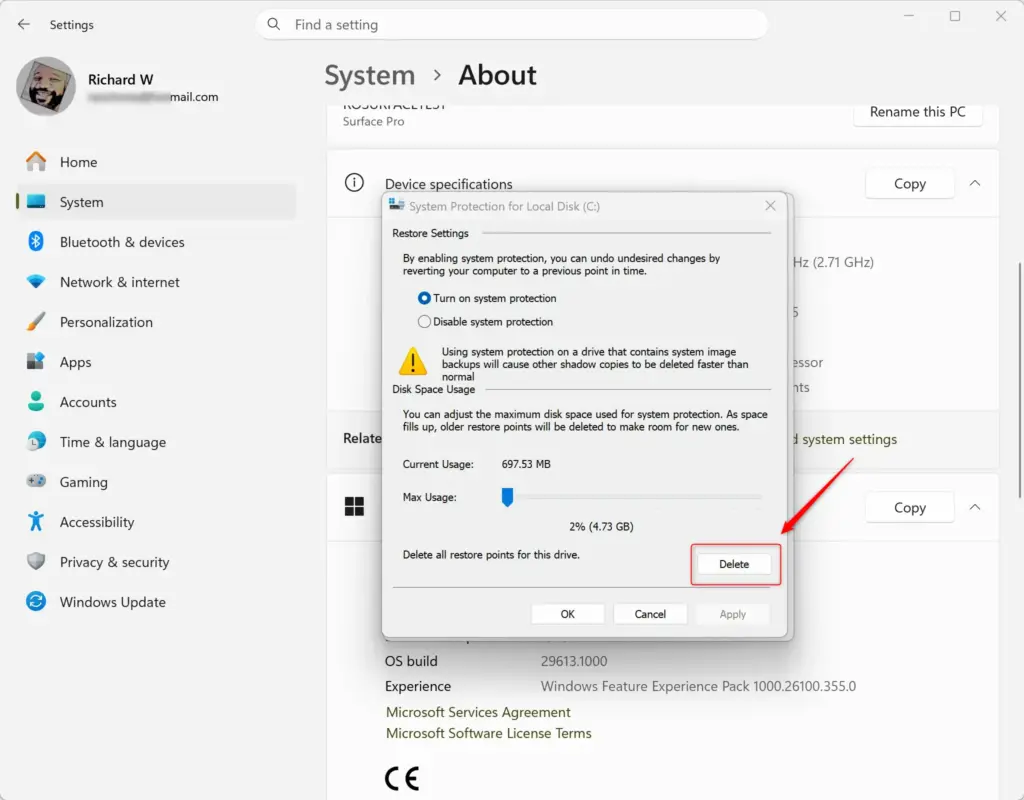
- Click the Delete button. This sits under Disk Space Usage. Windows asks you to confirm.
- Admin privilege required: Click Continue to confirm that you want to delete them. The deletion starts.
- Click Close when the process is finished.
- Click OK. This closes the Configure window and takes you back to System Properties.
- Check that “Current Usage” for the selected drive is now “0 bytes”. This means all restore points on that drive have been deleted.
- Click OK again to close System Properties.
Protection stays on for the drive after this, so Windows will create new restore points as usual (for example before an update or driver install). To make a new one yourself, go back to the System Protection tab and click Create. No restart is needed.
Option 2Delete All Restore Points on All Drives Using Command Prompt
It frees the most space, but it removes everything. It also deletes any other shadow copies on the PC, including ones that some backup programs and the Previous Versions feature rely on. Use it only if you are sure you want a clean slate.
- Admin privilege required: Open Windows Terminal (Admin). You can right-click the Start button and choose it from the menu. Click Yes if User Account Control asks for permission. Then open the drop-down arrow next to the new-tab (+) button and choose Command Prompt. A Command Prompt tab opens.
- Copy and paste one of the commands below into Windows Terminal (Admin). Then press the Enter key.
- This command will ask you to confirm before deleting:
- vssadmin delete shadows /all
- Or, this command will delete without asking for confirmation:
- vssadmin delete shadows /all /quiet
- If you used the first command, type Y and press Enter when asked to confirm. Windows reports how many shadow copies it deleted. If it says no copies were found, there was nothing to delete.
If the command fails with an access error, the window is not running as administrator. Close it and reopen Terminal with the (Admin) option. No restart is needed afterwards.
Option 3Delete All Restore Points on a Specific Drive Using Command Prompt
Use this method when you want to free space on one drive without touching the restore points on your other drives. The command only affects the volume whose letter you give it.
- Admin privilege required: Open Windows Terminal (Admin). Then choose Command Prompt from the drop-down menu next to the new-tab (+) button.
- Type one of the commands below into Windows Terminal (Admin). Press the Enter key.
- This command will ask you to confirm before deleting:
vssadmin delete shadows /For=(drive letter): /all - Or, this command will delete without asking for confirmation:
vssadmin delete shadows /For=(drive letter): /all /quiet
- This command will ask you to confirm before deleting:
- Replace
(drive letter)in the commands above with the actual letter of the drive (for example, "C") where you want to delete restore points.- Restore points from Point-in-time restore are only on your main system drive (C:).
- Restore points from System Restore can be on any drive that has protection turned on.
- For example, to delete all restore points on the C: drive, run:
vssadmin delete shadows /For=C: /all /quiet
Windows reports how many copies it deleted for that drive. Your other drives are left as they were.
Option 4Delete the Oldest Restore Point on a Specific Drive Using Command Prompt
This method removes only the oldest restore point on a drive. It frees a smaller amount of space, but your newer restore points stay in place, so you can still roll back to a recent state. It is a good choice when you only need a little room.
- Admin privilege required: Open Windows Terminal (Admin). Then choose Command Prompt from the drop-down menu next to the new-tab (+) button.
- Type one of the commands below into Windows Terminal (Admin). Press the Enter key.
- This command will ask you to confirm before deleting:
vssadmin delete shadows /For=(drive letter): /oldest - Or, this command will delete without asking for confirmation:
vssadmin delete shadows /For=(drive letter): /oldest /quiet
- This command will ask you to confirm before deleting:
- Replace
(drive letter)in the commands above with the actual letter of the drive (for example, "C") where you want to delete the oldest restore point.- Restore points from Point-in-time restore are only on your main system drive (C:).
- Restore points from System Restore can be on any drive that has protection turned on.
- For example, to delete the oldest restore point on the C: drive, run:
vssadmin delete shadows /For=C: /oldest /quiet
Run the command again if you want to remove the next oldest one. Each run deletes one restore point.
Option 5Delete a Specific Restore Point Using Command Prompt
This method lets you pick one exact restore point and delete only that one. First you list every restore point to find its unique ID. Then you run the delete command with that ID. It takes a little more care than the other methods, but nothing else is touched.
- Admin privilege required: Open Windows Terminal (Admin). Then choose Command Prompt from the drop-down menu next to the new-tab (+) button.
- Copy and paste the command below into Terminal (Admin). Press the Enter key.
- vssadmin list shadows
- Read the list that appears. It shows all available restore points, each with its own unique "Shadow Copy ID". The list can be long, so scroll up if needed.
- A "ClientAccessible" type means it's a restore point from Point-in-time restore.
- A "ClientAccessibleWriters" type means it's a restore point from System Restore.
- Write down the "Shadow Copy ID" of the restore point you want to delete. For example, it might look like
{c034d8e3-9e5b-47ed-8e56-fd50708045bd}. You can also select the ID with your mouse in Terminal and press Ctrl + C to copy it. - Type one of the commands below into Windows Terminal (Admin). Press the Enter key.
- This command will ask you to confirm before deleting:
vssadmin delete shadows /Shadow=<Shadow Copy ID> - Or, this command will delete without asking for confirmation:
vssadmin delete shadows /Shadow=<Shadow Copy ID> /quiet
- This command will ask you to confirm before deleting:
- Replace
<Shadow Copy ID>in the commands above with the actual Shadow Copy ID you noted in step 4. Remember to include the curly braces{}. - For example, if your Shadow Copy ID is
{c034d8e3-9e5b-47ed-8e56-fd50708045bd}, the command would be:vssadmin delete shadows /Shadow={c034d8e3-9e5b-47ed-8e56-fd50708045bd} /quiet
To check that it worked, run the list command again. The ID you deleted should no longer appear.
Summary
Restore points function as saved snapshots of your computer. They help resolve problems by rolling back to an earlier working state after a bad update, driver or app install. Your personal files are not what they protect, so keep separate backups of documents and photos.
Delete restore points when you need the disk space or want to clear out old ones. Try to keep at least one recent restore point, or create a new one once the cleanup is done.
Have a question about this guide?
Answered by AI from this guide. Good questions may be added to this page — please don't include personal details.
Did this guide fix your problem?

About the Author
Richard
Tech Writer, IT Professional
Richard is a writer at Geek Rewind who turns complex IT tasks into clear, step-by-step guides. He draws on years of hands-on experience in system administration and enterprise IT operations, focusing on Windows, Linux and WordPress: the problems people actually run into, and the fixes that work. His server and WordPress guides come from systems he runs himself. Richard builds and maintains the platform behind Geek Rewind, from its Ubuntu servers and Nginx configuration to its custom WordPress plugins. Many new tutorials start with readers' questions, and he's always glad to answer them in the comments.
No comments yet — be the first to share your thoughts!