How to Change Folder Layout View in Windows 11 File Explorer

File Explorer’s folder layout in Windows 11 controls how you see your files and folders.
You can change this view from small icons to a detailed list to better organize your digital workspace. This change impacts how files appear in each folder you open.
For example, Windows 11 File Explorer shows folders by default using a medium icon view. Adjusting this layout helps you quickly find what you need.
You can change folder layouts in Windows 11 File Explorer by using the scroll wheel with Ctrl, keyboard shortcuts, or the View menu on the command bar. Choose from options like List, Details, or Large icons to organize your files.
Change Folder Layout View using a Scroll Wheel
You can quickly change how your folders look in Windows 11 File Explorer using your mouse scroll wheel. Open the folder you want to adjust, then press and hold the Ctrl key on your keyboard. Roll your scroll wheel up or down until you see the layout you prefer, then release the Ctrl key.
2. Open the folder you want to change.
3. Press and hold the Ctrl key. Roll your mouse scroll wheel up or down to cycle through layouts. Release the key when you see the view you like.
| Layout View | Keyboard Shortcut |
|---|---|
| Extra large icons | Ctrl+ Shift + 1 |
| Large icons | Ctrl+ Shift + 2 |
| Medium icons | Ctrl+ Shift + 3 |
| Small icons | Ctrl+ Shift + 4 |
| List | Ctrl+ Shift + 5 |
| Details | Ctrl+ Shift + 6 |
| Tiles | Ctrl+ Shift + 7 |
| Content | Ctrl+ Shift + 8 |
Change Folder Layout View using Keyboard Shortcut
1. Open File Explorer (⊞ Win+E).
2. Open the folder you want to change.
3. Press Ctrl + Shift together with a number from 1 through 8. This combination lets you jump directly to specific views, such as Details, List, or Large Icons.
Change Folder Layout View from File Explorer Toolbar
1. Open File Explorer (⊞ Win+E).
2. Open the folder you want to change.
3. Look for the Details or Large icons button in the bottom right corner of the window and click it.

Change Folder Layout View from File Explorer Command Bar
1. Open File Explorer (⊞ Win+E).
2. Open the folder you want to change.
3. Click View on the top command bar. From the list that appears, select the layout you like best.

Change Folder Layout View from Context Menu
1. Open File Explorer (⊞ Win+E).
2. Right-click any empty space inside the folder.
3. Hover your mouse over View and then choose your preferred layout from the options.

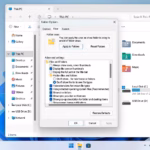
Setting Default Folder Views
When you set a default folder view in Windows 11 File Explorer, all your folders will adopt that same appearance. To make this change, first open any folder, then click the three-dot menu ( … ) on the command bar, and select ‘Options’. Navigate to the ‘View’ tab, and then click ‘Apply to Folders’. This action sets your current view as the standard for all folders of that type.
Customizing Detail Columns
When you’re in Details view, right-clicking any column header lets you add or remove specific information, such as ‘Date Created’ or ‘File Size’. You can also drag these headers left or right to arrange them in your preferred order. This helps you manage your files better.
Summary
You’ve learned how to change your folder layout using the mouse, keyboard, or various menu options. Plus, you now know how to set default views and customize columns for enhanced organization. If you want to learn more about how these settings stick, check out the official Microsoft support page.
Why does 🪟 Windows 11 keep resetting my folder view?
Your Windows 11 folder view might reset if the temporary file storage, also called the folder cache (the temporary storage for folder information), becomes full or corrupted.
How do I make all folders look the same in 🪟 Windows 11?
Open File Explorer and set one folder to your preferred layout. Then, click the three-dot menu ( … ), choose ‘Options’, go to the ‘View’ tab, and click ‘Apply to Folders’. This action tells Windows to apply your current layout settings to every folder on your computer.
Was this guide helpful?

About the Author
Richard
Tech Writer, IT Professional
Richard, a writer for Geek Rewind, is a tech enthusiast who loves breaking down complex IT topics into simple, easy-to-understand ideas. With years of hands-on experience in system administration and enterprise IT operations, he’s developed a knack for offering practical tips and solutions. Richard aims to make technology more accessible and actionable. He's deeply committed to the Geek Rewind community, always ready to answer questions and engage in discussions.


No comments yet — be the first to share your thoughts!