How to Back Up Your Files Using Windows Backup Before Performing a Reset

Windows Backup saves your files, apps, settings, and passwords to OneDrive so you can restore them after you reset your PC. The tool is built into Windows 11 and keeps working in the background once you turn it on. You need to set it up before you wipe your computer, not after.
The main difference between Windows Backup and other backup methods is that it stores everything in your OneDrive account, not on an external drive. Your files stay safe even if your PC is damaged or lost.
Before you reset, know what Windows Backup covers and what it doesn’t. A reset that goes wrong is much harder to fix than one planned in advance. Backing up first takes a few minutes and can save you hours later.
To back up your files in Windows 11, open Settings with Win+I, select Accounts, then select Windows Backup. Next to Back up your files, select Manage sync settings and turn on the toggle for each folder you want synced to OneDrive. Windows Backup covers your five user folders, apps, settings and Wi-Fi passwords, but not files saved elsewhere on your drive.
What Windows Backup Actually Saves (and What It Doesn’t)
It won’t save a copy of Windows itself, your installed drivers, or program files that sit outside your user folders. If you need a full image of your drive, like the old “Backup and Restore (Windows 7)” tool in Control Panel creates, this isn’t it. Windows Backup works at the file and settings level, using your Microsoft account and OneDrive as storage.
What it does back up:
- Your Desktop, Documents, Pictures, Videos, and Music folders — synced to OneDrive so they’re available from any device signed into your Microsoft account.
- A list of your installed apps — Windows remembers what you had installed from the Microsoft Store and reinstalls them automatically after a reset, on a new PC, or when you sign back in.
- Your settings and preferences — things like your desktop background, language settings, and some accessibility options.
- Saved Wi-Fi network names and passwords.
What it does not back up:
- Anything stored outside those five user folders.
- Files on a second drive or partition.
- Browser bookmarks or passwords in a third-party manager.
- Desktop programs you installed manually from outside the Microsoft Store. These appear as shortcut suggestions afterward, not automatic reinstalls.
If your files live elsewhere, say in a folder you created directly on your C: drive, Windows Backup won’t touch them. A reset with “Remove everything” will delete them for good.
Before You Start
- Sign in with a Microsoft account, not a local account. Windows Backup depends on OneDrive, so it needs a Microsoft account attached to your device. If you’re using a local account, go to Settings Accounts Your info and select Sign in with a Microsoft account instead. Follow the prompts, and your account page should then show your Microsoft account email address. If the Windows Backup page is greyed out or won’t let you toggle anything on, this is almost always why.
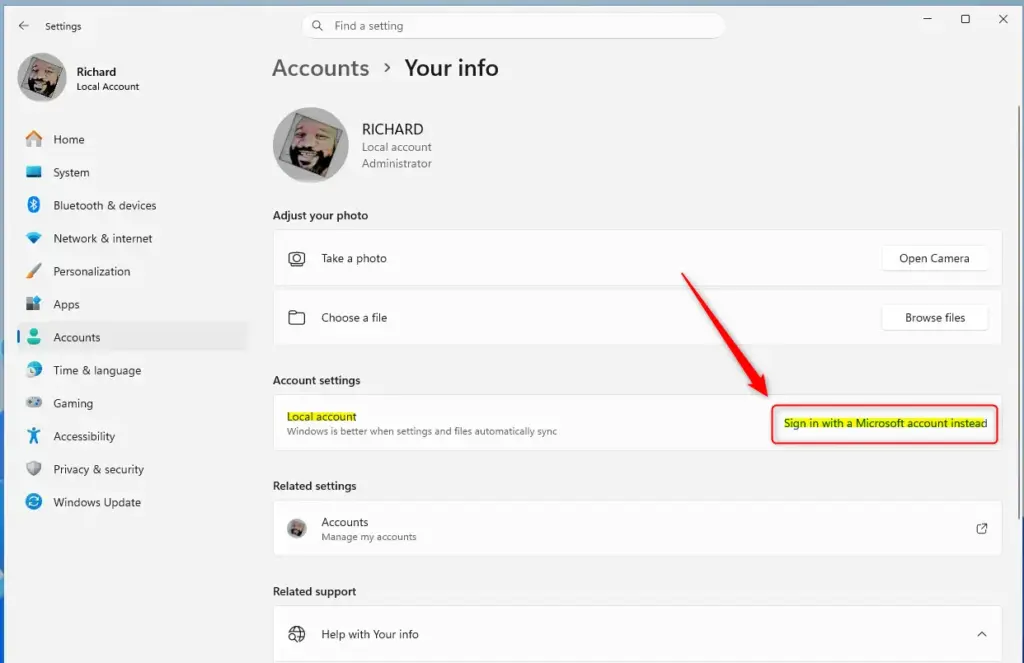
Windows 11 prompt to sign in with a Microsoft account. - Check your OneDrive storage. The free tier gives you 5GB, which fills up fast with large photo or video libraries. Open OneDrive from the system tray (the cloud icon near the clock) and check how much space you’ve used. If you’re running low, see the section below on freeing up space.
- Connect to a stable internet connection. The initial sync can take a while depending on how much you’re uploading. It needs to finish before the reset, so don’t start a reset while files are still uploading. A wired connection or a strong Wi-Fi signal helps with large libraries.
How to Back Up Your Files With Windows Backup
- Open Settings by pressing Win+I.

Windows 11 Start menu with Settings gear icon highlighted. - Select Accounts from the left-hand menu. You’ll see a list of account-related pages including Your info, Email & accounts, and Sign-in options.
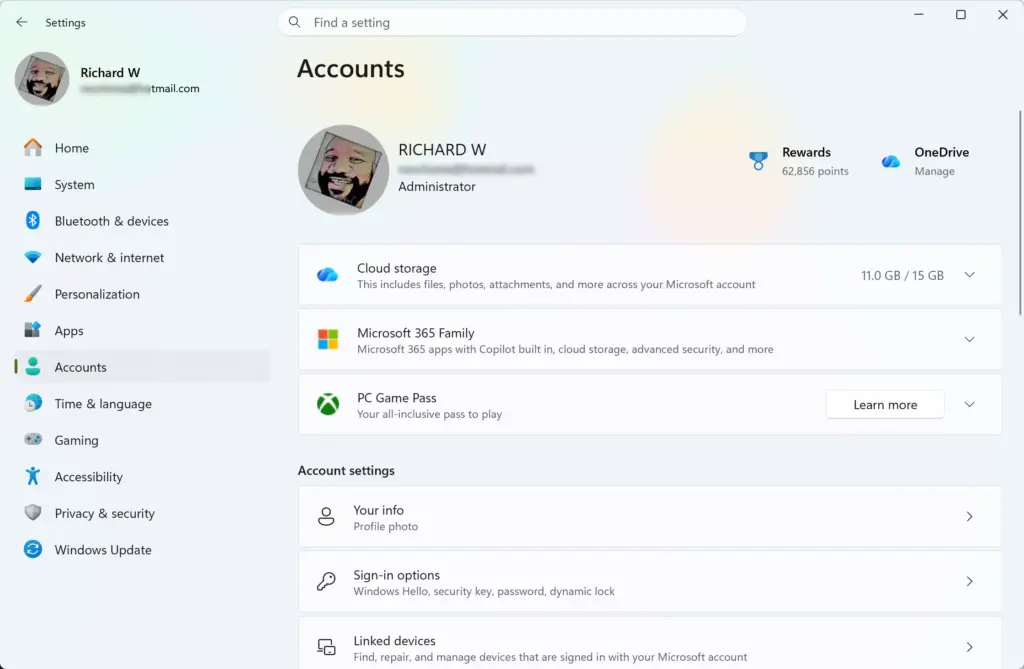
Settings › Accounts - Select Windows Backup. This opens a page with a summary of what’s currently being backed up and separate toggles for folders, apps, and settings.
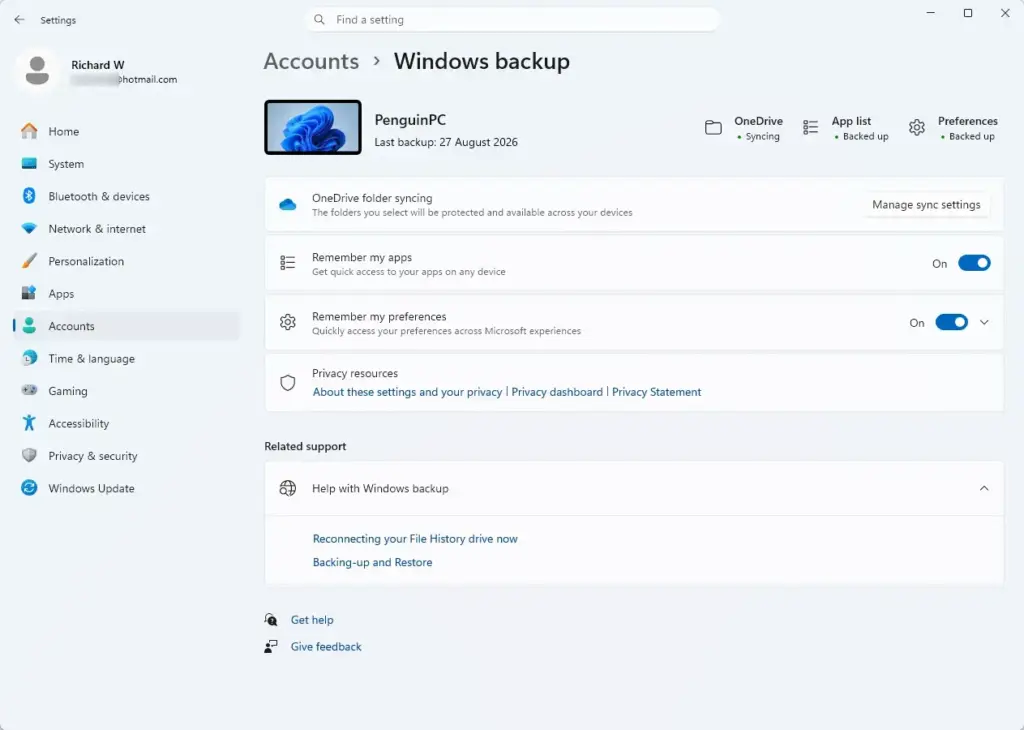
Settings › Accounts › Windows backup - Next to Back up your files, select Manage sync settings. A panel opens listing your Desktop, Documents, Pictures, Videos, and Music folders, each with its own toggle.
- Turn on the toggle for each folder you want synced to OneDrive. Once enabled, Windows starts uploading the contents of that folder right away. You’ll see a progress indicator on the OneDrive icon in the system tray .
- Close the panel once all the folders you need are toggled on. The Windows Backup page now shows those folders as actively syncing.
If a folder toggle won’t turn on, it usually means OneDrive isn’t signed in or is paused. Open the OneDrive icon in the system tray and look for an error message. Sign back in if prompted, then try the toggle again.
How to Back Up Apps, Settings, and Passwords
- On the same Windows Backup page in Settings, find the toggle for Remember my apps and turn it on if it isn’t already. This saves a list of your Microsoft Store apps so they reinstall automatically later.
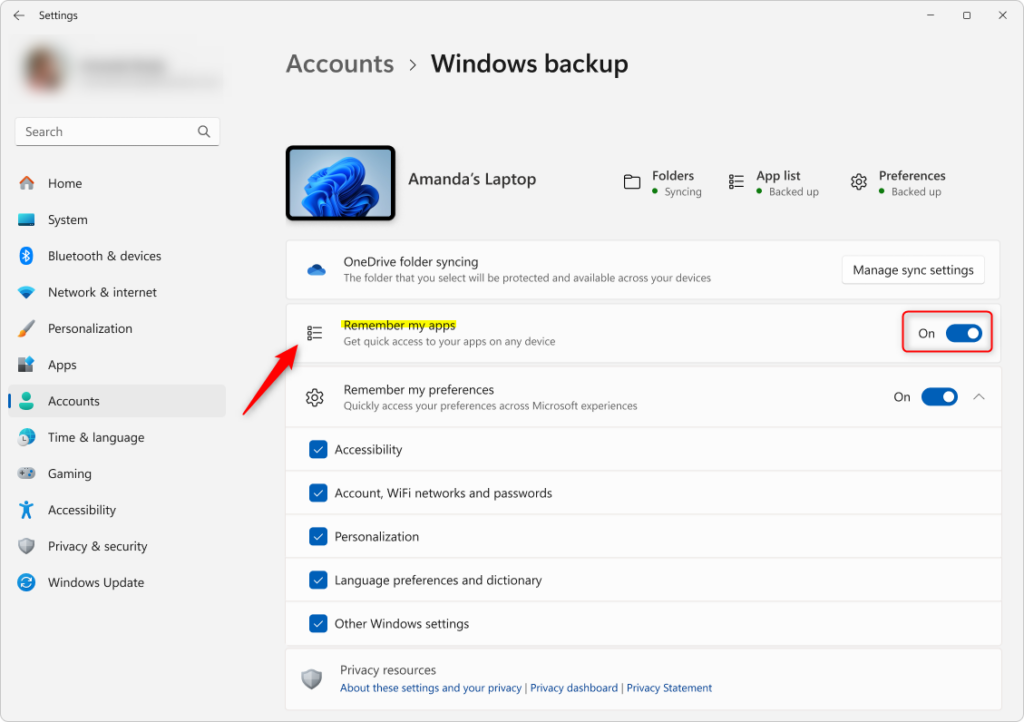
Windows 11 backup settings: 'Remember my apps' button highlighted. - Turn on Remember my preferences to include things like accessibility settings, your desktop theme, and language preferences.
- Turn on Remember my Wi-Fi network passwords if you don’t want to re-enter every saved network password by hand after the reset.
These three toggles are separate from file syncing. You can turn them on even if you decide not to back up your folders to OneDrive. If you’re about to reset the PC, though, there’s little reason not to enable all of them.
How to Check That Your Backup Finished
- Select the OneDrive icon in the system tray . Click the small arrow to show hidden icons if you don’t see it.
- Look at the sync status. A spinning arrows icon means files are still uploading. A green checkmark means all your files have finished uploading.
- Open File Explorer and go to one of your synced folders, such as Documents. Each file should show a green checkmark badge once it’s fully backed up. A blue cloud icon means the file exists online but hasn’t finished syncing, or is set to download-on-demand rather than stored locally.
Don’t start the reset while you still see the spinning sync icon. If it’s stuck and not moving, pause and resume syncing from the OneDrive icon’s settings menu, or restart the OneDrive app. Then check the status again before you go on.
What to Do If OneDrive Storage Is Full
If OneDrive shows you’re out of space, Windows Backup will stall partway through and you’ll get a notification that files couldn’t be uploaded. You have three options:
- Remove or move files you don’t need backed up out of the synced folders temporarily.
- Buy more OneDrive storage or upgrade to a Microsoft 365 subscription, which includes a much larger storage allowance.
- Back up the overflow manually. Copy anything that won’t fit onto a USB drive or external hard drive instead, since Windows Backup can’t split a backup across cloud and local storage.
Backing Up Files Windows Backup Doesn’t Cover
Before you reset, go through your drive manually for anything outside the five default folders. Check for:
- Files saved directly to 📁C:\
or to a custom folder you created outside Documents, Pictures, Music, or Videos. - Email stored locally in a desktop mail client rather than a web-based service.
- Game saves, which are often buried in AppData rather than in your user folders.
- Browser bookmarks and saved passwords, if you don’t already sync your browser to an account.
- License keys or installers for desktop software you bought outside the Microsoft Store. Windows Backup won’t remember these, and you’ll need to reinstall and reactivate them manually.
Copy anything in this category to an external drive or a separate cloud folder before you move on to the reset.
How to Reset This PC After Your Backup Is Done
Resetting your PC removes your current Windows installation and, depending on the option you pick, some or all of your personal files. This step needs an administrator account. If you’re on a shared PC and signed in with a standard account, you’ll need to enter admin credentials when prompted.
Anything that isn’t in OneDrive or on a separate drive is gone and can’t be recovered afterward. Before you go any further:
- Confirm the backup is finished. OneDrive should show a green checkmark, and your files should show as backed up in File Explorer .
- Have your BitLocker or device recovery key ready. If device encryption is on, Windows may ask for it during the reset, and without it you can be locked out.
- Make sure you know your Microsoft account email and password, and have access to whatever you use for two-step verification. You’ll need them to sign in and restore after the reset.
If the problem is only that Windows is misbehaving, you may not need a reset at all. Windows Update can repair the system and keep your files, apps, and settings. Go to System Recovery and look for Fix problems using Windows Update . Select Reinstall now and let it finish. Try this first if it’s offered. It’s much less drastic than a reset. The option may not appear on older Windows 11 builds.
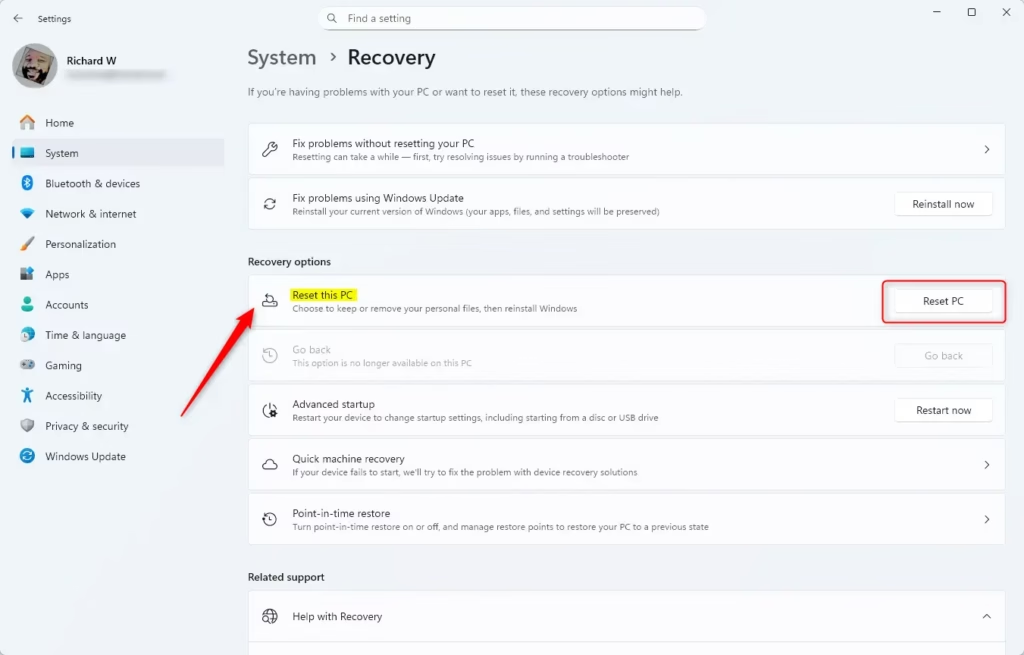
- Open Settings and go to System Recovery
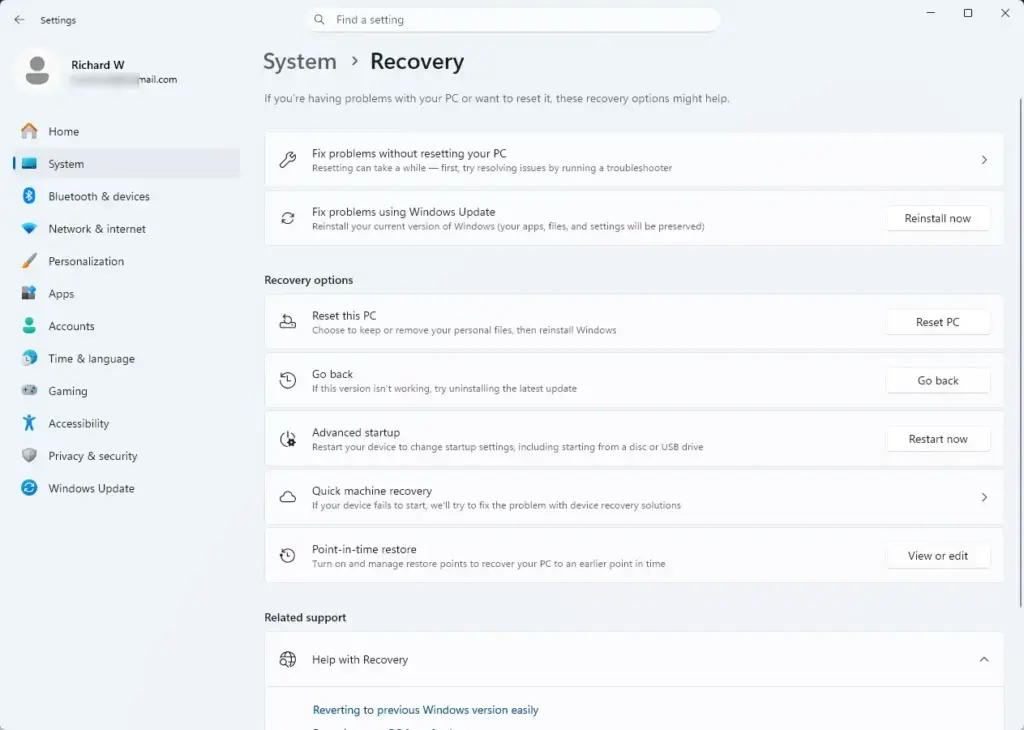
Settings › System › Recovery - Next to Reset this PC, select Reset PC. A window opens asking how you want to reset.
- Choose Keep my files to remove apps and settings but leave your personal files in place, or Remove everything to wipe the drive completely. If your files are already safely in OneDrive, “Remove everything” is the more thorough option and the one that best clears out whatever problem prompted the reset.
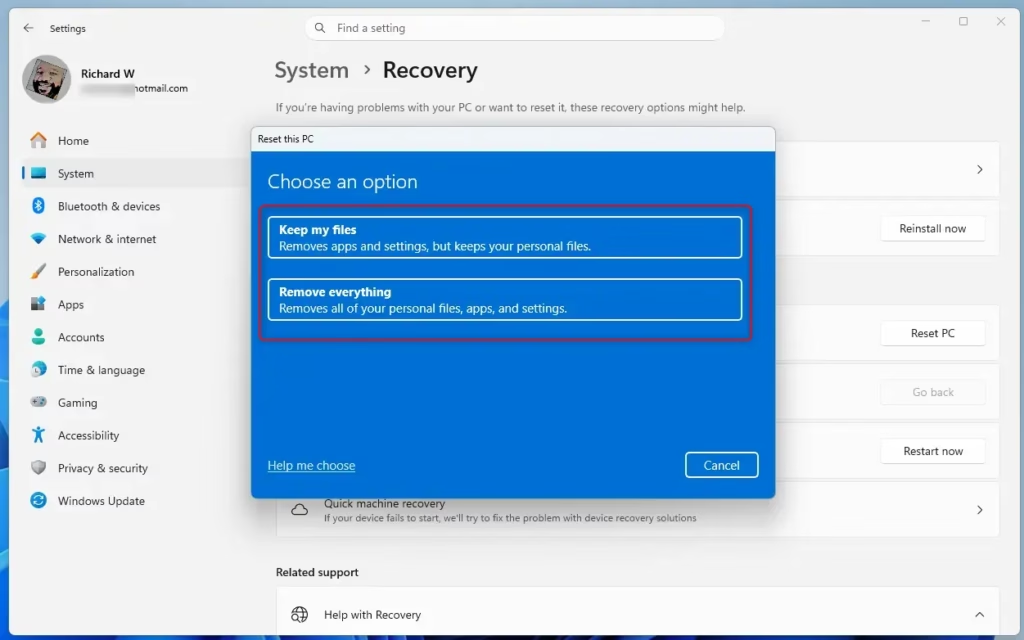
Windows 11 reset option: keep files or remove everything. - Choose how to reinstall Windows. Cloud download pulls a fresh copy of Windows from Microsoft. It needs an internet connection and downloads several gigabytes, but it avoids problems in the existing system files. Local reinstall rebuilds Windows from the files already on your PC and doesn’t need a download. If you suspect the current installation is damaged, Cloud download is usually the better pick.
- Follow the remaining prompts to confirm your choice and start the reset. Your PC restarts several times during this process. Don’t turn it off, and keep a laptop plugged in.
How to Restore Your Files After the Reset
- After the reset finishes, work through the setup screens and sign in with the same Microsoft account you backed up with. The restore only works for that account.
- When the setup screen offers Restore from this PC backup, select it and choose the backup for your PC. Windows then restores your settings and your remembered apps. If you skip this screen, you can still open the OneDrive app afterward and sign in to start syncing your folders back down.
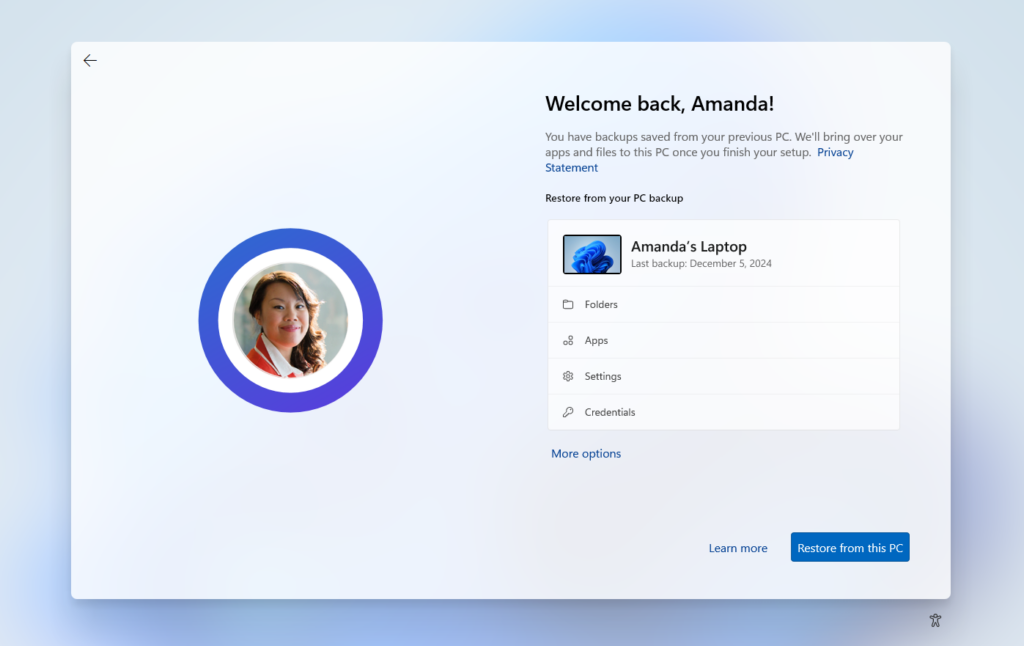
Windows 11 backup restore screen showing options to restore files and settings. - Give OneDrive time to download everything. Large photo or video libraries can take a while depending on your connection speed.
- Check the Start menu for your remembered apps. They show up as placeholders first and are then installed from the Microsoft Store, so some may take a few minutes to become usable. You can also open the Microsoft Store app to see progress. This only works if you had the Remember my apps toggle turned on before the reset.
How to Undo Windows Backup Syncing
If you want to stop backing up a folder, for example because OneDrive storage runs low, go back to Settings Accounts Windows Backup Manage sync settings and turn off the toggle for that folder. This stops new files from uploading. Files already copied to OneDrive stay there until you delete them from OneDrive directly. Turning off a folder toggle doesn't delete anything already on your PC.
What to Do Next
Once your files, apps, and settings are confirmed backed up, you're ready to run the reset without worrying about what you'll lose. If you'd rather have a complete image of your drive instead of a file-level backup, look at the older Backup and Restore (Windows 7) tool in Control Panel or third-party imaging software, since Windows Backup won't cover a full system restore. And if OneDrive sync keeps stalling during the backup, check your storage plan and connection before you try the reset again rather than forcing it through.
Frequently asked questions
Does 🪟 Windows 11 have a Backup and Restore program?
Yes. Windows 11 includes Windows Backup, which saves your files, apps, settings, and passwords to OneDrive. It runs automatically once enabled. There's also Backup and Restore (Windows 7) in Control Panel, but it's an older tool. Windows Backup is the current built-in option.
How do I backup my entire computer in 🪟 Windows 11?
Open Settings, go to Accounts Windows Backup, and turn on the folder syncing and Remember my preferences toggles. Windows Backup then saves your files, apps, settings, and passwords to OneDrive. However, this isn't a complete drive image—it won't back up Windows itself or program files outside your user folders.
Will I lose everything if I restore from a backup?
No. Restoring from a backup only recovers the files and settings that were backed up. You won't lose data that existed before the backup was created. Windows Backup saves your files to OneDrive, so they're separate from your PC and safe during a reset.
What is the difference between Backup and Restore?
Backup stores copies of your files and settings for safekeeping. Restore puts them back on your computer. Windows Backup copies to OneDrive; Backup and Restore (Windows 7) creates a complete drive image. Backup copies your data on an ongoing basis (for synced folders); Restore is a one-time action to recover lost data.
Still have a question?
Answered by AI from this guide. Good questions may be added to this page — please don't include personal details.
Did this guide fix your problem?

About the Author
Richard
Tech Writer, IT Professional
Richard is a writer at Geek Rewind who turns complex IT tasks into clear, step-by-step guides. He draws on years of hands-on experience in system administration and enterprise IT operations, focusing on Windows, Linux and WordPress: the problems people actually run into, and the fixes that work. His server and WordPress guides come from systems he runs himself. Richard builds and maintains the platform behind Geek Rewind, from its Ubuntu servers and Nginx configuration to its custom WordPress plugins. Many new tutorials start with readers' questions, and he's always glad to answer them in the comments.
No comments yet — be the first to share your thoughts!