How to Move the Windows Page File to Another Drive

The page file is a hidden system file (pagefile.sys) that Windows uses as overflow memory when physical RAM fills up. Moving it to another drive can free space on a full C: drive, or spread disk wear across several storage devices. Windows manages this file automatically by default. Moving it means working through a few older System Properties dialogs.
Before you start, check three things:
- You are signed in with an administrator account. Without one, you can’t change the page file settings.
- You know the exact drive letter of the drive you want to use.
- The destination is an internal, fixed drive formatted as NTFS, and it has enough free space. It cannot be a USB or other removable drive, or a network location. Ideally it is a fast SSD, because a slow drive makes the whole system feel slower whenever Windows pages memory out.
Open System Properties, select Advanced, then Performance Settings, then Advanced, and click Change under Virtual memory. Untick Automatically manage paging file size for all drives, select your system drive and choose No paging file (or keep a small one), then select the new drive, pick System managed size, click Set, and restart.
How to Access Virtual Memory Settings
The page file settings sit inside the Performance Options window, which you reach from System Properties. There are two ways to open System Properties. Either one gives you the same window.
- Open the Start menu , type
View advanced system settings, and press Enter. The System Properties window opens.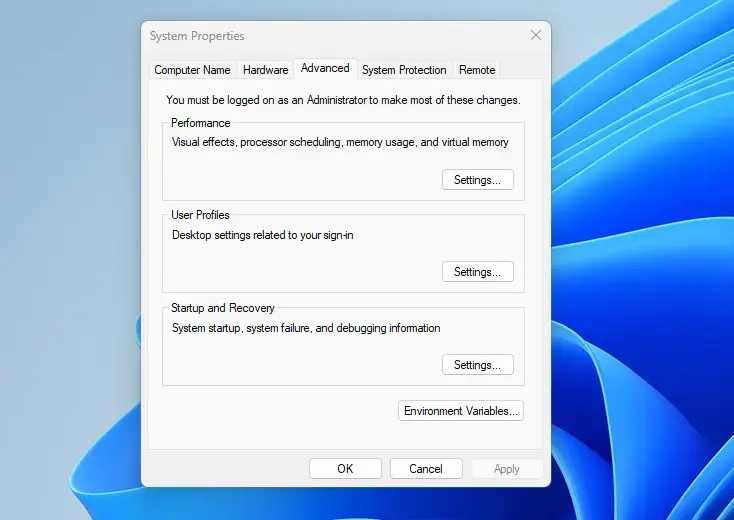
- Select the Advanced tab at the top of the window.
- In the Performance section, click Settings. The Performance Options window opens.
- Select the Advanced tab in the Performance Options window.
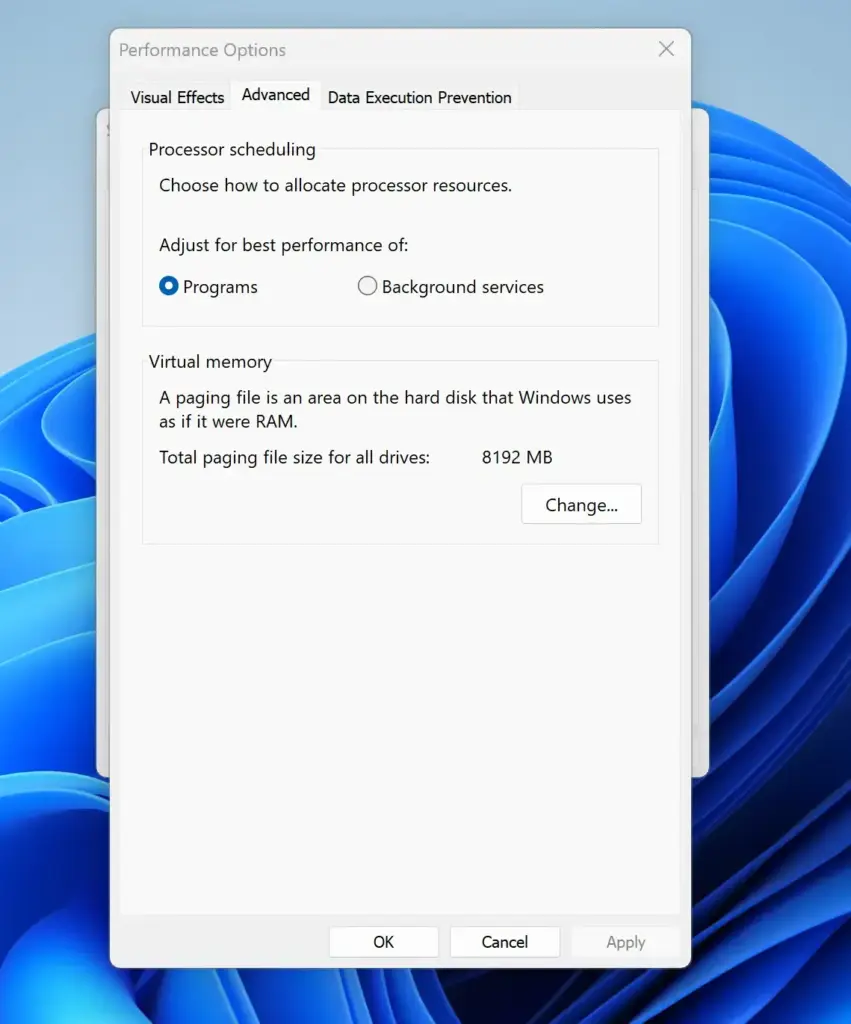
- In the Virtual memory section at the bottom, click Change. The Virtual Memory window opens, listing your drives.
Alternatively, go through Settings. Open Settings System About and click Advanced system settings under Related links. You can also press Win+R, type sysdm.cpl, and press Enter. Both routes open System Properties on the same window as above, so continue from step 2.
Disabling Automatic Page File Management
Windows won’t let you place the page file by hand while automatic management is on. Turn it off first.
- Open the Virtual Memory window using the steps in the previous section.
- Clear the check box next to Automatically manage paging file size for all drives at the very top of the window.
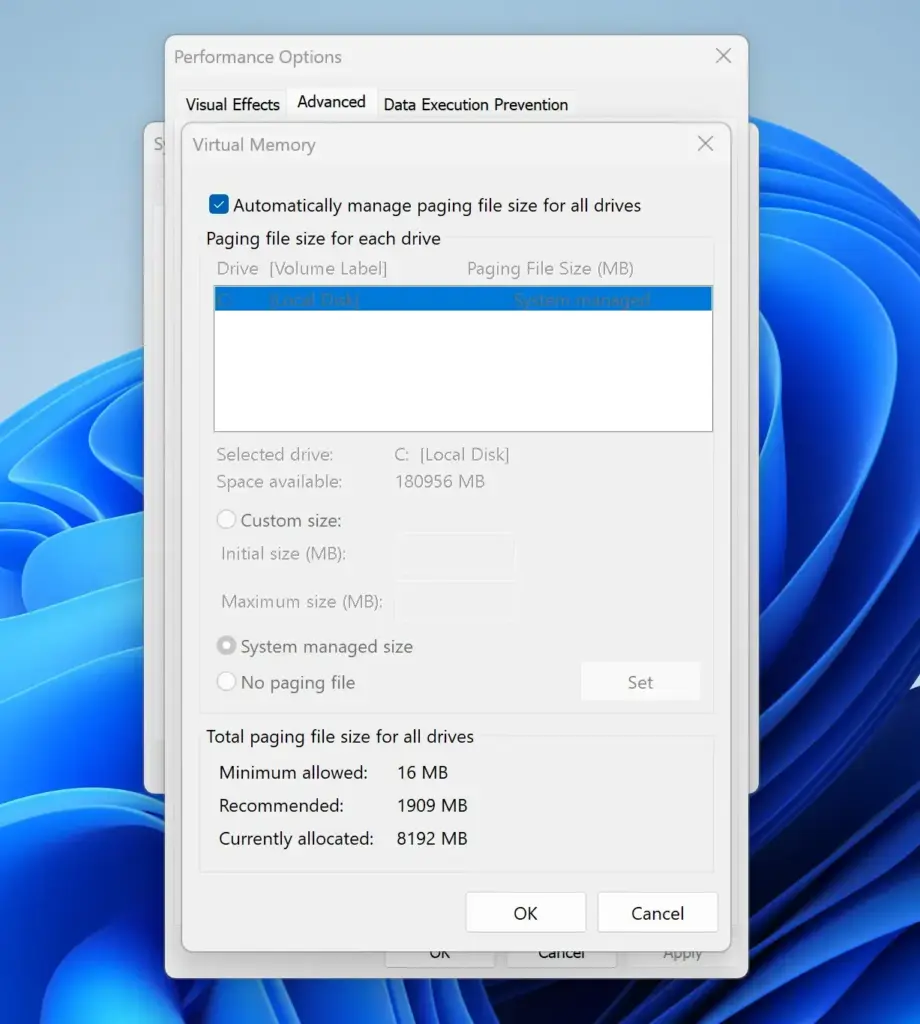
The drive list and the size options below it should now be available. If they stay greyed out, you are probably not signed in as an administrator.
To undo everything later, return to this window and tick the same check box again. Windows will go back to managing the page file itself.
Removing the Page File From Your Current Drive
If Windows has no page file on C:, it may not be able to write a full or kernel crash dump after a blue screen. Some apps also expect a page file on C:. The safer approach is to keep a small page file on C:, or leave C: set to System managed size, and put the main page file on the new drive. Only choose No paging file for C: if you accept those trade-offs.
If you do want to remove the page file from C:, follow these steps:
- Click your original system drive (typically C:) in the drive list in the Virtual Memory window.
- Select the No paging file radio button.
- Click Set next to the drive list. The list now shows "None" for that drive. Windows may show a warning about system performance and crash dumps. Read it, then confirm only if you are sure.
- Click Apply if prompted, but do not restart your computer yet.
Don't restart yet. If you did, Windows would have no page file configured on any drive.
Creating the Page File on the New Drive
Now tell Windows to use the new drive. Make sure you click Set before you click OK. Otherwise the change is not saved.
- Click your target secondary drive letter in the drive list in the Virtual Memory window.
- Select the System managed size radio button. Or select Custom size and enter your own Initial size (MB) and Maximum size (MB) in megabytes.
- Click Set next to the drive list. The drive's entry in the list should now show the size setting you chose.
- Click OK at the bottom of the Virtual Memory window.
- Click OK in the Performance Options window, then OK in the System Properties window.
Windows may tell you that you need to restart for the changes to take effect. That is expected.
Restarting Your Computer
Windows keeps the page file locked while it is in use. It can't release the old file or start using the new one until the system reboots.
- Save any open work in your applications.
- Open the Start menu, click the Power icon, and select Restart. Use Restart rather than Shut down. With Fast Startup enabled, a full shutdown may not apply the change the same way.
Verifying the Move
After the restart, confirm that the file landed on the new drive. You can check the drive itself, the settings window, or both.
- Open File Explorer and open your destination drive to look for pagefile.sys. The file is hidden, so you may need to enable "Show hidden files, folders, and drives" and clear "Hide protected operating system files (Recommended)" in File Explorer's View Show options and Folder Options. Re-enable the protected-files option afterwards.
- Return to the Virtual Memory settings window to verify that the active allocation points to the new drive letter. If you kept a small page file on C:, expect to see both drives listed.
Optimizing Page File Sizes on Secondary Drives
Choose the size setting based on how much room the new drive has. System managed size lets Windows decide, and it grows or shrinks the file as needed. Custom size lets you set fixed minimum and maximum values. A custom size helps if the secondary drive has limited storage, because it stops the page file from taking more space than you can spare. Don't set it too small, though. A page file that is too small can cause low-memory warnings or app crashes when RAM runs short.
You can change these values at any time by reopening the Virtual Memory window. A restart is usually needed for size changes to take effect, especially after reducing the size.
What to do next
You should now see the new allocation in your system performance properties, and your primary drive should have recovered space. Next, consider configuring Storage Sense (a tool that automatically frees up space) or reviewing your installed applications to free up more capacity.
Have a question about this guide?
Answered by AI from this guide. Good questions may be added to this page — please don't include personal details.
Did this guide fix your problem?

About the Author
Richard
Tech Writer, IT Professional
Richard is a writer at Geek Rewind who turns complex IT tasks into clear, step-by-step guides. He draws on years of hands-on experience in system administration and enterprise IT operations, focusing on Windows, Linux and WordPress: the problems people actually run into, and the fixes that work. His server and WordPress guides come from systems he runs himself. Richard builds and maintains the platform behind Geek Rewind, from its Ubuntu servers and Nginx configuration to its custom WordPress plugins. Many new tutorials start with readers' questions, and he's always glad to answer them in the comments.
No comments yet — be the first to share your thoughts!