How to Move the Windows 11 Paging File to a Secondary SSD

Moving the Windows 11 paging file to a secondary SSD frees up valuable space on your main C: drive and speeds up data access when your physical memory runs low. The paging file is a hidden system file that acts as virtual RAM, storing temporary data from active apps when your 8GB or 16GB of physical memory fills up.
Windows normally manages this virtual memory automatically on your primary boot drive, but shifting it to a faster second solid-state drive helps balance system workloads. Open the Advanced system settings window to change the drive assignment and give your primary storage some breathing room.
- Saves Space: Paging files can take up gigabytes of precious space on your main drive. Moving it frees up room for your operating system and games.
- Balances the Workload: Using two separate drives for system tasks and temporary files keeps your computer running smoothly.
- Maintains Speed: Modern SSDs are very fast. Moving the file to a secondary SSD ensures your computer can still read and write temporary data quickly.
Open the Start menu , type View advanced system settings, click Settings under Performance, go to the Advanced tab, click Change under Virtual memory, uncheck automatic management, select your main drive, and choose No paging file to move it to a secondary SSD.
How to Check Your Current Paging File Settings
Checking your current paging file settings in Windows 11 takes just a minute through the System Properties window. Open Start , type view advanced system settings, and press Enter. Click Settings under the Performance section on the Advanced tab, then click Change on the Advanced tab to see which drive currently holds your virtual memory file and how large it is.
- Click the Start button on your taskbar .
- Type View advanced system settings into the search box.
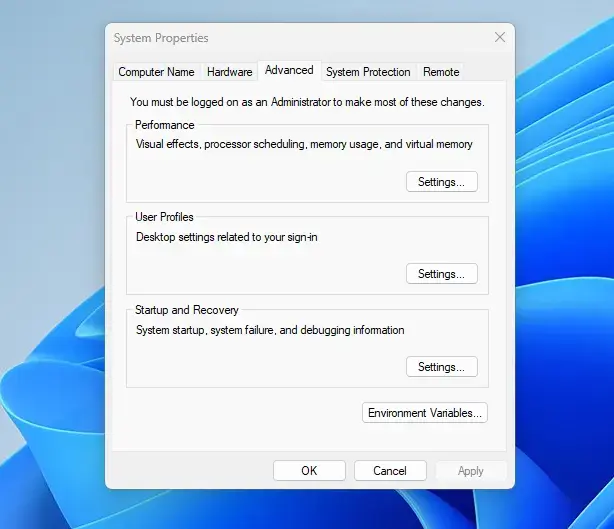
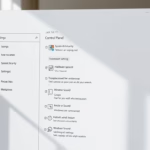
System Properties - Click on the result that says View advanced system settings with a control panel icon next to it.
A small window will pop up. Make sure you are on the Advanced tab at the top.
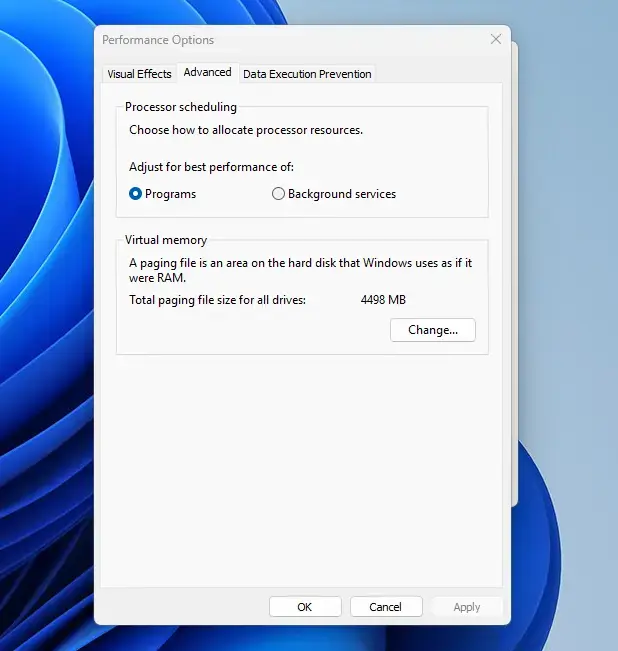
Look for the Performance section near the top of the window. Click the Settings button inside that section.
Another window will pop up. Click on the Advanced tab inside this new window.
Look for the Virtual memory section near the bottom. Click the Change button.
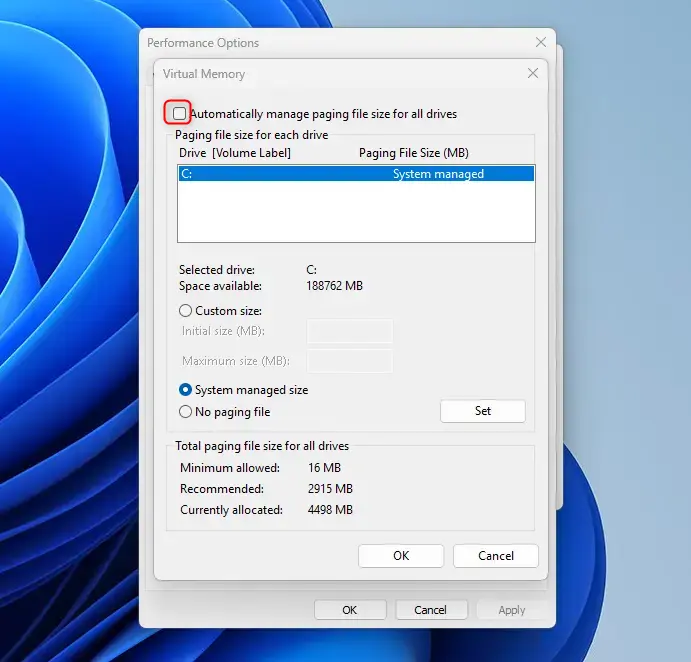
You will now see a list of your computer drives and their current paging file sizes. At the bottom of this window, look for the total paging file size currently recommended and allocated for your system.
Step-by-Step Guide: How to Move the Paging File to a Secondary SSD
Moving the paging file to a secondary SSD in Windows 11 requires you to open the Virtual Memory window, turn off automatic sizing, remove the file from your main drive, and set up a new one on your second drive. This process frees up storage space on your primary drive by shifting virtual memory tasks to your secondary solid-state drive.
- Open the Virtual Memory window by following the steps in the previous section.
- Look near the top of the window and uncheck the box that says Automatically manage paging file size for all drives. Unchecking this box allows you to make manual changes.
- In the drive list, click on your main drive (usually labeled C:).
- Below the drive list, select the option for No paging file.
- Click the Set button next to the drive list. If a warning box pops up asking if you are sure, click Yes. This removes the paging file from your main drive.
- Next, click on your secondary SSD in the drive list (for example, drive D:).
- Select the option for System managed size or Custom size. Choosing system-managed size lets Windows pick the best size automatically.
- Click the Set button again.
- Click the OK button at the bottom of the virtual memory window.
Click Restart Now to finish the process.
When your computer turns back on after you restart the system, Windows 11 will use the secondary solid-state drive (SSD) for all virtual memory needs. This change frees up space on your main C drive, which helps your computer run faster and gives Windows more room to store temporary data efficiently.
Choosing the Right Paging File Size (Custom vs. System Managed)
When you set up your paging file on the secondary drive, you must decide how big it should be. You have two main choices:
System Managed Size
A system managed paging file size lets Windows 11 automatically control your virtual memory based on your installed RAM and current app usage. This option prevents out-of-memory errors without requiring you to calculate custom storage limits manually, making it the safest choice for most users moving their pagefile to a second drive.
Custom Size
Setting a custom size for your paging file lets you manually type in exact starting and maximum megabyte values for your virtual memory. This option works best for advanced users who want to prevent Windows from resizing the file automatically or who need to restrict disk space usage on a specific drive partition.
Advanced Tip: Optimizing SSD Health and Wear
Optimizing SSD health and wear when moving a paging file to a secondary drive is unnecessary because modern solid-state drives feature built-in wear-leveling technology. This hardware feature spreads read and write operations evenly across the memory chips, meaning a standard paging file will not wear out your secondary SSD prematurely.
Today's SSDs feature wear-leveling technology. This technology spreads write operations evenly across the entire drive so no single part wears out prematurely. Unless you run heavy video editing software or enterprise servers 24 hours a day, a modern secondary SSD will easily outlive the useful life of your computer, even with an active paging file.
Maintaining drive health on your secondary solid-state drive requires keeping at least 15 to 20 percent of the total storage space empty when you move the Windows 11 paging file. Leaving this free space gives the solid-state drive room to move data around efficiently and keeps your system fast.
Troubleshooting Common Issues After Moving Your Paging File
Troubleshooting common issues after moving your paging file usually involves fixing startup errors like temporary pagefile warnings or boot crashes. You can resolve these problems by verifying your secondary SSD is securely connected, properly recognized by Disk Management, and correctly configured without conflicting pagefile settings on the primary drive.
- "Windows created a temporary paging file" message: This happens if Windows started up and could not find the paging file on your secondary drive. Make sure your secondary drive is plugged in correctly and shows up in File Explorer. Restart your computer.
- System crashes or blue screens: If your computer crashes after moving the file, your custom size might be too small. Go back into the virtual memory settings and change the option to System managed size.
- Drive letter changed: If your secondary drive changes its letter (for example, from D: to E:), Windows will lose track of the paging file. Assign a permanent drive letter using Disk Management to prevent this issue.
Summary
Moving your Windows 11 paging file to a secondary SSD is a simple way to free up storage space on your main drive and manage virtual memory more efficiently. By disabling automatic management, clearing the old file, and creating a new system-managed or custom file on your second drive, you complete the entire transfer safely.
Was this guide helpful?

About the Author
Richard
Tech Writer, IT Professional
Richard is a writer at Geek Rewind who turns complex IT tasks into clear, step-by-step guides. He draws on years of hands-on experience in system administration and enterprise IT operations, focusing on Windows, Linux and WordPress: the problems people actually run into, and the fixes that work. His server and WordPress guides come from systems he runs himself. Richard builds and maintains the platform behind Geek Rewind, from its Ubuntu servers and Nginx configuration to its custom WordPress plugins. Many new tutorials start with readers' questions, and he's always glad to answer them in the comments.

No comments yet — be the first to share your thoughts!