What to Do When Windows 11 Blue Screens After a Graphics Driver Update

- 37 steps
- Needs administrator rights
- Includes a restart or sign-out
A Windows 11 blue screen after a graphics driver update means the new display software clashed with your system. Windows stopped the computer on purpose to protect your files and hardware. This is also called a Blue Screen of Death or BSOD. It usually happens when an installation goes wrong or an incompatible display update is pushed to your machine, sometimes by Windows Update without you asking for it.
You almost certainly do not need new hardware, because the cause is software. There are three main fixes, and they work best in this order:
- Roll back the bad update in Device Manager (a tool for managing hardware).
- Use Safe Mode (a diagnostic state that loads only minimal drivers) to clear out old display files.
- Install a clean copy of your graphics software from scratch.
If Windows still starts, even briefly, you can go straight to the Device Manager section. If it crashes in a loop, start with Safe Mode. A last section covers system file and memory checks, in case the driver was not the real culprit.
If Windows 11 blue screens after a graphics driver update, roll back the driver in Device Manager. Right-click the Start button, choose Device Manager, expand Display adapters, double-click your graphics card, and click Roll Back Driver on the Driver tab. If the PC crashes before you can do this, start Safe Mode from the recovery screen first.
Understanding Why Graphics Updates Cause Blue Screens
Graphics updates cause blue screens when a newly installed display driver clashes with your version of Windows or contains bugs that crash the system. Your graphics card relies on this software to talk to the rest of your hardware, so a faulty driver can freeze the whole machine.
NVIDIA, AMD and Intel all release new graphics drivers regularly. These updates usually fix old bugs or make games run faster, but they can also bring in new errors. If the new driver has a flaw, it can crash the core of Windows 11 and trigger a blue screen.
Two common messages are KERNEL MODE HEAP CORRUPTION and BAD POOL CALLER. Both mean the system’s memory was mishandled, in this case by the new graphics instructions. If you see a different stop code, write it down. It can help you search for a more specific fix later.
Getting Into Safe Mode When Windows Won’t Load Normally
When Windows won’t load normally, you reach Safe Mode through the automatic repair screen. You get there by interrupting the normal boot a few times. Safe Mode starts the PC with only basic files and drivers, so it skips the broken graphics driver and gives you a stable place to work.
Use these steps when your computer is stuck in a blue screen loop:
- Turn on your computer. As soon as you see the Windows logo or your manufacturer’s logo, press and hold the physical power button for about 10 seconds until the machine shuts off.
- Turn the computer back on.
- Repeat the forced shutdown two or three times. Windows counts these failed starts.
- On the third or fourth start, let the computer boot fully. Windows now sees that it failed to start properly several times, so it opens a recovery screen instead of the desktop. This can take a minute or two.
- On the Choose an option screen, click Troubleshoot.
- Click Advanced options.
- Click Startup Settings. If you do not see it, click See more recovery options at the bottom of the screen to find it.
- Click the Restart button.
- When the computer restarts, you will see a numbered list of options. Press the 4 key or the F4 key to choose Enable Safe Mode.
The computer now starts in a basic-looking mode with a black background and low screen resolution. This is normal. You can now work on your graphics software without the machine crashing.
Safe Mode (option 4) does not include internet access. Option 5 or F5, Enable Safe Mode with Networking, does. If you need to download anything, plan ahead and get it before you start. You can also download it on another PC and copy it over on a USB drive.
Rolling Back Your Graphics Driver in Device Manager
Rolling back the driver in Device Manager is the quickest fix, because Windows usually keeps a copy of the previous driver when it installs a new one. You open your display adapter's properties and click the rollback button to restore the earlier, stable version. You can do this in normal Windows if it still starts, or in Safe Mode if it does not.
Follow these steps:
- Right-click the Start button on your taskbar and select Device Manager from the menu. The Device Manager window opens with a list of hardware categories.
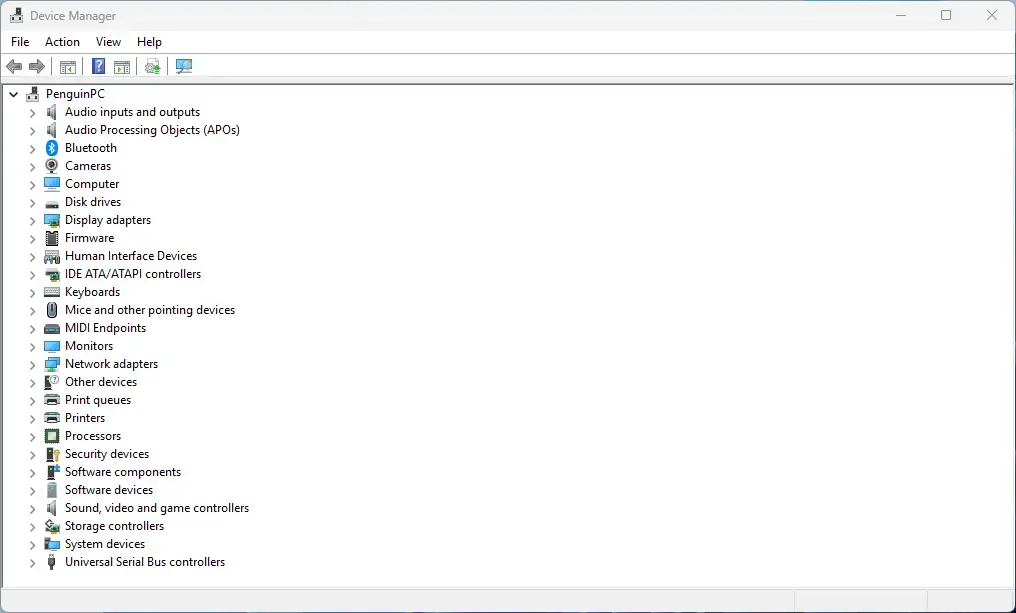
- Find the category named Display adapters. Click the small arrow next to it to expand the list.
- Look for your graphics card's name, such as an NVIDIA, AMD or Intel chip. Some PCs list two adapters, usually an Intel one and a separate NVIDIA or AMD one. Roll back the one you just updated. Right-click that name.
- Select Properties. A new window opens.
- Click the Driver tab near the top of the window.
- Click Roll Back Driver. If the button is greyed out, Windows does not have an older driver saved. This can happen if the driver was removed or cleaned out earlier. Skip to the next section of this guide.
- Windows asks why you are rolling back. Choose any reason from the list, then click Yes or Next.
- Wait while Windows replaces the new driver with the old one. Your screen may flicker or go black for a second. That is expected.
- Restart your computer normally.
After the restart, Windows 11 should load without the blue screen. If Windows Update tries to install the same driver again, open Settings Windows Update and use the pause option while you sort things out. You can resume updates later.
Using DDU to Completely Clean Out Corrupted Driver Files
Display Driver Uninstaller (DDU) is a free tool that removes every trace of an old graphics driver, including hidden leftover files and registry entries that a regular uninstall misses. Use it when the rollback is greyed out or the crashes continue. Run it in Safe Mode, because the tool works deep inside the system and the display driver must not be in use.
- While you still have internet access, download the Display Driver Uninstaller tool from the developer's official website. Extract the program folder to your desktop. If you only have a normal-mode connection, do this step first. Safe Mode without networking cannot download files.
- Also download the latest stable driver for your graphics card from the manufacturer's website and save it where you can find it, such as the desktop or a USB drive. You will need it after the cleanup.
- Boot your computer into Safe Mode using the steps earlier in this guide.
- Open the DDU program folder and double-click the application file to run it.
- A small settings window may appear. You can usually leave the defaults as they are and click Close.
- On the right side of the main DDU window, find the drop-down menu labelled Select device type. Click it and choose GPU.
- Directly below it, open the next drop-down menu and choose your graphics card brand, for example NVIDIA, AMD or Intel.
- Click Clean and restart in the top left corner.
- Do not touch the mouse or keyboard while the program works. It strips out all the old graphics files, registry entries and broken leftovers.
- The computer restarts by itself when the cleaning finishes.
Once Windows 11 boots back up normally, your screen may look stretched or fuzzy. This is expected, because no graphics driver is installed and Windows is using its basic display driver. Install the driver package you downloaded earlier, or go to the official website for your graphics card manufacturer, download the latest stable driver package and install it.
If the newest version caused the crash, try the one before it instead. Manufacturers keep older versions on their driver download pages. Restart again when the installer asks you to.
Note: This troubleshooting step requires administrative privileges on your computer.
Checking System Files and Memory Health
If the blue screens continue after a clean driver install, check your system files and memory. Windows has built-in tools for both. The System File Checker (a utility that repairs corrupted system files) scans for damaged Windows files, and the Windows Memory Diagnostic tool tests your physical RAM for faults that can cause crashes.
Start with the system file scans:
- Click the Start button and type cmd in the search bar.
- Right-click Command Prompt in the results and choose Run as administrator. If a User Account Control prompt appears, click Yes.

- In the black Command Prompt window, type the following command carefully:
sfc /scannow - Press Enter.
- Wait while Windows scans its core system files. If it finds damaged files, it replaces them automatically. This can take 10 to 15 minutes, so do not close the window.
- When the scan finishes, type this next command and press Enter:
DISM /Online /Cleanup-Image /RestoreHealth - Let that scan finish too, then restart your computer.
Next, check your memory for physical faults:
- Click the Start button, type Windows Memory Diagnostic in the search bar, and click the app.
- Click Restart now and check for problems (recommended). Save any open work first, because the computer restarts straight away.
The computer restarts into a blue diagnostic screen and begins testing your RAM. Let the test finish completely, which can take a while. Windows then restarts on its own, and the result may appear as a notification after you sign in. If the test reports errors, one of your RAM sticks may be failing and need replacement.
Note: This troubleshooting step requires administrative privileges on your computer.
Summary
Your computer should now boot normally into Windows 11 without further blue screen errors.
Have a question about this guide?
Answered by AI from this guide. Good questions may be added to this page — please don't include personal details.
Did this guide fix your problem?

About the Author
Richard
Tech Writer, IT Professional
Richard is a writer at Geek Rewind who turns complex IT tasks into clear, step-by-step guides. He draws on years of hands-on experience in system administration and enterprise IT operations, focusing on Windows, Linux and WordPress: the problems people actually run into, and the fixes that work. His server and WordPress guides come from systems he runs himself. Richard builds and maintains the platform behind Geek Rewind, from its Ubuntu servers and Nginx configuration to its custom WordPress plugins. Many new tutorials start with readers' questions, and he's always glad to answer them in the comments.
No comments yet — be the first to share your thoughts!