Rename Your Workgroup in Windows 11 Workgroup Settings

A workgroup is a simple way to group PCs on a home or small office network so they can share files and printers. In Windows 11, you change the workgroup name in System Properties, the classic window that the Settings app links to. The change needs administrator rights and takes about a minute.
Open Settings , go to System, then About, and select Domain or workgroup. Next, select Change, type the new name under Workgroup, and restart the PC.
Windows 11 has no page called “workgroup settings”. The workgroup field lives in System Properties, which the Settings app links to. Below, you will find that route, two faster ways to reach the same window, and what to check if the option is greyed out.
To rename your workgroup in Windows 11, open Settings , select System About, then choose Domain or workgroup under Related links. Select Change, type the new name under Workgroup, select OK, and restart. You need administrator rights. Windows 11 has no page named “workgroup settings”; the field sits in System Properties.
Before you change the workgroup name
A workgroup is a label that groups PCs on a small network without a central server. Home and small office networks use one. Every Windows 11 PC that is not joined to a domain starts in a workgroup named WORKGROUP. A domain replaces the workgroup. A domain is a network where a central server manages sign-ins and settings, so a PC on a domain has no workgroup name to edit.
Check these points first:
- You need an administrator account. A standard account gets a prompt for administrator credentials when you select Change.
- The PC must not be joined to a domain. If it is, the dialog shows a domain name instead of a workgroup. Do not change that on a work PC without asking your IT staff. Leaving a domain removes the PC from central management and is hard to undo.
- Windows 11 Home and Pro both support this. Only Pro and higher editions can join a domain. Home PCs are always in a workgroup.
- Pick a valid name. Use 15 characters or fewer. Avoid spaces at the start and end, and avoid these characters: ; : ” < > * + = \ / | ? , . Letters, numbers and hyphens are safe. Use a different name from the computer name.
- Save your work. The change only takes effect after a restart.
Rename your workgroup in Settings
This is the main method. It uses the Settings app to reach the workgroup field. This requires administrator privileges.
- Open Settings by pressing Windows key + I.

Windows 11 Start menu with Settings gear icon highlighted. - Go to System About The About page opens and shows your PC name and Device specifications.
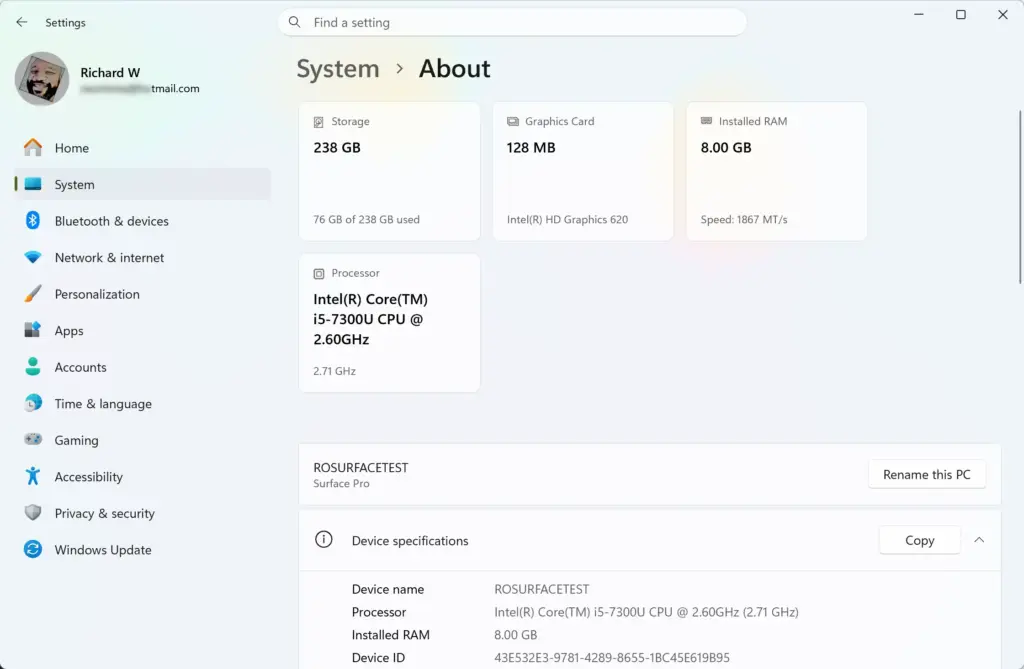
Settings › System › About - Find Related links near the top of the page. Select Domain or workgroup. The System Properties window opens on the Computer Name tab.
- Read the Workgroup line in the middle of the tab. It shows the current name, usually WORKGROUP. If you see Domain here instead, stop and read the troubleshooting section below.
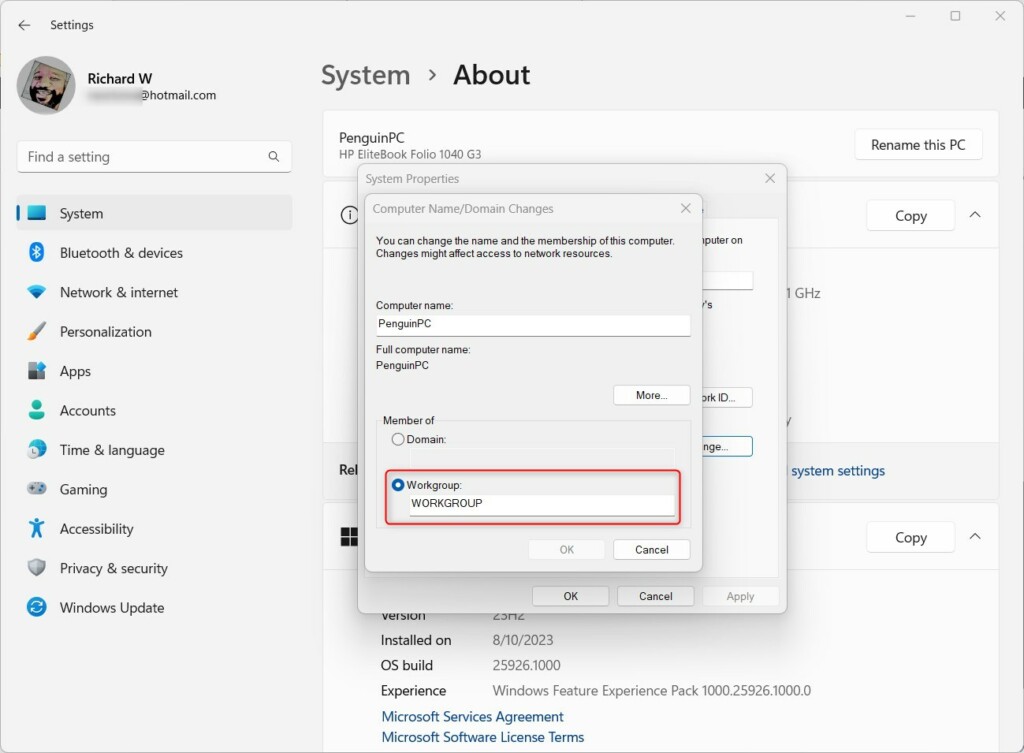
- Select Change. If a User Account Control prompt appears, select Yes, or enter the user name and password of an administrator account if asked. The Computer Name/Domain Changes dialog opens.
- Confirm that Workgroup is selected under Member of. Windows selects it by default on a PC that is not on a domain.
- Click the box under Workgroup and replace the existing name with your new one, for example OFFICE. Leave Computer name as it is unless you also want to rename the PC.
- Select OK. After a few seconds, a message appears: "Welcome to the OFFICE workgroup." Your new name appears in the message.
- Select OK. A second message says you must restart the computer to apply the changes.
- Select OK, then Close on the System Properties window.
- When Windows asks to restart, select Restart Now. Select Restart Later if you need to save work first, and restart before you rely on the new name.
If the "Welcome" message does not appear and you see an error instead, read the message. A "name is not valid" error means the name breaks the character or length rules above. Shorten it or remove the symbols and try again.
Open the workgroup settings with the Run command
It is the quickest route if you do this on several PCs. Changing the name still requires administrator privileges.
- Press Windows key + R. The Run dialog opens.
- Type
sysdm.cpland press Enter. The System Properties window opens. - Select the Computer Name tab if it is not already showing.
- Select Change and follow steps 5 to 11 from the previous section.
Rename the workgroup with PowerShell
PowerShell (a command-line tool built into Windows) is useful when you set up several PCs or work over a remote session (a connection to another PC over the network). This requires administrator privileges. Windows applies the change after a restart, the same as the graphical method.
- Right-click the Start button and select Terminal (Admin). Select Yes at the User Account Control prompt. A terminal window opens, usually in PowerShell.
- Run this command, replacing OFFICE with your new name:Code
Add-Computer -WorkgroupName "OFFICE"The command returns to the prompt, usually with a warning that the change takes effect after a restart.
- Restart the PC by running this command. (Restore the restart command from the source article before publishing.)Code
Restart-Computer
If PowerShell returns an error, use the Settings method above. The message in the dialog gives the most specific clue, so read it first.
Check that the new workgroup name applied
After the restart, confirm the name before you move on to other PCs.
- Press Windows key + R, type
sysdm.cpl, and press Enter. The Computer Name tab opens. - Read the Workgroup line. It shows your new name.
You can also check from PowerShell. This command prints the current workgroup name, or the domain name if the PC is on a domain:
(Get-CimInstance Win32_ComputerSystem).WorkgroupIf the Change button is greyed out or the workgroup option is missing
Most problems come from the account you use or the way the PC is managed.
- The Change button is greyed out or does nothing. Your account probably lacks administrator rights. Sign in with an administrator account and try again. If it is a work PC, the option may be locked by your organisation's policies, and only IT staff can change it.
- The tab shows a domain, not a workgroup. The PC is joined to a domain. Renaming a workgroup is not possible here, because the PC has no workgroup. Switching to a workgroup means leaving the domain. That needs domain credentials, removes central management, and is hard to undo. Ask your IT staff.
- Your PC signs in with a work or school account. Some PCs are connected to a work or school account through Settings Accounts Access work or school, without being joined to a domain. Setups differ, so check with the organisation that manages the device before you change the name.
- The name is rejected. Check the length and characters against the rules at the start of this article.
- The old name still shows after the change. You have not restarted. Restart the PC, then check again.
Match the name on your other PCs
Repeat the steps on each PC that should share the workgroup, and use exactly the same name on each. Letter case does not matter, but spelling does.
Most Windows 11 networks depend little on the workgroup name. Mismatched names rarely stop you from opening a shared folder by typing the computer name, for example \\COMPUTER-NAME in File Explorer. The workgroup name mainly affects how PCs are grouped and listed on a small network. Rename it when you want a consistent label, or when a setup guide or older device expects a specific name.
How to undo the change
Reverse the rename the same way you made it. Open sysdm.cpl from the Run dialog, select Change, and type the old name into the Workgroup box. The default name is WORKGROUP. Select OK and restart when Windows asks. Nothing else on the PC depends on the name, so your files, accounts and apps stay as they are.
What to do next
If the other PCs still do not appear on the network after you match the names and restart, check Advanced sharing settings under Settings Network & internet Advanced network settings. Make sure network discovery and file and printer sharing are on for the Private network profile. Then try opening a shared folder directly by typing the other PC's name in the File Explorer address bar.
How do I change the name of my PC in 🪟 Windows 11?
To change your PC name in Windows 11, open Settings, go to System, then About, and select Rename this PC. Type the new name, select Next, and restart the PC when asked. The change needs administrator rights. Shared folders and saved network links may need updating afterward.
How do workgroups work?
A workgroup is a group of PCs on a small home or office network that has no central server. Each PC keeps its own user accounts and settings, but the PCs can see each other and share files and printers. Windows 11 names the default workgroup WORKGROUP, and every PC in the group must use the same name.
What can I do if my Windows computer cannot connect to the domain?
If your PC cannot connect to a domain, first check that its network connection works. Then confirm the domain name is spelled correctly, the date and time are right, and you use an account the domain accepts. If the problem continues, ask your network administrator, since the server may be the cause.
How to create a new workgroup in 🪟 Windows 10?
To create a new workgroup in Windows 10, right-click This PC, choose Properties, then select Change settings next to Computer name, domain, and workgroup settings. Select Change, type the new name under Workgroup, select OK, and restart the PC. You need administrator rights to make this change.
Did this guide fix your problem?

About the Author
Richard
Tech Writer, IT Professional
Richard is a writer at Geek Rewind who turns complex IT tasks into clear, step-by-step guides. He draws on years of hands-on experience in system administration and enterprise IT operations, focusing on Windows, Linux and WordPress: the problems people actually run into, and the fixes that work. His server and WordPress guides come from systems he runs himself. Richard builds and maintains the platform behind Geek Rewind, from its Ubuntu servers and Nginx configuration to its custom WordPress plugins. Many new tutorials start with readers' questions, and he's always glad to answer them in the comments.
No comments yet — be the first to share your thoughts!