How to Change Workgroup on Windows 11

Open Settings System About Advanced system settings, click the Computer Name tab, select Change, choose Workgroup, enter your new name (max 15 characters, no spaces), click OK, and restart your computer. The workgroup updates after the restart.
What is a Workgroup?
A workgroup is a shared label that helps computers find each other on a local network to exchange files and printers. Changing this setting lets devices use a custom identifier instead of the default WORKGROUP label, which keeps your hardware organized for cleaner network sharing.
Windows computers default to the workgroup name WORKGROUP. Changing it puts specific devices together under a name of your choosing, for example one for the office and another for a home lab.
A custom workgroup makes file and printer sharing across local devices easier to manage. Computers with the same workgroup name appear together when you browse the network. Every PC you want in the group must use exactly the same name.
Learn more about turning file and printer sharing on or off in Windows 11.
How to Change Your Workgroup Using Windows Settings
The Settings route is the easiest one, and it works the same on Windows 11 Home and Pro. You need to be signed in with an administrator account, or know an administrator’s password.
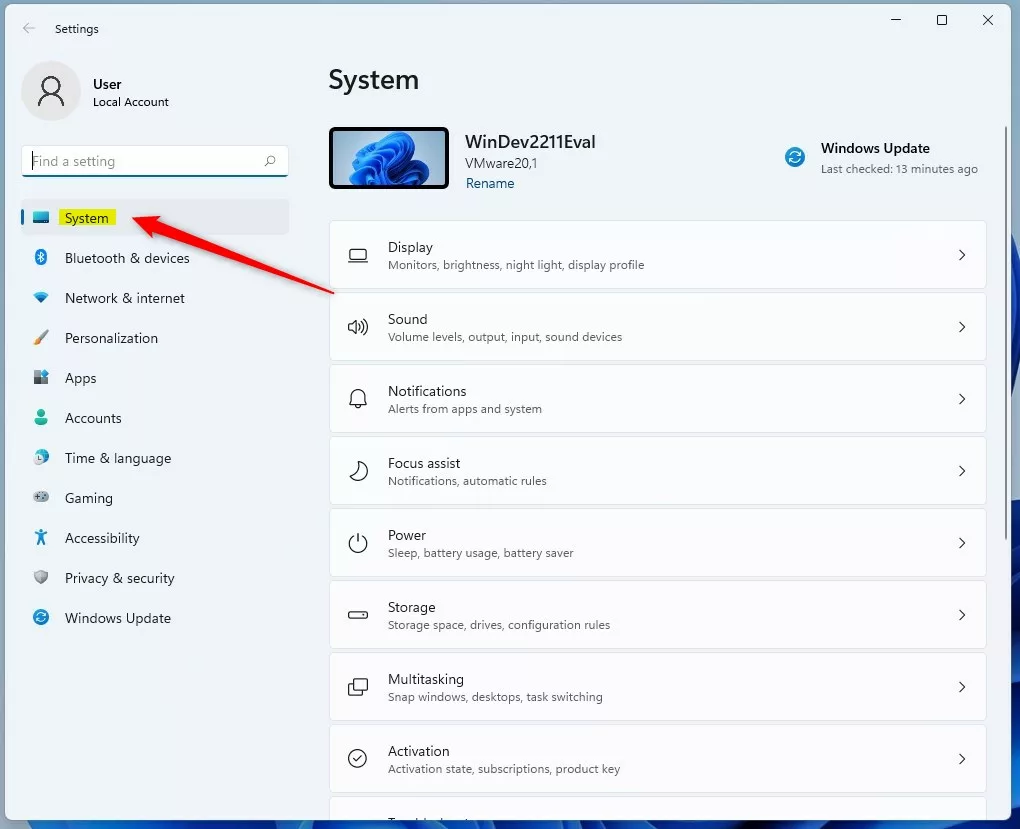
- Open Settings . Click the Start menu and select Settings, or press Win+I on your keyboard. The Settings window opens.
- In Settings, click System on the left side.
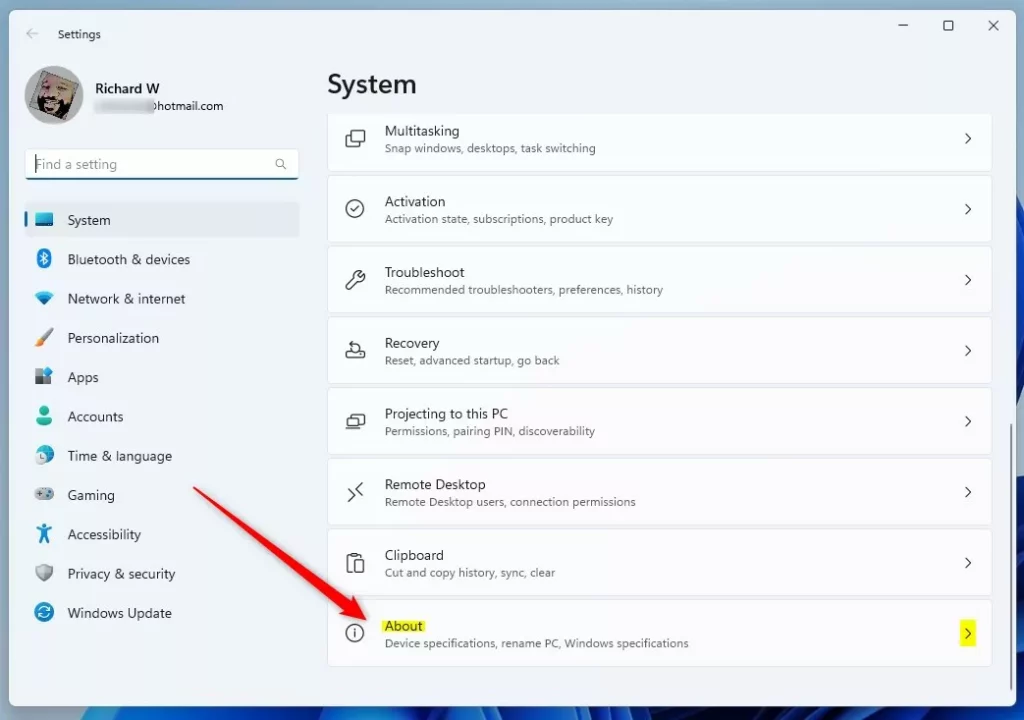
- Scroll down on the right and click About. You should see your device name, processor, RAM and Windows edition.
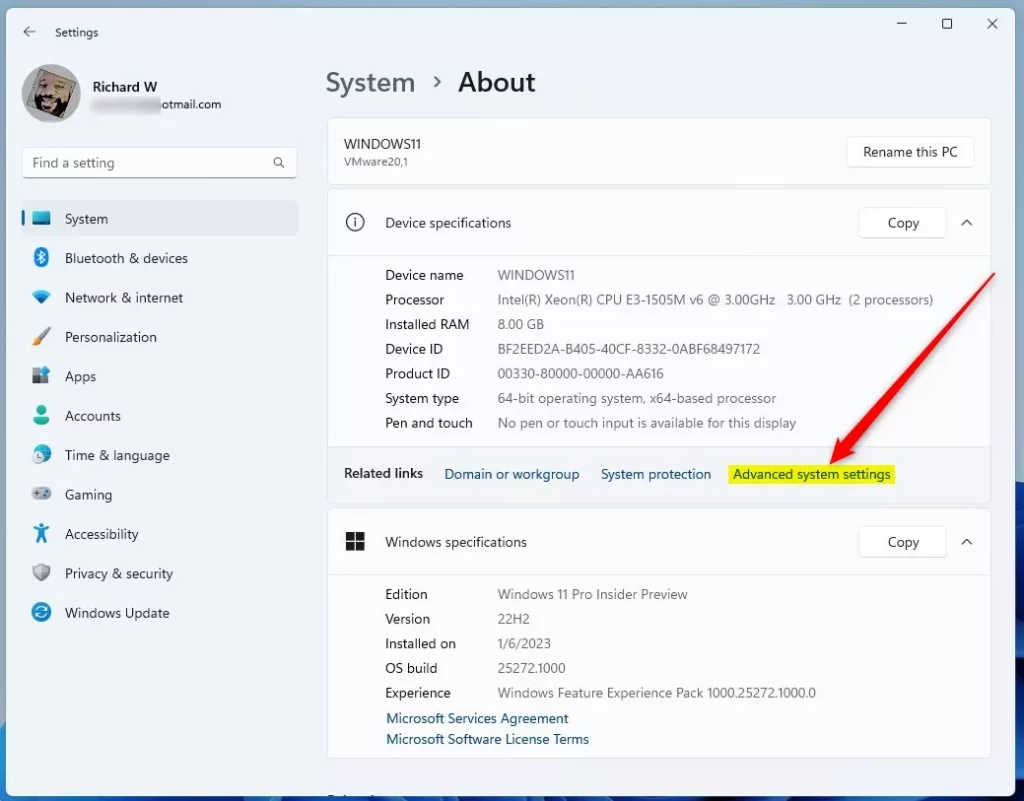
- Under About, click Advanced system settings. You will find it in the Related links area near the top of the page. You might see a popup asking for permission. %📂%FLAG_ADMIN%% If you are signed in as a standard user, Windows asks for an administrator’s password instead.
The System Properties window should now be open. It has several tabs, and the Advanced tab is usually the one showing first. The Related links area on the About page also has a Domain or workgroup link. It opens the same window on the Computer Name tab, which saves you a click.
Before you change anything, note your current workgroup name. You will see it on the next tab. Writing it down makes it easy to switch back later if the new name does not suit you.
Now move to the tab that holds the computer's name and network membership. The steps continue from step 4.
- In the System Properties window, click the Computer Name tab. You will see the computer description, full computer name and the current workgroup.
- Click the Change button. A new window opens for renaming the computer or changing its membership.
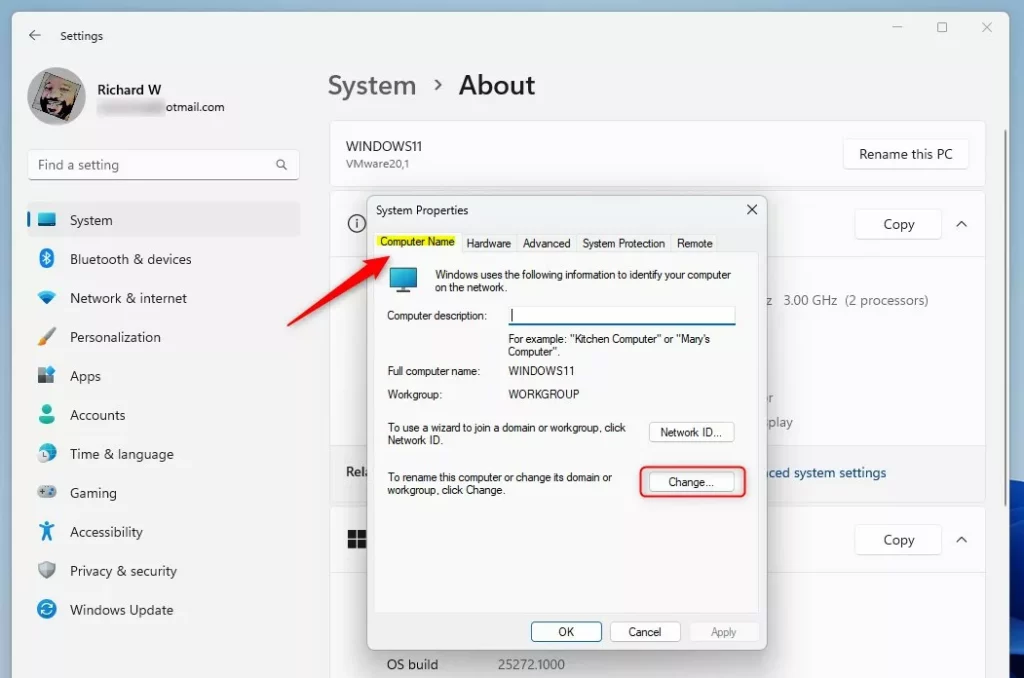
If the PC is joined to a work or school domain, the Domain option will be selected. Do not change that on a managed PC without asking your IT department. For a home or small-office PC, you want the workgroup option.
- In the new window, choose Workgroup and enter the name you want for your workgroup. If Workgroup is already selected, replace the text in the box.
- Click OK when done. Windows usually shows a welcome message for the new workgroup, followed by a prompt telling you to restart.
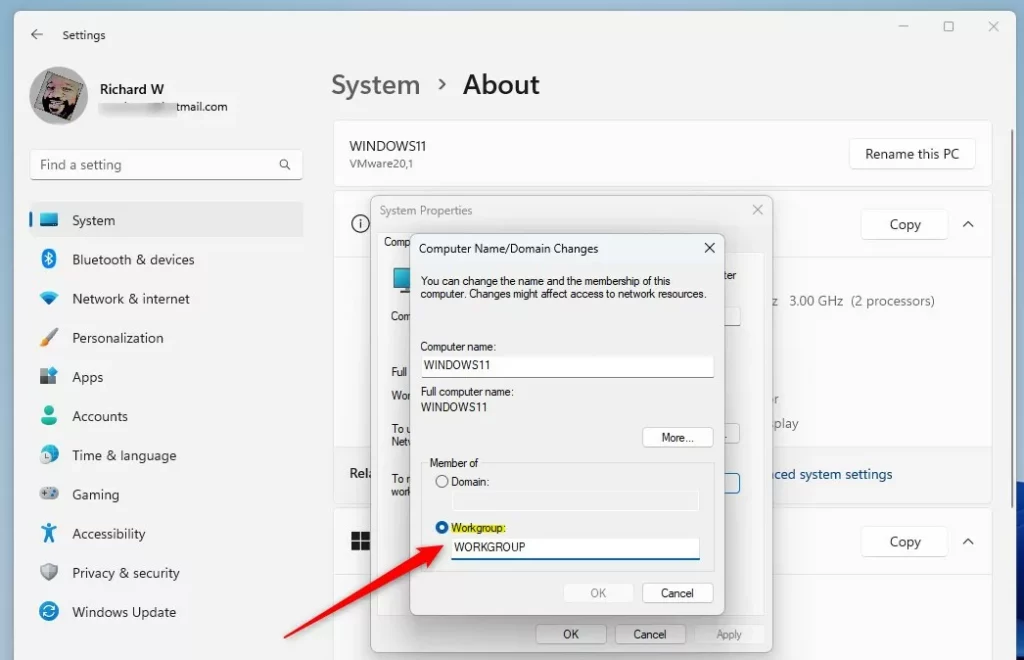
Check the name before you click OK, because Windows rejects names it does not accept. Keep the name short, since workgroup names are limited to 15 characters.
` ~ @ # $ % ^ & ( ) = + [ ] { } | ; : , ' " . < > / ?
- After clicking OK, restart your computer to apply the new workgroup name. Close any open work first, then use Start, the power button, and Restart.
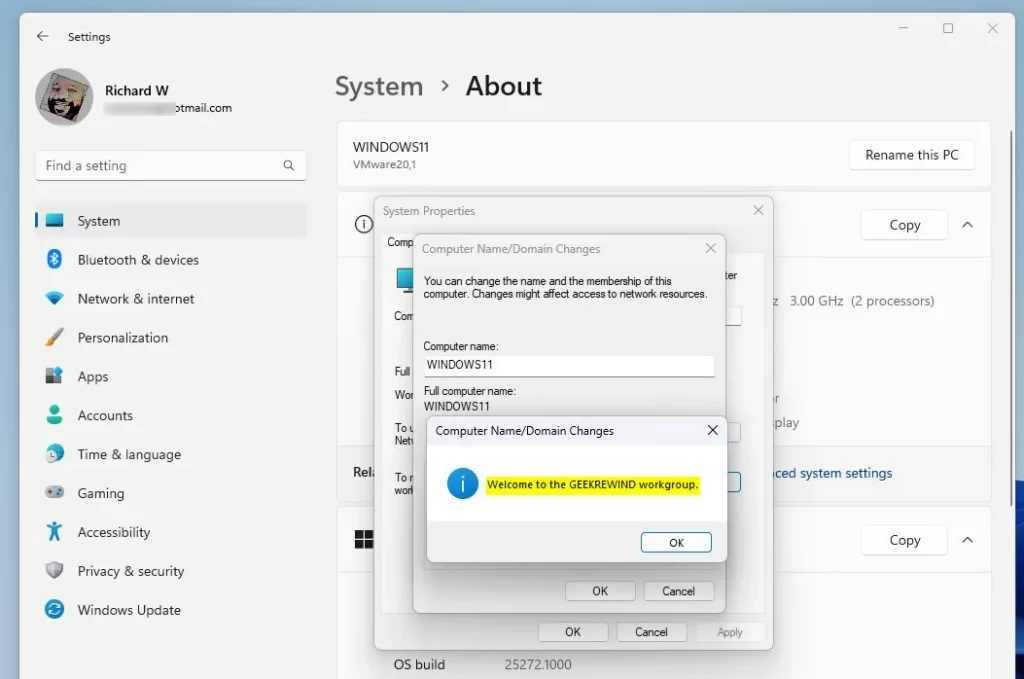
After the restart, repeat steps 1 to 5 and check the Workgroup line on the Computer Name tab. It should show your new name. To undo the change, follow the same steps and enter the old name, which is why you wrote it down earlier.
If other PCs still do not show up on the network, check that they use exactly the same workgroup name. Also check that the network profile is set to Private and that network discovery and file sharing are turned on under the advanced sharing settings.
Change Workgroup Using Command Prompt
Command Prompt lets you rename your workgroup quickly using text commands. Open the console with administrator rights to make the change. Running a single command updates the workgroup name, and a restart finishes the job.
- Open Command Prompt. To do this, type "cmd" in the Start menu, right-click Command Prompt, and select Run as administrator. Click Yes if the User Account Control prompt appears. %%FLAG_ADMIN%% The window title should read Administrator: Command Prompt.
- Type the following command, replacing YourWorkgroupName with your desired workgroup name:
wmic computersystem where name="%computername%" call joindomainorworkgroup name="YourWorkgroupName"Use a name with no spaces and no restricted characters, the same rules as in the Settings method. If you get an error, check that the window title says Administrator. If it still fails, use the Settings or PowerShell method instead.
Example to switch to a workgroup named GEEKREWIND:
wmic computersystem where name="%computername%" call joindomainorworkgroup name="GEEKREWIND"- Restart your PC to finish the change. The new name will not show up in System Properties until you do.
Change Workgroup Using Windows PowerShell
Windows PowerShell provides an alternative command-line route for this configuration. It also needs administrator rights:
- Open PowerShell as an administrator. Type "powershell" in the Start menu, right-click Windows PowerShell, and select Run as administrator. %%FLAG_ADMIN%%
- Type the command below, replacing YourWorkgroupName with the name you want:
Add-Computer -WorkGroupName "YourWorkgroupName"Example to change to GEEKREWIND workgroup:
Add-Computer -WorkGroupName "GEEKREWIND"- Restart your computer to apply the change. Afterwards, open System Properties and confirm the name on the Computer Name tab.
Summary
- Changing your workgroup helps your Windows 11 PC share files and printers with other devices on your network.
- You can do it easily through Settings, Command Prompt, or PowerShell. All three need administrator rights.
- Make sure your workgroup name has no spaces or special characters, and keep it to 15 characters or fewer.
- Don't forget to restart your computer after changing the workgroup.
- To undo the change, repeat the same steps with your old workgroup name.
Adjusting the local workgroup makes hardware sharing across connected machines smoother. You can apply the change through Settings, Command Prompt, or PowerShell, as long as you avoid invalid punctuation. Rebooting the PC finalizes the change.
Was this guide helpful?

About the Author
Richard
Tech Writer, IT Professional
Richard is a writer at Geek Rewind who turns complex IT tasks into clear, step-by-step guides. He draws on years of hands-on experience in system administration and enterprise IT operations, focusing on Windows, Linux and WordPress: the problems people actually run into, and the fixes that work. His server and WordPress guides come from systems he runs himself. Richard builds and maintains the platform behind Geek Rewind, from its Ubuntu servers and Nginx configuration to its custom WordPress plugins. Many new tutorials start with readers' questions, and he's always glad to answer them in the comments.


No comments yet — be the first to share your thoughts!