How to Enable or Disable Cloud Search in Windows 11
Cloud Search in Windows 11 brings results from services like OneDrive right into your PC’s search bar.
This feature lets you find files and photos stored in the cloud alongside your local documents, making it faster to locate what you need.
You might choose to turn off Cloud Search for privacy or if you want to speed up search on an older PC.
When you disable it, Windows 11 stops looking for and showing cloud content in your searches.
To enable or disable Cloud Search in Windows 11, open Settings, navigate to Privacy & security, then Search Windows, and toggle “Enable deep content search of cloud content.” Alternatively, use Group Policy Editor or Registry Editor for advanced control.
What is Cloud Search?
Cloud Search in Windows 11 helps you find files, photos, and settings stored online in services like OneDrive or SharePoint, right from your PC’s search bar.
How to Turn Cloud Search On or Off Using Windows Settings
- Click the Start menu (Windows icon) at the bottom left of your screen.
- Select Settings (gear icon). Or press Windows key + I on your keyboard to open Settings quickly.
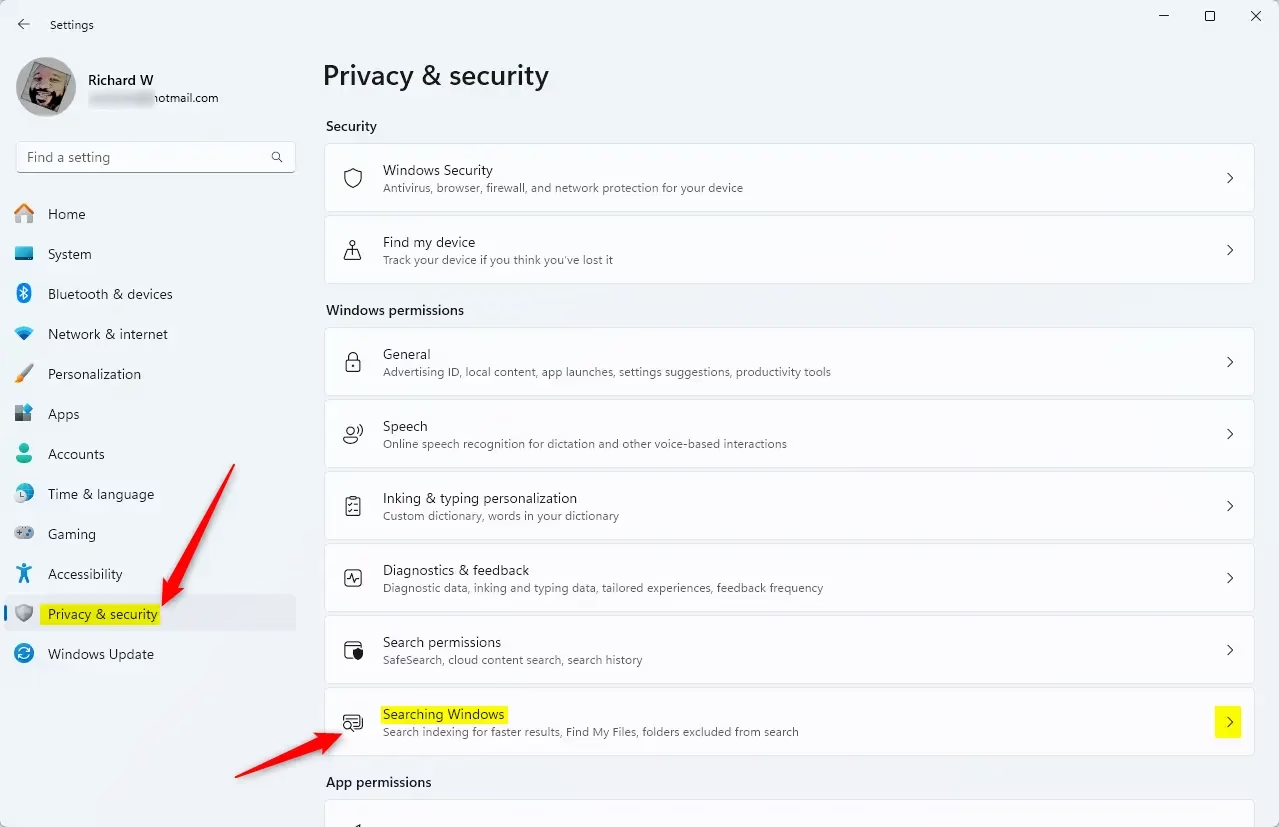
- In Settings, click Privacy & security on the left side panel.
- On the right side, find and click Search Windows.
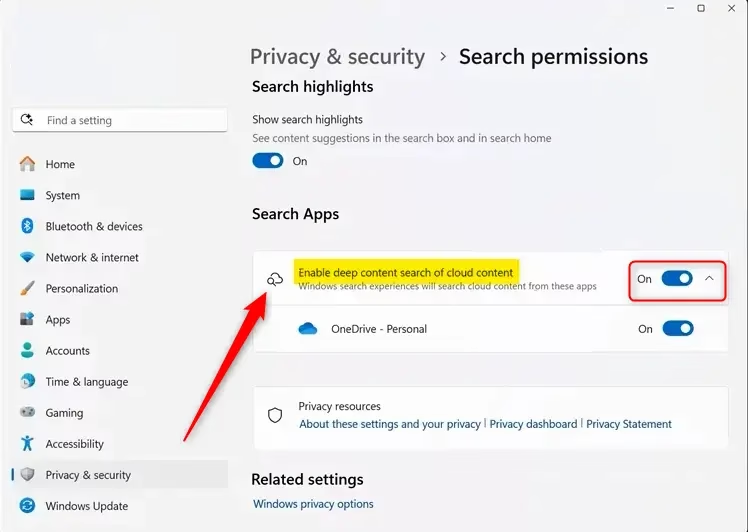
- Look for the option called “Enable deep content search of cloud content” and click the toggle switch to turn it on or off.
You can turn cloud search on or off in Windows 11 using the main Settings app. This feature lets Windows look through your cloud files when you search. Follow these simple steps in Settings to control your cloud search.
You can turn cloud search on or off in Windows 11 using the main Settings app. This feature lets Windows look through your cloud files when you search. Follow these simple steps in Settings to control your cloud search.
When finished, you can close the Settings window.
How to Enable or Disable Cloud Search Using Group Policy Editor
Windows 11 Pro and newer versions let you manage cloud search with the Group Policy Editor. This tool lets you decide if Windows can index your cloud content for faster searching. Using Group Policy is an advanced way to control this search feature.
- [Admin Required] Press the Start menu button and type
Edit group policy, then press Enter to open the Local Group Policy Editor. - In the left pane, follow this path: Computer Configuration > Administrative Templates > Windows Components > Search
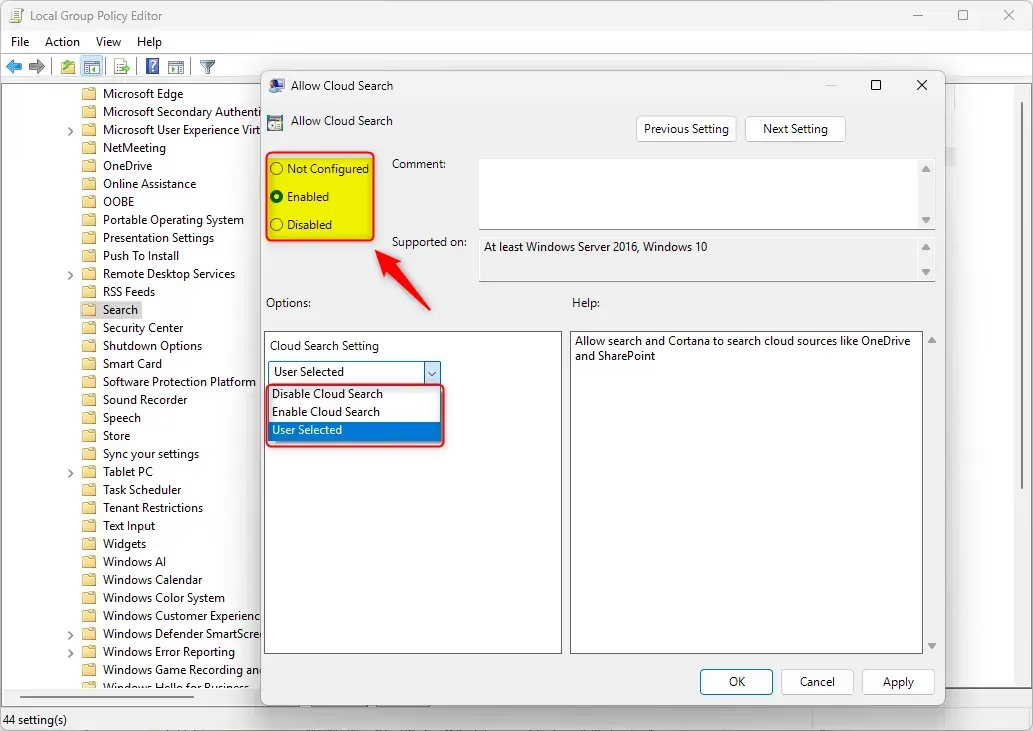
- On the right, find and double-click Allow Cloud Search.
- Choose from these options:
- Not Configured – Default setting (Windows decides).
- Enabled – Turns cloud search on.
- Disabled – Turns cloud search off.
- Click OK to save.

How to Enable or Disable Cloud Search Using Registry Editor
You can also control cloud search in Windows 11 by editing the Registry Editor. This method is useful if you don’t have the Group Policy Editor. Remember to back up your registry before making changes to avoid problems with your system.
Before you start:
Backup your registry Create a System Restore point
- [Admin Required] Press the Start menu button, type
regedit, and press Enter to open the Registry Editor. - In Registry Editor, navigate to this folder:
HKEY_LOCAL_MACHINE\SOFTWARE\Policies\Microsoft\Windows\Windows Search - If you don’t see Windows Search folder, right-click Windows, select New > Key, and name it Windows Search.
- Inside Windows Search, right-click the right side, select New > DWORD (32-bit) Value, and name it AllowCloudSearch.
- Double-click AllowCloudSearch and set its value to:
- 1 to enable Cloud Search
- 0 to disable Cloud Search
- Click OK and close Registry Editor.
- Restart your computer to apply changes.

If you want to remove the setting and go back to normal, just delete the AllowCloudSearch DWORD value.
Summary
Windows 11’s Cloud Search feature makes finding online files and photos simple, and you can control it using Settings, Group Policy, or Registry Editor.How do I disable cloud search in 🪟 Windows 11?
Navigate to Computer Configuration > Administrative Templates > Windows Components > Search. Find Allow Cloud Search and double-click it. Choose Enabled or Disabled, then click Apply and OK.
Is it okay to turn off search indexing?
Choosing not to index the contents of files can reduce the size of the index, but it makes files harder to find in some cases.
Was this guide helpful?

About the Author
Richard
Tech Writer, IT Professional
Richard, a writer for Geek Rewind, is a tech enthusiast who loves breaking down complex IT topics into simple, easy-to-understand ideas. With years of hands-on experience in system administration and enterprise IT operations, he’s developed a knack for offering practical tips and solutions. Richard aims to make technology more accessible and actionable. He's deeply committed to the Geek Rewind community, always ready to answer questions and engage in discussions.


No comments yet — be the first to share your thoughts!