How to Turn On or off Delete Warnings for Cloud Files in Windows 11

Delete warnings for cloud files in Windows 11 stop you from accidentally erasing online-only files from services like OneDrive or Dropbox. The safety prompt appears in File Explorer when you try to delete a file that lives only in the cloud. It gives you one last chance to back out before the file is gone.
You can turn this prompt on or off in a few clicks. The easiest way is the checkbox on the prompt itself. The other way is a registry change. Keeping the warning on is the safer choice, especially if you share a synced folder or clean up files in a hurry.
Open File Explorer , select a cloud file, and press Del. In the confirmation box, leave the “Don’t ask me again” checkbox unchecked to keep warnings on, or check it to turn warnings off. To restore warnings after disabling them, open Registry Editor, navigate to Computer\🗝️HKEY_CURRENT_USER\
What is File Explorer?
Before the steps, here are the two terms this tutorial depends on.
File Explorer is the built-in tool for managing files and folders on a Windows computer. It handles local drives and synced cloud folders in the same window, so the delete prompt shows up there whichever service you use.
What are Online-Only Cloud Files?
Cloud platforms like OneDrive and Dropbox can keep some items as “online-only” files to save local disk space. The file appears in File Explorer with a cloud icon, but its contents are not stored on your PC until you open it or choose to keep it on the device. That means the online copy is the only copy you have.
Why Do You See a Delete Warning?
The reason is simple: there is no local copy, so the removal cannot be undone from your PC. Some services keep deleted files in their own online recycle bin for a limited time. Check how yours handles this before you rely on it.
How to Turn the Delete Warning On or Off in File Explorer
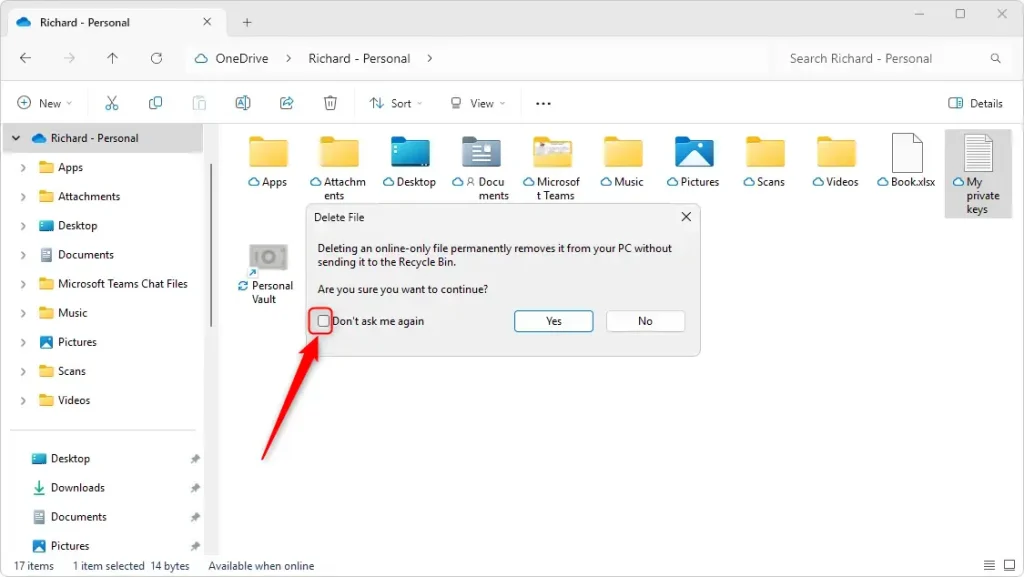
The quickest way to control the warning is from the confirmation box itself. When you try to delete a cloud file, the box includes a checkbox that says "Don't ask me again". Leave it unchecked if you want the warning to keep appearing. Check it if you want to turn the warning off and delete cloud files without the extra prompt.
This method only works while the prompt is on screen. Once you have checked the box and confirmed, the prompt stops appearing. To bring it back, use the registry method in the next section.
- Select an online-only file in File Explorer and press Delete. When the confirmation box appears, look for the checkbox labeled Don't ask me again.
- To keep seeing warnings, make sure the box is unchecked. Then confirm or cancel the deletion as you normally would, and the prompt will appear next time.
- To stop seeing warnings, check the box and confirm the deletion. From then on, you won't be asked again, and online-only files are deleted straight away.
How to Turn the Delete Warning On or Off Using the Registry Editor
You can also turn the cloud file delete warning on or off in the Registry Editor, a tool for changing advanced system settings. Use this method if you already ticked "Don't ask me again" and want the prompt back, or if you would rather not wait for the popup. Open the Registry Editor by typing regedit in your Start menu, then go to Computer\HKEY_CURRENT_USER\Software\Microsoft\Windows\CurrentVersion\Explorer\ShellServiceFlags to change the setting.
In Registry Editor, click File Export and save a copy somewhere safe. To undo a bad change later, double-click that saved file to restore it.
⚠️ Admin privileges required for the following steps.
Sign in with an administrator account. If a User Account Control prompt appears, choose Yes to continue.
Proceed with these instructions:
- Open the Registry Editor by typing
regeditin the Start menu search and pressing Enter. The Registry Editor window opens. - Go to this folder path:
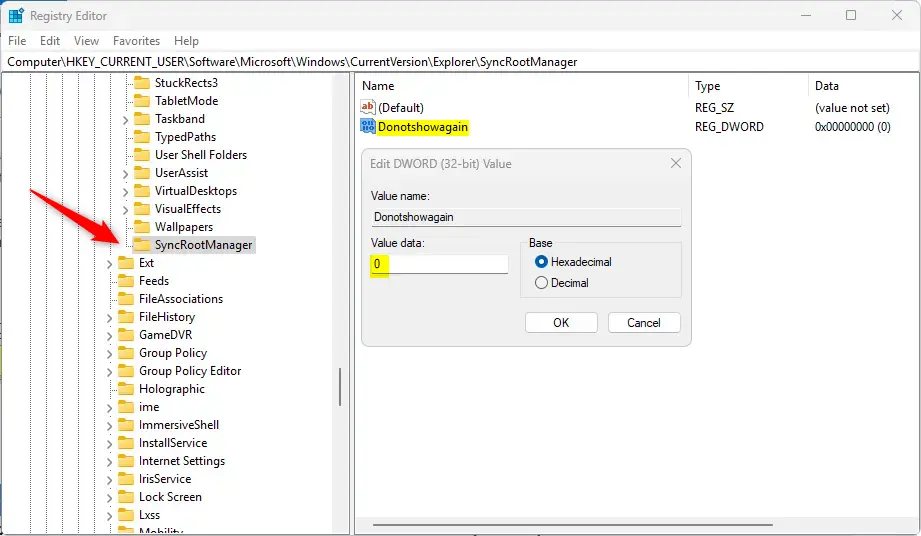
Computer\HKEY_CURRENT_USER\Software\Microsoft\Windows\CurrentVersion\Explorer\SyncRootManager. You can paste it into the address bar at the top of the Registry Editor, or expand the folders in the left pane one by one. - Right-click on
SyncRootManagerand choose New DWORD (32-bit) Value. A new entry appears in the right pane with its name ready to edit. If a value with the right name already exists, skip this step and edit that one instead. - Name the new value
Donotshowagain. Type the name exactly, then press Enter. - Double-click
Donotshowagainto open the Edit DWORD (32-bit) Value box, and set the Value data to:0to enable the delete confirmation prompt (you will see the warning).1to disable the prompt (no warning will appear).
- Click OK, close Registry Editor, and restart your computer to apply the change. After you sign back in, delete a test online-only file to check that the prompt behaves the way you set it. To reverse the change, return to the same value and enter the other number.
Summary
- The delete confirmation helps prevent accidentally deleting important cloud files, which have no local copy to fall back on.
- If you delete files often and don't want interruptions, you can turn off the warning. You can turn it back on later.
- You can toggle this setting either from the "Don't ask me again" checkbox when the warning pops up or by using the Registry Editor. The registry method is the one to use if you want to restore a prompt you already dismissed.
- Always back up your system, or at least export the registry, before making registry changes.
- Understanding these settings helps you manage your cloud files safely and easily.
Managing your cloud file delete warning lets you balance file safety against a faster cleanup. The delete confirmation popup protects you from accidentally erasing files stored online. If you delete files often and want fewer interruptions, you can turn it off with either the prompt checkbox or the Registry Editor. If you do turn it off, check your cloud service's own recycle bin so you know what you can recover after a mistake.
Was this guide helpful?
0% of readers found this helpful (1 votes)

About the Author
Richard
Tech Writer, IT Professional
Richard is a writer at Geek Rewind who turns complex IT tasks into clear, step-by-step guides. He draws on years of hands-on experience in system administration and enterprise IT operations, focusing on Windows, Linux and WordPress: the problems people actually run into, and the fixes that work. His server and WordPress guides come from systems he runs himself. Richard builds and maintains the platform behind Geek Rewind, from its Ubuntu servers and Nginx configuration to its custom WordPress plugins. Many new tutorials start with readers' questions, and he's always glad to answer them in the comments.


No comments yet — be the first to share your thoughts!