How to Configure Advanced File Explorer Hidden Extension Visibility in Windows 11 System Advanced

File Explorer hides system files, file extensions and several customization switches by default. That keeps casual users from breaking things, but it gets in the way when you troubleshoot, hunt for configuration files or want to know what a file really is. This guide shows how to reveal hidden items, show file extensions and change where File Explorer opens, using the Folder Options dialog and, for settings that are not in the normal menus, Registry Editor.
Everything here works on Windows 11 Home and Pro. The Folder Options dialog is identical in both editions, and none of the changes need a restart unless the Registry Editor section says so.
Open File Explorer , click the three-dot menu and select Options. Go to the View tab, scroll to Advanced settings, and check Show hidden files, folders, and drives. Clear Hide extensions for known file types. Click Apply, then OK.
Accessing Folder Options in 🪟 Windows 11
Folder Options is the dialog that controls how files and folders behave across your computer. In Windows 11 it is hidden behind the three-dot menu on the File Explorer toolbar. Its General tab covers navigation and startup. Its View tab holds the advanced settings list used in the rest of this guide.
- Press Win+E to open File Explorer . You should see a File Explorer window with the command bar along the top.
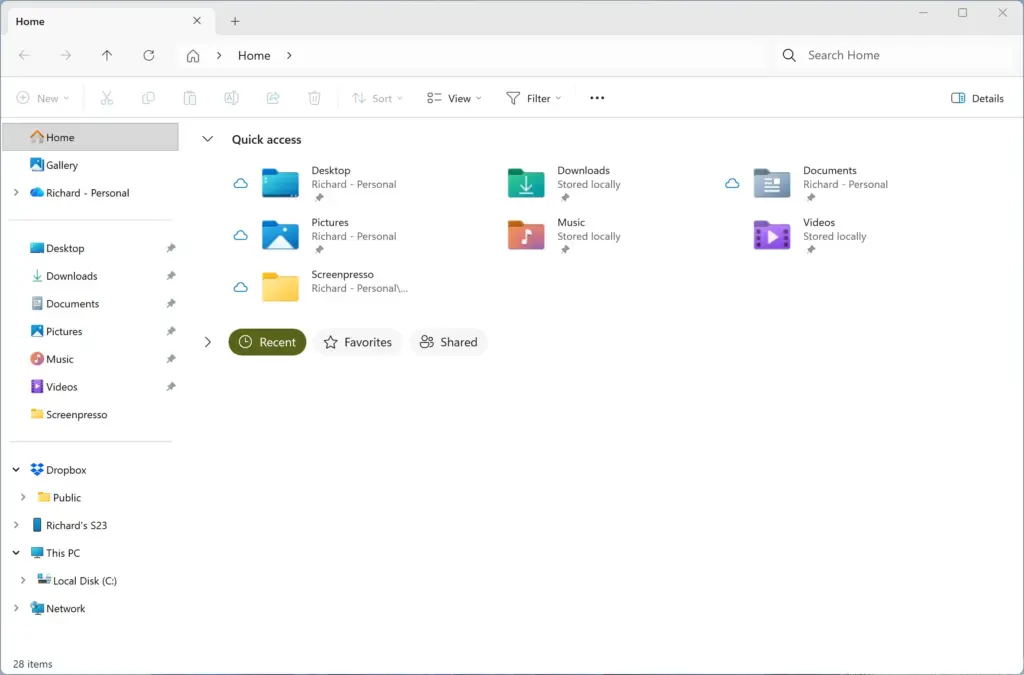
File Explorer - Click the three horizontal dots on the top command bar. A drop-down menu opens.
- Click Options at the bottom of the list. The Folder Options dialog box opens.
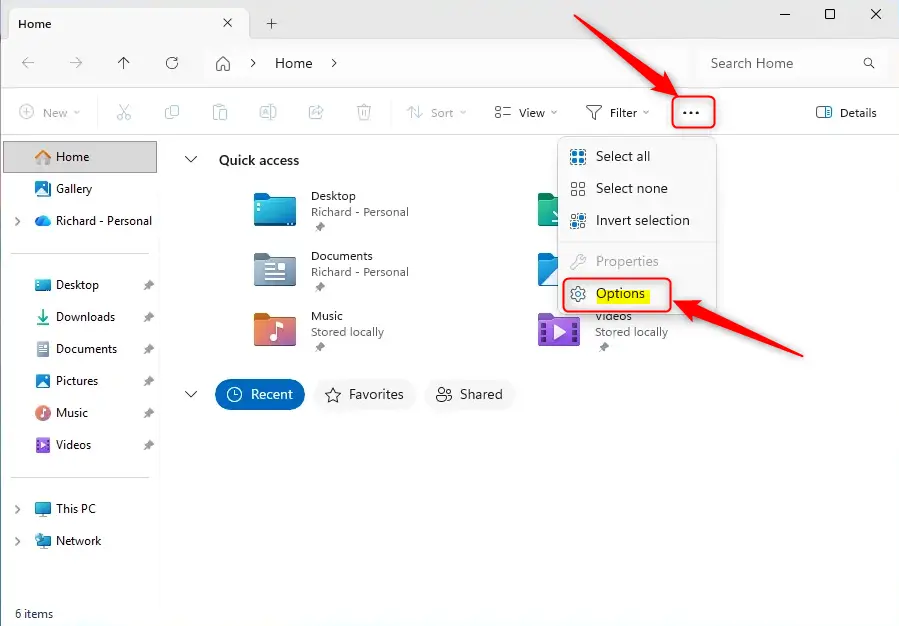
File Explorer options window showing folder open settings in Windows 11. - Click the View tab at the top of the window. You should now see a scrolling list under Advanced settings.
If the three-dot menu looks different on your PC, make sure Windows 11 is up to date. The menu has changed slightly between releases, but Options is always at the bottom of it.
Revealing Hidden Files, Folders, and Drives
Windows keeps configuration files and app data in folders it normally hides, such as per-user app data folders. Turning on hidden items makes them visible so you can browse to them. Hidden items show up slightly faded, which is how you tell them apart from normal files.
- Open Folder Options and select the View tab.
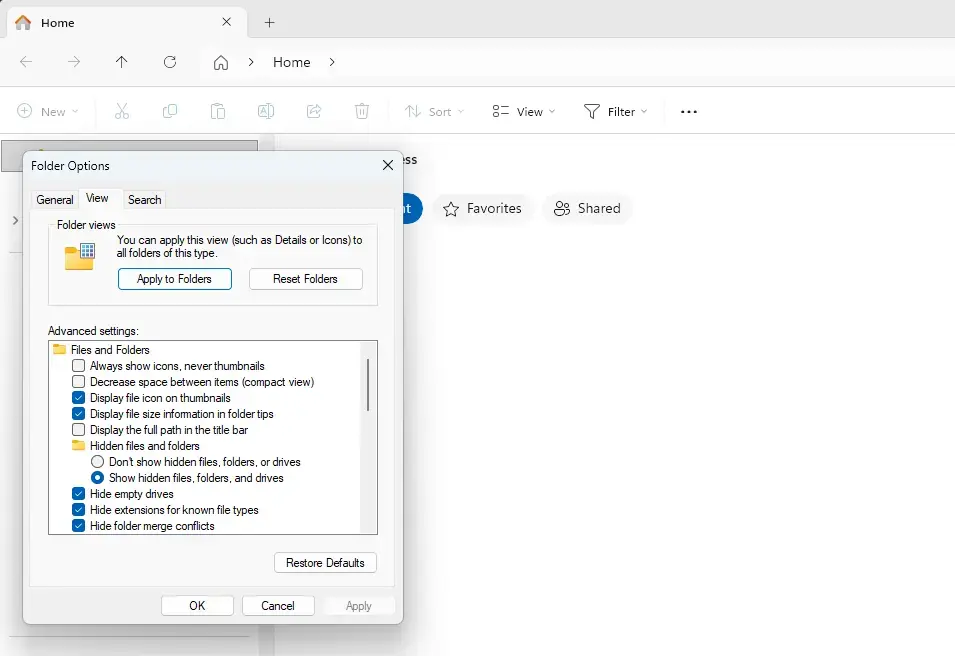
- Scroll the Advanced settings list until you reach the Hidden files and folders section.
- Click the radio button next to Show hidden files, folders, and drives.
- Click Apply, then OK. Open any folder that contains hidden items, and they should now appear.
To undo this, go back to the same section and choose Don’t show hidden files, folders, or drives. As a quicker alternative on current Windows 11 builds, you can open the View menu on the File Explorer toolbar, point to Show and toggle Hidden items.
Unhiding Protected Operating System Files
Windows does this so you do not delete or move something the system needs to boot. Showing them gives you full visibility into system storage, but you should treat anything you see as read-only unless you know exactly what it does.
- Open Folder Options and go to the View tab.
- Scroll down the Advanced settings list and clear the check box next to Hide protected operating system files (Recommended).
- A warning dialog box appears and asks if you are sure you want to turn this option off. Read it, then click Yes to confirm.
- Click Apply, then OK to commit the change.
If the system files do not appear, check that Show hidden files, folders, and drives is also selected from the previous section. Both settings need to be on. To undo this, tick the box again once you are finished looking around.
Displaying Known File Extensions
By default Windows hides the extension for file types it recognizes, so a file shows as report instead of report.docx. Showing extensions lets you spot executables and script files at a glance. It also helps you catch disguised files such as invoice.pdf.exe.
- Open Folder Options and select the View tab.
- Find the check box labeled Hide extensions for known file types and clear it.
- Click Apply, then OK. Every file name in your folders should now show its extension straight away.
Be careful when renaming files after this change. The extension is now part of the name you edit, and if you change or delete it Windows will warn you that the file may become unusable. To undo this, tick the box again. You can also use View, then Show, then File name extensions on the toolbar as a quick toggle.
Modifying Navigation Pane and Folder Views via Registry Editor
Some File Explorer options do not appear in any menu, and this is where you change them. Mistakes here can cause system instability, so back up before you start.
To make a backup, open Registry Editor, click File, then Export. Choose All as the export range, name the file and save it somewhere safe. If something goes wrong, double-click that file to merge the saved settings back.
- Press Windows Key + R, type regedit, and press Enter. If User Account Control asks for permission, click Yes. Registry Editor opens.
- Use the left-hand sidebar to navigate to the following key:
HKEY_CURRENT_USER\Software\Microsoft\Windows\CurrentVersion\Explorer\Advanced- Right-click an empty space in the right-hand pane, point to New, and select DWORD (32-bit) Value. A new value appears with its name ready to edit.
- Name the new value according to the specific advanced tweak you want to apply, then double-click it to change its data value.
- Close Registry Editor and restart your computer to apply the changes.
To undo a tweak, return to the same key, right-click the value you added and choose Delete, then restart again. Only add values you have checked against a reliable source, because a wrong name does nothing and a wrong value can change behavior you did not intend.
Configuring Launch Behavior and Quick Access
In Windows 11, File Explorer opens to Home by default. Home shows pinned folders, favorites and recent files. If you would rather land on your drives, you can make it open on This PC. That saves you a click every time you open a window.
- Open File Explorer, click the three horizontal dots on the command bar, then select Options.
- Stay on the General tab and find the drop-down menu next to Open File Explorer to:.
- Select This PC from the list instead of Home.
- Click Apply, then OK to finish. Close File Explorer and press Windows Key + E again. It should now open to your drives.
To go back, choose Home from the same drop-down menu. Depending on your Windows 11 version, the list may also include other locations, such as Downloads.
What to do next
You should now see hidden files, protected system files and full file extensions across your drives, and File Explorer should open where you want it to. If something looks wrong, go back through the sections above and check that each setting was applied. Each change can be reversed on the same screen where you made it.
Next, you can set up Storage Sense, an automated tool that frees up disk space by deleting temporary files. It will help keep the directories you have just revealed clean and organized.
Frequently asked questions
How do I get to advanced settings in 🪟 Windows 11?
Open File Explorer and click the three-dot menu icon in the top toolbar. Select Options to open Folder Options, where you can access the View tab containing advanced settings for file visibility, hidden files, and folder behavior.
How do I get the classic File Explorer view in 🪟 Windows 11?
Windows 11 File Explorer doesn't have a true classic view, but you can adjust it in Folder Options. Open File Explorer, click the three-dot menu, select Options, then use the View tab to show file extensions, hidden files, and change navigation pane settings.
Where can I find the advanced settings?
Advanced settings are in Folder Options. Press Windows Key + E to open File Explorer, click the three-dot menu on the toolbar, select Options at the bottom, then click the View tab to see all advanced file and folder settings.
How do I change File Explorer back to normal in 🪟 Windows 11?
Open File Explorer, click the three-dot menu, and select Options. In the View tab, uncheck options you enabled earlier like "Show hidden files" or "Show file extensions," then click Apply and OK to restore default settings.
Still have a question?
Answered by AI from this guide. Good questions may be added to this page — please don't include personal details.
Did this guide fix your problem?

About the Author
Richard
Tech Writer, IT Professional
Richard is a writer at Geek Rewind who turns complex IT tasks into clear, step-by-step guides. He draws on years of hands-on experience in system administration and enterprise IT operations, focusing on Windows, Linux and WordPress: the problems people actually run into, and the fixes that work. His server and WordPress guides come from systems he runs himself. Richard builds and maintains the platform behind Geek Rewind, from its Ubuntu servers and Nginx configuration to its custom WordPress plugins. Many new tutorials start with readers' questions, and he's always glad to answer them in the comments.
No comments yet — be the first to share your thoughts!