How to Easily Transfer Photos to Windows 11


Transferring photos to Windows 11 lets you back up your favorite pictures, edit them on a larger screen, and free up storage on your phone or camera. You can move the files with a USB cable, through cloud storage, or wirelessly with Phone Link (a Microsoft app that connects your phone to your PC).
Connecting your device properly means your pictures copy over quickly and at full quality. Pick the method that suits your devices, then start copying your collection to the computer. A cable is best for big batches. Phone Link is handy for a few pictures. OneDrive suits you if you want photos to arrive on their own.
Connect your phone to your PC with a USB cable and use the Photos app to import. You can also use the Phone Link app for wireless transfers or OneDrive for automatic cloud syncing.
Quick Summary Table
| Method | Best For | Speed |
|---|---|---|
| USB-C Cable | Large batches | Fast |
| Phone Link | Quick access | Medium |
| OneDrive | Automatic sync | Automatic |
Transferring Photos via USB-C Cable
A USB cable is the fastest way to move pictures from your phone to your PC, and it keeps the original image quality. You connect the phone, unlock its screen so the computer can see the files, and use the built-in Photos app to import the pictures to your hard drive.
Use a cable that carries data. Some cheap cables only charge, and your PC will not see the phone at all if you use one. The cable that came with your phone is the safest choice. A USB-C cable is shown here, but older phones may need a different connector.
- Connect your phone to your PC using a high-quality USB-C cable. Windows may play a connection sound and set up the device for the first time. That can take a few seconds.
- Unlock your phone screen. Windows cannot read the photos while the phone is locked. On an Android phone, a notification may say the phone is charging over USB. Tap it and choose File Transfer if asked what the USB connection should do.
- If using an iPhone, tap Trust when the prompt appears, and enter your passcode if asked. The prompt shows on the iPhone, not on the PC. If you tap Don’t Trust by mistake, unplug the cable and plug it back in to see the prompt again.
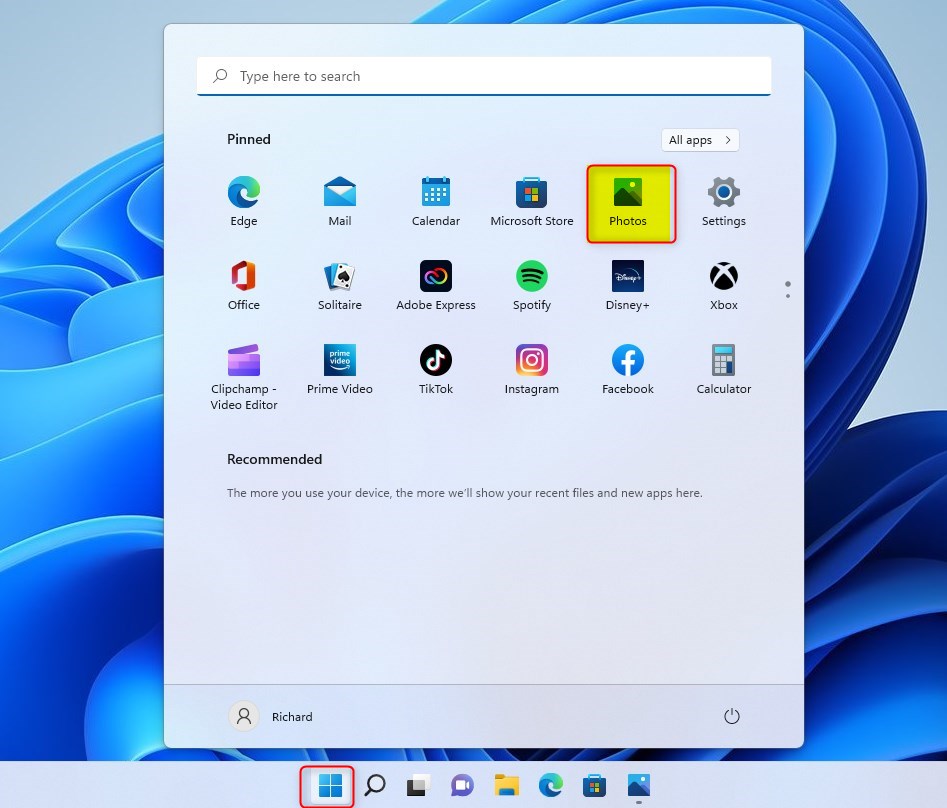
- Open the Windows Photos app on your PC. Search for Photos in the Start menu if you can’t find it. The app opens to your photo library.
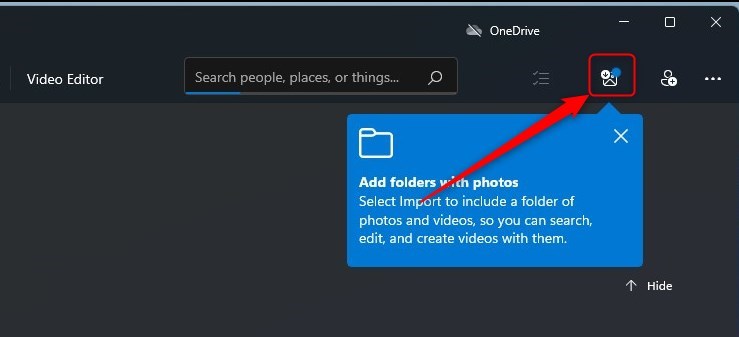
- Click the Import button in the top right. A small menu opens. The Photos app changes between versions, so if you don’t see Import, update the app from the Microsoft Store. You can also open File Explorer , click This PC, open your phone, and copy the photos from the DCIM folder by hand.
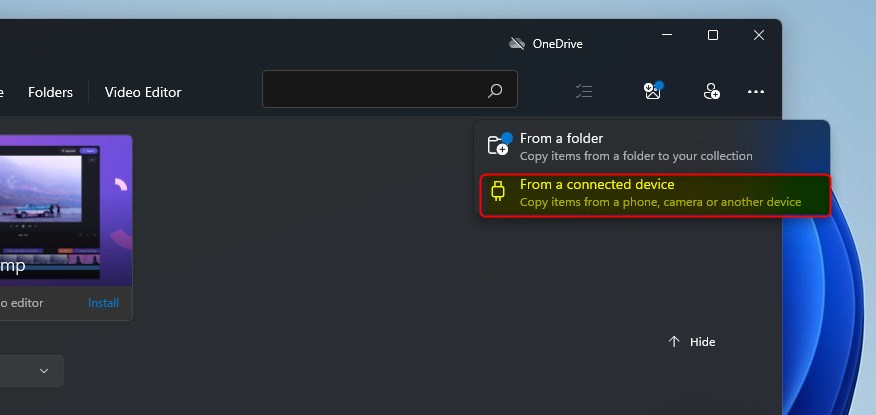
- Select From a connected device. Windows searches the phone for pictures. This can take a minute if the phone holds thousands of photos.
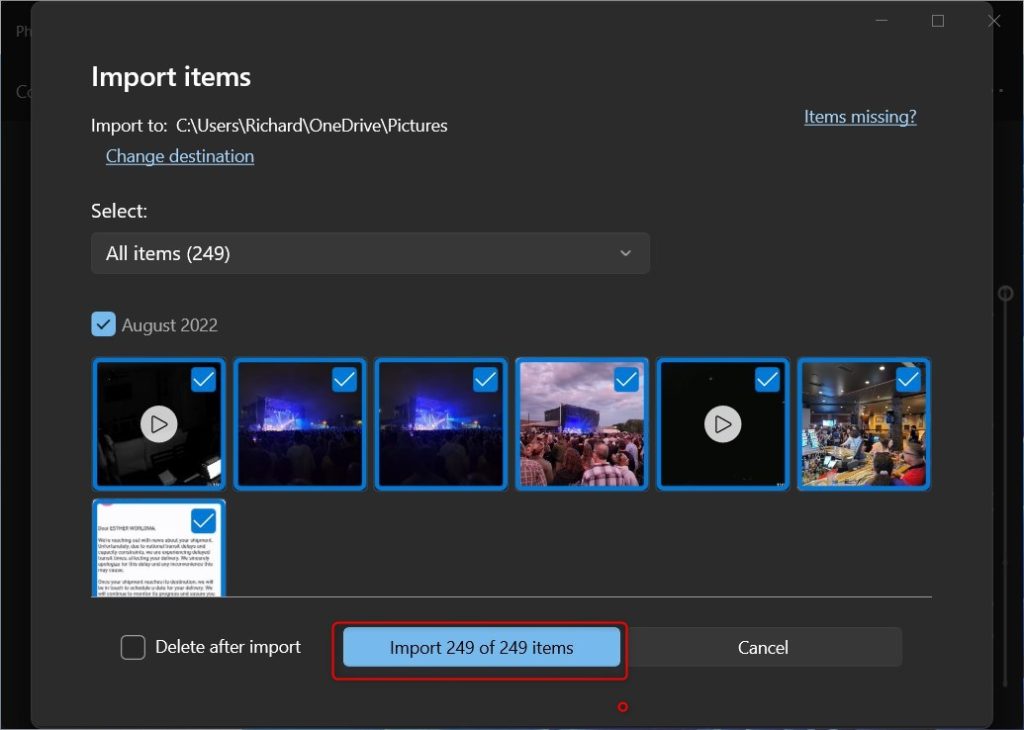
- Choose the photos you want and click Import Items. The pictures are copied to the Pictures folder on your PC. The originals stay on your phone until you delete them, so check that the copies open before you free up space.
Plug straight into the PC rather than through a hub. Admin Privilege Required: If the computer still does not recognize the device, update your device drivers (software that helps Windows communicate with your phone) in Device Manager. You need to be signed in as an administrator to do that.
Using Phone Link for Wireless Transfer
Phone Link lets you grab pictures from your phone without a cable. You open the app on your PC, pair your phone through a short setup process, and view your recent camera roll on the desktop so you can save what you need.
The Photos tab works with Android phones. On an iPhone, Phone Link covers calls, messages and notifications, but not photos, so use the USB or OneDrive method instead. On Android you also need the Link to Windows app on the phone. Both devices should be online during setup.
- Open Phone Link on your PC. It comes with Windows 11, so search for it in the Start menu. Sign in with your Microsoft account if asked.
- Follow the setup steps to pair your phone. The app shows a QR code, which you scan with your phone's camera. Accept the permission requests on the phone, including access to photos. When pairing finishes, your phone's details appear in the Phone Link window.
- Click the Photos tab in the app. Your most recent photos and screenshots appear as thumbnails. If the tab is empty, check that the phone allowed photo access during pairing.
- Right-click a photo and select Save as to move it to your computer. Choose a folder and confirm. Repeat for each picture. This works well for a handful of photos, but for hundreds a cable is faster.
Cloud Syncing with OneDrive
OneDrive syncing sends pictures from your iPhone or Android device to your computer automatically, with no cable. You install the app on your phone, turn on the camera upload setting, and your images show up in the OneDrive folder inside your C:\Users\Username\ folder on Windows 11. Username here stands for your own Windows account name.
Sign in to OneDrive on the phone with the same Microsoft account you use on the PC. OneDrive is built into Windows 11 and usually signs in when you do. Free accounts have limited storage (5 GB at the time of writing), and a large photo library can fill it. Check your free space before you turn this on.
- Install the OneDrive app on your phone from the App Store or Google Play, then sign in with your Microsoft account.
- Turn on Camera Upload in the app settings. Allow access to your photos when the phone asks. The first upload can take a while, so leave the phone on Wi-Fi. You can turn the setting off at any time to stop the uploads.
- Your photos will appear in the OneDrive folder on your PC at C:\Users\Username\OneDrive\Pictures. Camera uploads usually land in a Camera Roll subfolder there. If a file shows a cloud icon, it is stored online only. Right-click it and choose Always keep on this device if you want a full copy on the PC.
Fixing Connection Issues
If Windows 11 does not detect your phone, work through these checks in order. Most problems come down to the cable or the phone's USB mode.
- Ensure your phone is unlocked. Many phones stop sharing files when the screen turns off, so keep it awake while you copy.
- Try a different USB cable. A cable that only charges is the most common cause of a phone that never shows up.
- Check if your phone is set to File Transfer mode in the USB settings menu. On Android, the option appears in the USB notification after you connect. If it is set to charge only, the PC sees nothing to import.
- Restart both your phone and your PC, then reconnect. If it still fails, try another USB port and update the drivers in Device Manager as described above.
Handling HEIC Files
iPhones often save photos in HEIC format. Windows 11 might need the HEIF Image Extensions, available from the Microsoft Store, to open these files. If a photo won't open or shows no thumbnail, install the extension first.
You can also avoid the problem on the iPhone itself. Change your iPhone settings to "Most Compatible" to save new photos as JPEG automatically. This only affects photos you take afterwards, and the files will be larger than HEIC. Photos already on the phone stay in HEIC.
Summary
Transferring photos to Windows 11 offers several options. USB cables work well for large batches of pictures, the Phone Link app provides wireless transfers for Android phones, and cloud services like OneDrive handle automatic syncing.
If you are unsure where to start, use the cable for a first big backup, then switch on OneDrive Camera Upload so new photos keep arriving without any effort from you.
Have a question about this guide?
Answered by AI from this guide. Good questions may be added to this page — please don't include personal details.
Did this guide fix your problem?

About the Author
Richard
Tech Writer, IT Professional
Richard is a writer at Geek Rewind who turns complex IT tasks into clear, step-by-step guides. He draws on years of hands-on experience in system administration and enterprise IT operations, focusing on Windows, Linux and WordPress: the problems people actually run into, and the fixes that work. His server and WordPress guides come from systems he runs himself. Richard builds and maintains the platform behind Geek Rewind, from its Ubuntu servers and Nginx configuration to its custom WordPress plugins. Many new tutorials start with readers' questions, and he's always glad to answer them in the comments.
No comments yet — be the first to share your thoughts!