How to Connect a Flatbed Scanner to Your Device Using Windows Settings

Connecting a flatbed scanner to a Windows 11 PC lets you turn paper documents, photos and artwork into digital files with tools already built into Windows. For most modern scanners you do not need a driver disc. Windows detects the scanner over a USB cable or your network and installs a driver automatically, usually through Windows Update . Home and Pro editions follow the same steps in this guide.
Open Settings , select Bluetooth & devices, click Printers & scanners, then Add device. Windows searches for your scanner over USB or network. When it appears, click Add device next to it and Windows installs the driver automatically.
Install or add a local scanner
Before you start, connect the scanner to a power outlet, switch it on, and plug the USB cable directly into a port on the PC. Avoid unpowered USB hubs, because they can cause detection to fail. You also need an internet connection so Windows can download the driver if it does not have one.
- Press the Windows key and the I key together to open Settings.

Windows 11 Start menu with Settings gear icon highlighted. - Select Bluetooth & devices from the left sidebar.
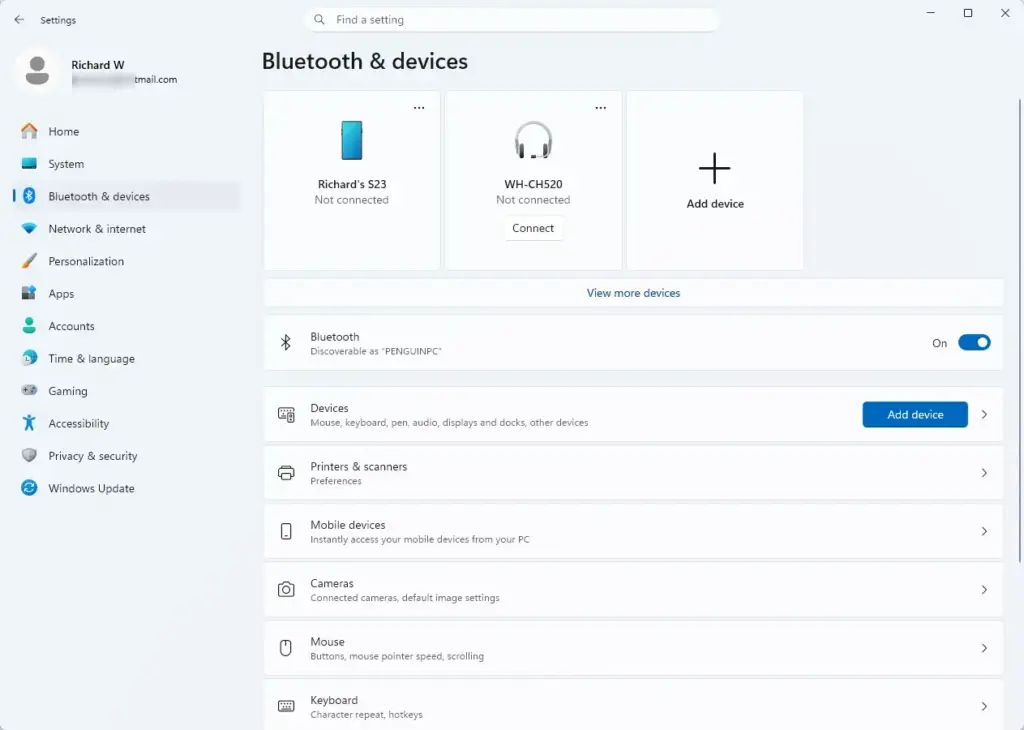
Windows Settings menu highlighting the Bluetooth and devices option for printers - Click Printers & scanners. You should now see the list of printers and scanners Windows already knows about.
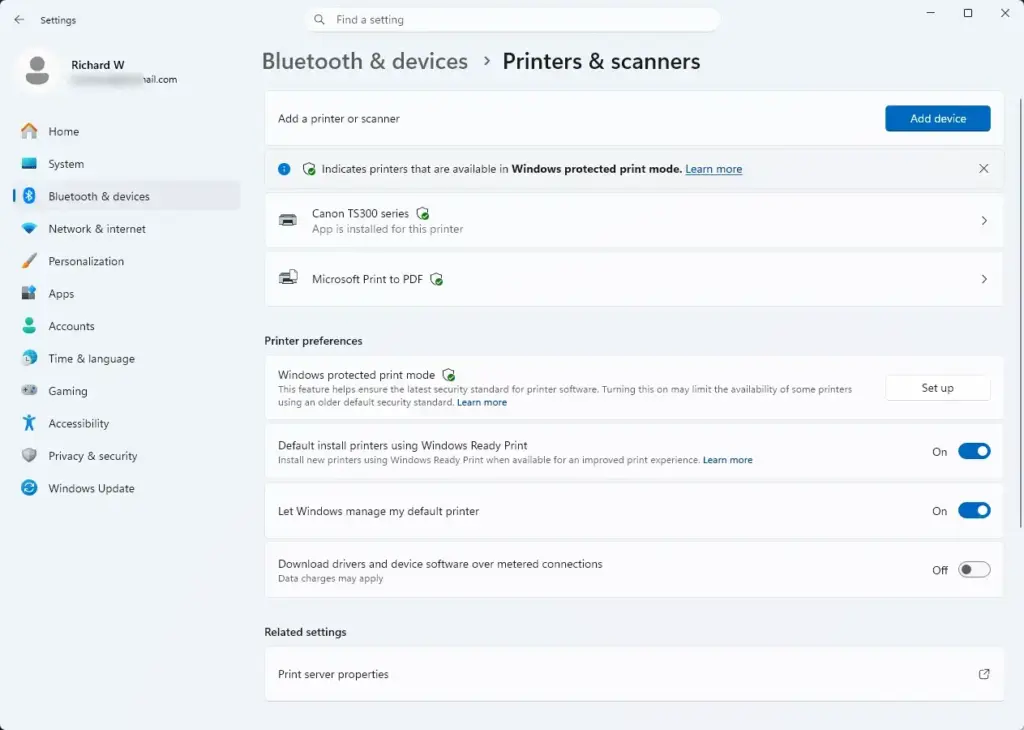
Settings › Bluetooth › Printers - Click the Add device button near the top of the window. Windows starts searching for hardware and shows a short “searching” message.
- Wait for the scan to finish. When your flatbed scanner appears in the list, click Add device next to it. Windows installs the driver, and the scanner then shows up in the main list.
If the scanner never appears, try a different USB port, switch the scanner off and on again, or restart the PC. Then run the search again. If it still fails, check Windows Update , since the driver may arrive there. You can also check the manufacturer’s support page for a driver download.
Install or add a network, wireless, or Bluetooth scanner
Use this method for a scanner on your network (Wi-Fi or Ethernet) or one that pairs over Bluetooth . A network scanner must be on the same local network as your computer. A Bluetooth scanner must be switched on, in pairing mode, and within range of the PC.
- Press the Windows key and the I key together to open Settings.
- Click Bluetooth & devices on the left menu.
- Select Printers & scanners.
- Click the Add device button. Windows searches for available wireless and network equipment.
Settings › Bluetooth › Printers - If your scanner does not show up on its own, click the Add manually link that appears during the search .
- Choose the option to add a Bluetooth , wireless or network discoverable device. Select your flatbed scanner from the search results and follow the on-screen prompts.
If the scanner is not found, confirm that both devices are on the same network. A scanner on a guest Wi-Fi network, or on a different one from your PC, will not be discovered. Some manufacturers also push their own scanning app during setup. The article “How to stop Manufacturer Apps from Installing Automatically in Windows 11” explains how to prevent that if you would rather use only the built-in tools.
Verify the scanner is installed
Once the scanner has been added, check that Windows recognizes it and reports it as working.
- Open Settings and go to Bluetooth & devices, then Printers & scanners.
- Scroll through the list of connected hardware until you find your flatbed scanner's model name.
- Click the scanner entry. Its page opens and shows the device status. It should read as ready or idle.
For a network scanner, also confirm it is on the same network as the PC. If the scanner is listed twice, or you added the wrong one, open its entry and use the remove option on that page. Then add it again.
Scan a picture or document with the Windows Scan app
The Windows Scan app is a free tool from Microsoft. If it is not already on your PC, download it from the Microsoft Store first.
- Lift the lid of your flatbed scanner. Place your document or photo face down on the glass, aligned with the corner markers. Close the lid.
- Open the Start menu, type Windows Scan, and press Enter to launch the app. The app lists the scanners it can find.
- Check the Scanner dropdown menu at the left of the app window and make sure your flatbed scanner model is selected.
- Set the source type to Flatbed.
- Open the File type dropdown and choose a format such as JPEG, PNG, TIFF or PDF. JPEG suits everyday photos. PDF is the usual choice for documents. TIFF keeps the most detail for archiving, but the files are larger.
- Click the Preview button to test the alignment and crop area, or click the Scan button straight away to capture the document. When the scan finishes, the app shows the result and a button to view the saved file.
If your scanner is not in the Scanner dropdown, go back to Printers & scanners in Settings and confirm it is listed there with a ready status.
Find saved scans in File Explorer
The Windows Scan app saves finished scans to a folder called Scans inside your Pictures folder. This is the default location, and you can change it in the app's settings.
- Press the Windows key and the E key together to open File Explorer.
- Click Pictures in the navigation pane on the left side of the window.
- Double-click the Scans folder to open it. Documents and images captured through the Windows Scan app are saved here automatically.
If you cannot find a file, check whether you changed the save location in the Scan app. Also check that you picked the file type you expected, since the extension shows which format was used.
What to do next
Once the scanner works, you can manage it at any time from the same place. Return to Printers & scanners in Settings to remove old hardware, check the connection status of several scanners, or set a default device. If you replace the scanner later, remove the old entry first. That keeps the device list clean and stops the Scan app from selecting hardware that is no longer connected.
Have a question about this guide?
Answered by AI from this guide. Good questions may be added to this page — please don't include personal details.
Did this guide fix your problem?

About the Author
Richard
Tech Writer, IT Professional
Richard is a writer at Geek Rewind who turns complex IT tasks into clear, step-by-step guides. He draws on years of hands-on experience in system administration and enterprise IT operations, focusing on Windows, Linux and WordPress: the problems people actually run into, and the fixes that work. His server and WordPress guides come from systems he runs himself. Richard builds and maintains the platform behind Geek Rewind, from its Ubuntu servers and Nginx configuration to its custom WordPress plugins. Many new tutorials start with readers' questions, and he's always glad to answer them in the comments.
No comments yet — be the first to share your thoughts!