How to Hide or Show Desktop Icons in Windows 11

Hiding desktop icons in Windows 11 clears a messy screen and shows your background picture with one click. It does not delete any files or shortcuts. A fresh Windows 11 install usually shows around 5 to 10 default icons, such as the Recycle Bin and Microsoft Edge, before you add your own.
The desktop’s own right-click menu controls this visibility setting. Hiding the icons is handy for better focus or clean screenshots, and you can turn them back on whenever you need them.
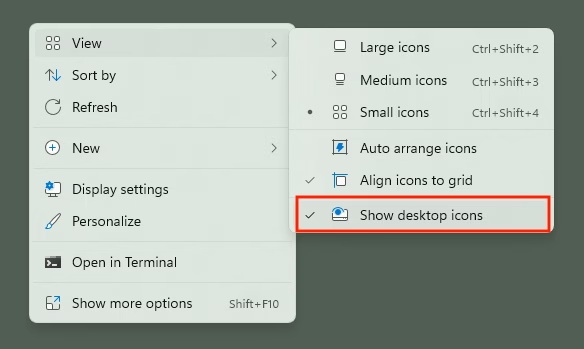
Right-click an empty spot on your desktop, click View, then click Show desktop icons to toggle them off. The icons disappear immediately without deleting any files, and you can turn them back on anytime using the same steps.
Hide or Show Desktop Icons Using the Right-Click Menu
This is the quickest method and works on every edition of Windows 11, including Home and Pro. It affects only your own account and needs no administrator rights.
- Right-click an empty spot on your desktop. You should see the desktop context menu .
- Click View. A submenu opens with icon size and layout options.
- Click Show desktop icons to turn the icons on (checked) or off (unchecked). The change takes effect immediately and no restart is needed.
If you can’t find View, make sure you right-clicked an empty area and not an icon. Also, if a Group Policy has been applied (see the next method), the right-click menu is disabled and won’t appear at all.
Option Two
Hide and Disable All Desktop Items Using Group Policy Editor
The Local Group Policy Editor is a built-in tool for managing advanced system settings. You can use it to hide desktop icons across your entire user account. It works best on Windows 11 Pro or Enterprise, because the tool is missing from Windows 11 Home editions. You need administrator rights to make this change stick.
If you are on Home, this method won’t work, so use the right-click method above instead. On Pro or Enterprise, you can find the editor by searching the Start menu for Edit group policy.
- Open the Local Group Policy Editor.
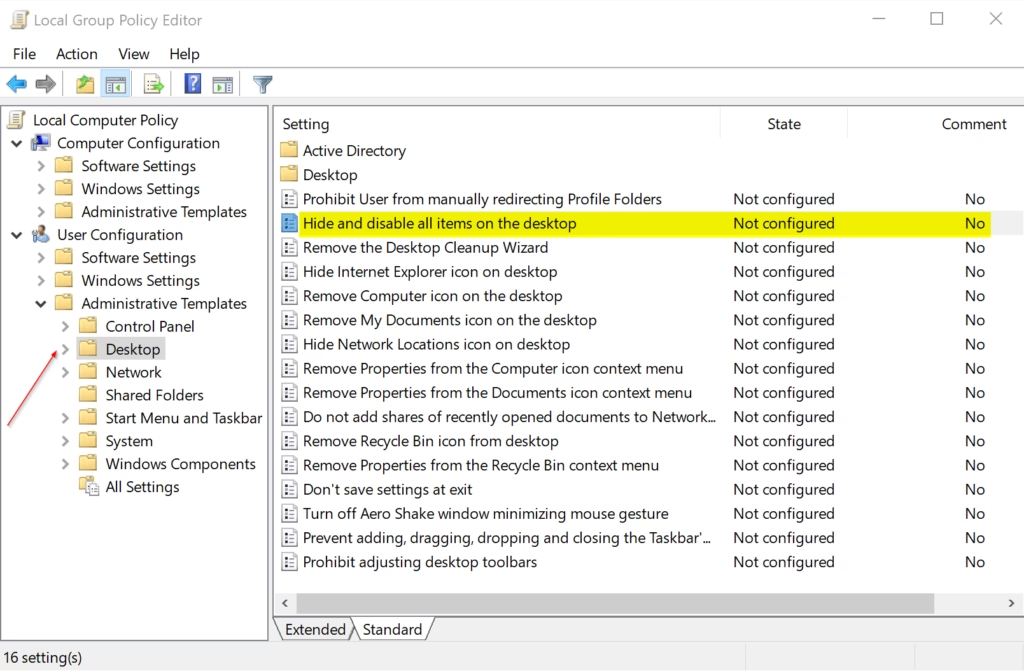
- In the left pane, navigate to one of the locations below. The first applies to all users, the second to a specific user or group.
(For all users)
Computer Configuration > Administrative Templates > Desktop
OR
(For a specific user or group)
User Configuration > Administrative Templates > Desktop
- In the right pane, under Desktop, double-click Hide and disable all items on the desktop. A settings window for that policy opens.
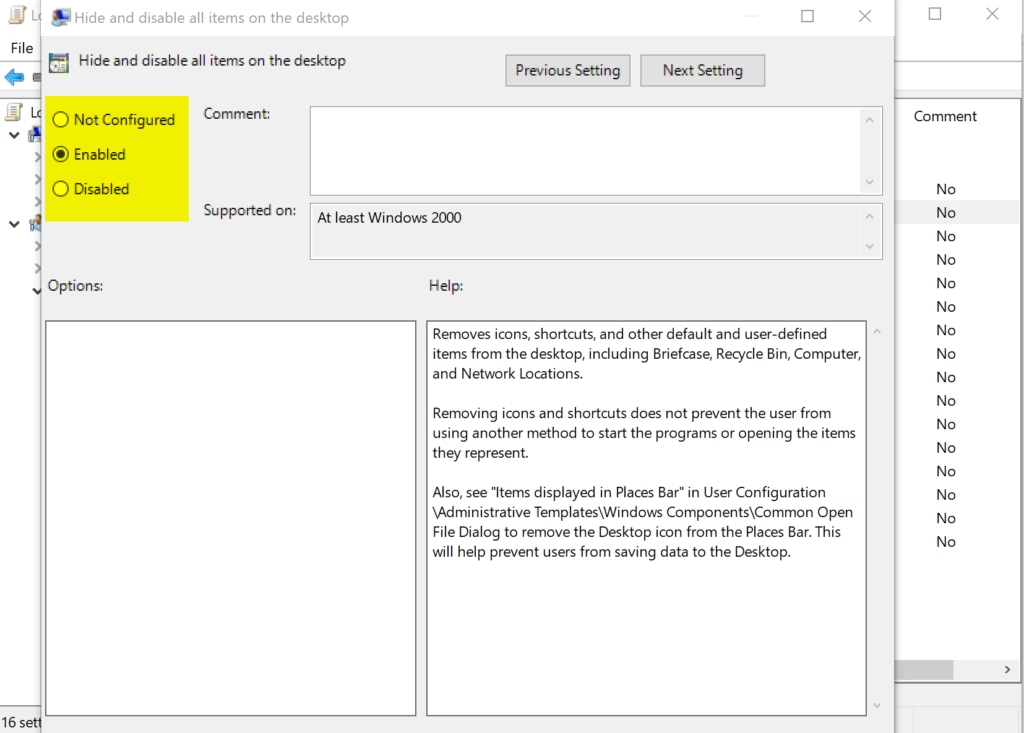
Hide and Disable All Items on the Desktop
You won't be able to use View and Show desktop icons to bring the icons back, so you will need to return to this policy to undo it.
To hide the icons:
- Select the dot next to Enabled.
- Click OK.
Undo Hide and Disable All Items on the Desktop
To show the icons again, open the same policy and set it back to its default:
- Select the dot next to Not Configured.
- Click OK.
Either way, finish with these steps so the change applies:
- Close the Local Group Policy Editor.
- Either restart the explorer process, sign out and back in, or restart your computer. Restarting the explorer process is the fastest option: open Task Manager, find Windows Explorer on the Processes tab, right-click it, and click Restart. The taskbar disappears briefly and then comes back.
After this, your desktop should show or hide its icons according to the policy you chose.
Option Three
Hide and Disable All Desktop Items Using the Registry
⚠️ Requires administrator access
You must be signed in with an administrator account, or be able to approve the admin prompt, for this method to work.
Hide and Disable All Items on the Desktop for All Users
Applying this change disables the desktop right-click menu. Keep that in mind, because the usual toggle won't be available until you reverse it.
reg add "HKEY_CURRENT_USERSoftwareMicrosoftWindowsCurrentVersionPoliciesExplorer" /v NoDesktop /t REG_DWORD /d 1 /f
reg add "HKEY_LOCAL_MACHINESOFTWAREMicrosoftWindowsCurrentVersionPoliciesExplorer" /v NoDesktop /t REG_DWORD /d 1 /f
Undo Hide and Disable All Items on the Desktop for All Users
reg delete "HKEY_CURRENT_USERSoftwareMicrosoftWindowsCurrentVersionPoliciesExplorer" /v NoDesktop /f
reg delete "HKEY_LOCAL_MACHINESOFTWAREMicrosoftWindowsCurrentVersionPoliciesExplorer" /v NoDesktop /f
Configuration is complete. If the icons haven't changed yet, restart the explorer process or sign out and back in.
Summary
Several methods exist for managing desktop icons in Windows 11. The right-click menu remains the quickest option for daily use. Reserve the Group Policy method for Pro or Enterprise machines where you want the setting enforced.
Have a question about this guide?
Answered by AI from this guide. Good questions may be added to this page — please don't include personal details.
Did this guide fix your problem?

About the Author
Richard
Tech Writer, IT Professional
Richard is a writer at Geek Rewind who turns complex IT tasks into clear, step-by-step guides. He draws on years of hands-on experience in system administration and enterprise IT operations, focusing on Windows, Linux and WordPress: the problems people actually run into, and the fixes that work. His server and WordPress guides come from systems he runs himself. Richard builds and maintains the platform behind Geek Rewind, from its Ubuntu servers and Nginx configuration to its custom WordPress plugins. Many new tutorials start with readers' questions, and he's always glad to answer them in the comments.
No comments yet — be the first to share your thoughts!