Windows 11 Taskbar: What Is the Task Vie Feature

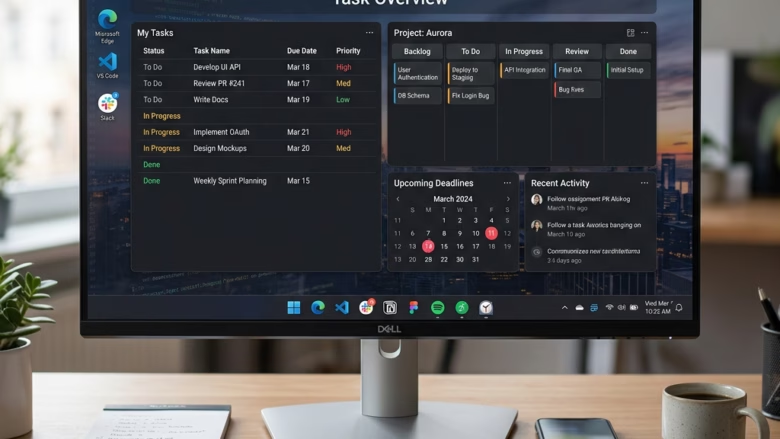
Managing multiple open windows on a crowded screen slows down your work. Windows 11 includes Task View, a full-screen overview that shows every open window and lets you group them into separate virtual desktops. It works the same way in Windows 11 Home and Pro, and it needs no setup or restart.
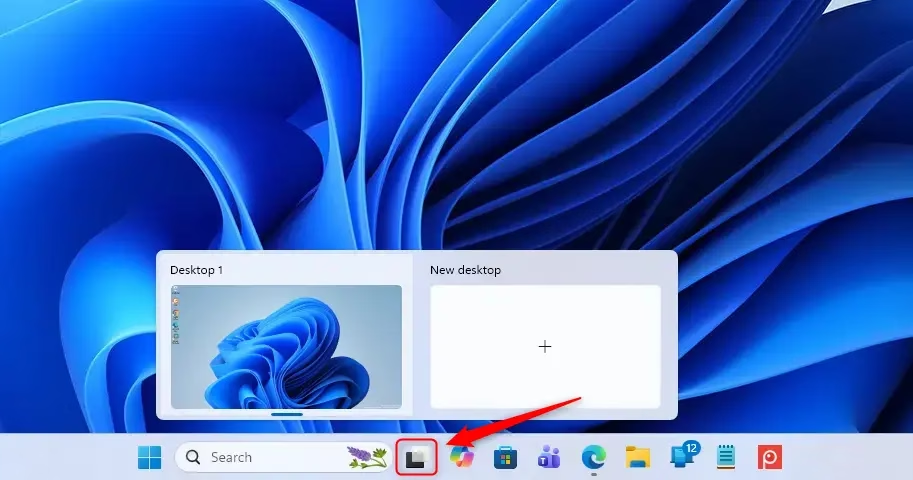
Windows 11 Task View is a full-screen overview that shows all your open windows as thumbnails and lets you organize them across virtual desktops. Open it by clicking the Task View icon (two overlapping rectangles) on the taskbar next to Search, or press Win+Tab.
1Finding and Opening Task View
There are two ways to open Task View. You can click the Task View button on the taskbar , which looks like two overlapping rectangles and sits next to the Search icon. Or you can press Win+Tab. The keyboard route is quicker once it becomes habit, and it works even if the taskbar button has been hidden.

| 1. Widgets | 2. Start | 3. Search | 4. Task view | 5. Applications | 6. System tray |
Press Win+Tab to open Task View using your keyboard. Here are both methods as steps:
- Click the Task View icon. Find the two overlapping rectangles on the taskbar , next to the Search icon, and click it. With the default centered taskbar, the icon sits near the left end of the group of icons. The screen dims and your open windows appear as thumbnails.
- Use the keyboard shortcut. Press
Windows key + Tabat the same time. You get the same overview without touching the mouse. Press the Esc key, or click an empty area, to close it without switching anywhere.
If you use a laptop with a precision touchpad, a three-finger swipe up usually opens Task View too. That depends on your touchpad settings, so don’t worry if yours doesn’t respond.
It is easy to bring back, and the steps are later in this guide.
2What You See When Task View Opens
Task View shows every running application and open window on your screen at once. The live thumbnails let you spot the program you want and jump to it, even when it’s buried under other windows.
Several distinct elements appear in this interface:
- Thumbnails of open windows: The main area shows a thumbnail for each application or document that is currently open. These are your active tasks. Click any thumbnail and Windows switches you straight to that window, so it works like a visual menu of everything you have running.
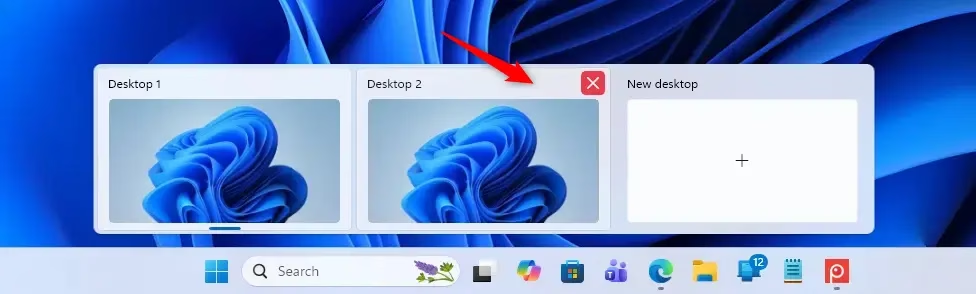
- Multiple desktops: This is where Task View is most useful for heavy multitaskers. A row of desktops appears along the bottom of the screen. By default you have only "Desktop 1". Each desktop is a separate workspace, and you can keep different sets of apps on each one. For example, you could use one desktop for work, another for personal browsing, and a third for gaming.
- "New desktop" button: Next to your existing desktops (Desktop 1, Desktop 2 and so on) you'll find a button labeled "+ New desktop". Click it to create a fresh, empty workspace.
Too many virtual desktops add clutter instead of order, and you end up hunting for the right one. Stick to a few dedicated workspaces unless a specific workflow needs more.
3How to Use Task View for Multitasking
Task View is more than a passive viewer. It lets you switch windows, sort them into desktops and tidy up your workspace. The sections below cover each of those jobs.
Switching Between Open Applications
Switching between open applications with Task View takes a couple of clicks, and it's the fastest way to find a window that has gone missing behind others.
- Open Task View. Click the Task View icon or press
Windows key + Tab. The screen shows thumbnails of your open windows. - Find your app. Look through the thumbnails and locate the window you want.
- Click the thumbnail. Task View closes and Windows brings that application to the front.
Practical Tip: When an application has several windows open, such as multiple text documents, each window gets its own preview. Hover over a thumbnail to see which window it is before you click.
Managing Multiple Desktops
Virtual desktops let you split projects into their own clean workspaces. You create them, move apps between them, switch among them and close them, all from Task View.
- Create a new desktop. Open Task View (
Windows key + Tab) and click + New desktop. A new, blank desktop appears in the row at the bottom of the screen. - Move an app to another desktop. Open Task View and hover over the thumbnail of the app you want to move. Right-click the thumbnail, and you'll see a Move to option followed by your available desktops. Select the desktop you want. As an alternative, you can click and drag the thumbnail onto the desktop at the bottom of the screen.
- Switch between desktops. Open Task View and click the desktop you want from the list at the bottom. You can also use the keyboard shortcuts
Ctrl + Windows key + Left ArroworCtrl + Windows key + Right Arrowto cycle between your desktops without opening Task View. - Close a desktop. Open Task View, hover over the desktop you no longer need, and click the X that appears in the corner of its thumbnail. The desktop disappears from the row.
They move to the desktop to its left, so they will show up mixed in with that desktop's windows. Save your work first, and check where things landed afterward.
Power User Tip: Give each desktop a clear job. Keep chat and email on one desktop and creative or work programs on another, so unrelated windows don't distract you.
4Showing or Hiding the Task View Button
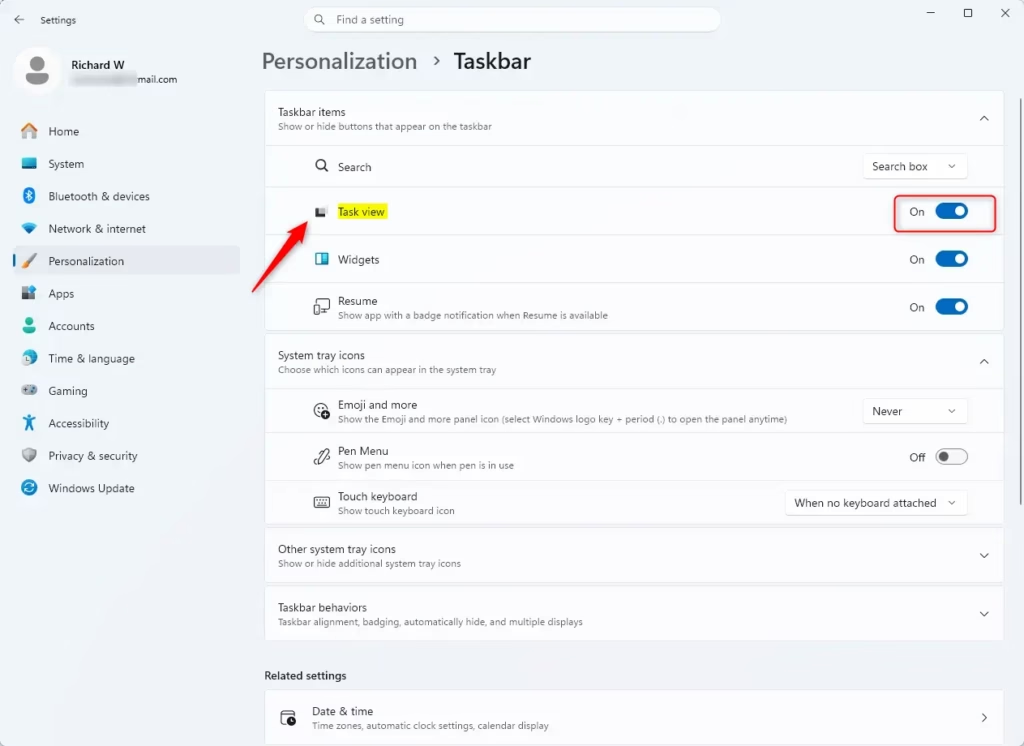
You can show or hide the Task View button from the taskbar settings. This only affects the icon, and the change takes effect immediately with no restart.
- Right-click an empty space on the taskbar. A small context menu appears.
- Select Taskbar settings. The Settings app opens on the taskbar page.
- Find the Taskbar items section near the top of the page.
- Find the Task view toggle switch. Turn it On if you want the icon to appear, or Off if you want it hidden. The icon appears or disappears right away.
To undo the change, flip the same toggle back. If the Taskbar settings option is missing from the right-click menu, make sure you clicked an empty part of the taskbar and not on an icon.
Convenience Tip: The Windows key + Tab shortcut keeps working even when the taskbar button is hidden. Turning off the icon never removes access to Task View.
Conclusion
Task View in Windows 11 gives you a reliable way to organize your active applications across multiple virtual workspaces. With dedicated desktops, research browser tabs and personal projects stay apart. Try a few layouts for a week or so and keep the one that fits how you work.
Frequently asked questions
What does the phrase "main features" mean?
Main features are the core abilities or tools that something is designed to do. For Task View, the main features are seeing all your open windows at once and organizing them into separate virtual desktops to keep your workspace tidy.
What does the term "feature factory" mean?
A feature factory is a company or team that builds lots of new features without focusing on whether they solve real problems. They chase novelty instead of making sure what they create actually helps people work better.
What does the verb "feature" mean?
The verb feature means to display or highlight something as a main part of something else. For example, Windows 11 features Task View, meaning Task View is one of its important built-in tools you can use.
Where can I find feature clothing?
This question doesn't relate to the Windows 11 Task View article. Feature clothing brands and stores are found through fashion retailers, online shopping sites, or search engines—not Windows help resources.
Still have a question?
Answered by AI from this guide. Good questions may be added to this page — please don't include personal details.
Did this guide fix your problem?

About the Author
Richard
Tech Writer, IT Professional
Richard is a writer at Geek Rewind who turns complex IT tasks into clear, step-by-step guides. He draws on years of hands-on experience in system administration and enterprise IT operations, focusing on Windows, Linux and WordPress: the problems people actually run into, and the fixes that work. His server and WordPress guides come from systems he runs himself. Richard builds and maintains the platform behind Geek Rewind, from its Ubuntu servers and Nginx configuration to its custom WordPress plugins. Many new tutorials start with readers' questions, and he's always glad to answer them in the comments.
No comments yet — be the first to share your thoughts!