How to Create Virtual Desktops in Windows 11

Virtual desktops in Windows 11 let you set up multiple separate screens on a single PC so you can keep open apps and windows organized. Instead of crowding one monitor with twenty open windows, you can put work tasks on desktop one and personal projects on desktop two.
Windows 11 builds this feature right into the operating system, so you do not need to download extra apps. It works the same in Home and Pro. You can switch between your workspaces by pressing Win+Tab or by clicking the Task View button on the taskbar.
Press Win+Ctrl+D to create a new virtual desktop. You can also click the Task View icon on the taskbar and then click the “+ New desktop” button.
How to Create Virtual Desktops in 🪟 Windows 11
You can create virtual desktops from the taskbar or with keyboard shortcuts. Task View is the tool that shows all your open windows and virtual desktops in one place. Microsoft introduced it in Windows 10, and Windows 11 keeps it with a refreshed look.
Your virtual desktops stay in place after you restart the PC, so you can set them up once and keep using them. There is no need to install anything or change a setting to turn the feature on.
Using Keyboard Shortcuts
The fastest way to create a new workspace is with your keyboard.
- Press Win+Ctrl+D.
- Look at the screen. Windows adds a new desktop and switches to it right away. It will be empty, with no windows open and only the taskbar and wallpaper showing.
- Repeat the shortcut for each extra desktop you want.
Windows 11 does not ask you to confirm anything. If the shortcut seems to do nothing, check that you are holding all three keys together. Press Win+Tab to confirm that the new desktop is there.
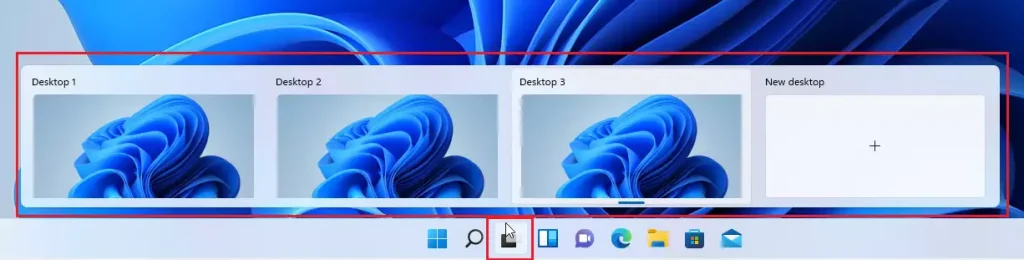
After the shortcut runs, you are already on the new desktop. Open the apps you want for that task here. Windows keeps them separate from the apps on your first desktop.
Using the Taskbar
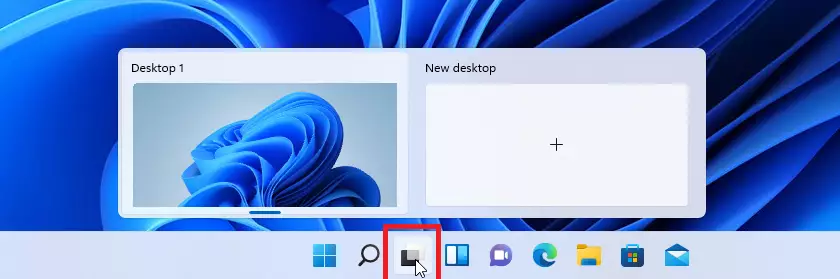
If you prefer the mouse, use the Task View button on the taskbar .
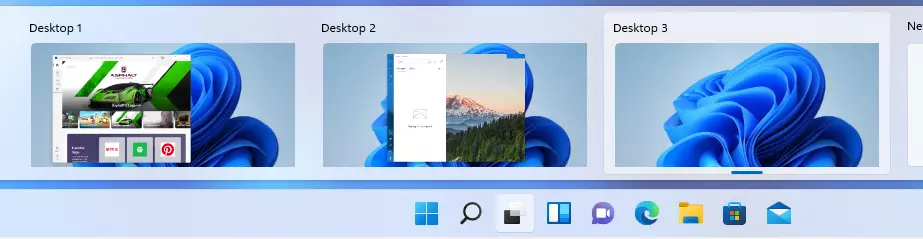
- Click the Task View icon on the taskbar . It looks like two overlapping squares. You will see your open windows, and a row of desktop thumbnails along the bottom of the screen.
- Click the + New desktop button. A new thumbnail appears in the row.
- Click the new thumbnail to switch to it, or click + New desktop again to add more.
You can also hover over the Task View icon without clicking. A small preview of your desktops pops up, and you can click one to jump to it.
If you can’t find the Task View icon, it may be hidden. Go to Settings Personalization Taskbar, open Taskbar items and switch Task view to On. The Win+Tab shortcut works whether the icon is visible or not.
Managing Your Virtual Desktops
Customizing virtual desktops makes them much easier to spot at a glance. Names like “Desktop 4” tell you nothing, and a different wallpaper tells you where you are as soon as you switch.
Renaming and Backgrounds
To rename a desktop:
- Open Task View with Win+Tab or the taskbar icon.
- Right-click the thumbnail of the desktop you want to change.
- Select Rename, type a new name such as “Work” or “Personal”, and press Enter. The new name now shows under the thumbnail.
To give a desktop its own background:
- In Task View, right-click the desktop’s thumbnail.
- Select Choose background. Windows opens the Personalization settings for that desktop.
- Pick a picture, solid color or slideshow. Only that desktop changes.
If Choose background is missing from the right-click menu , your copy of Windows 11 is probably an early build that predates per-desktop backgrounds. Run Windows Update to get it. This visual separation makes it easier to keep work and personal tasks apart.
Moving Windows Between Desktops
Need to move an app to another desktop?
- Open Task View with Windows + Tab.
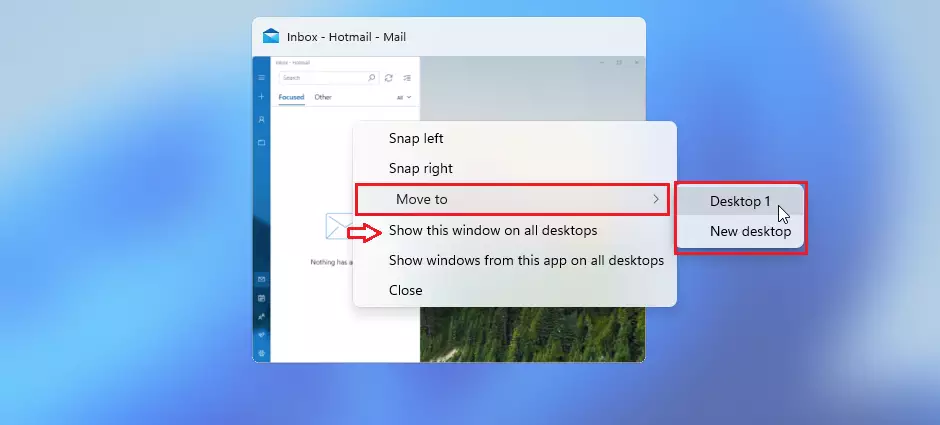
- Right-click the window you want to move. Its thumbnail sits in the main area of Task View.
- Select Move to.
- Choose the desktop where the app should go. The window disappears from the current desktop and shows up on the one you picked.
The same right-click menu has options to show a window, or all windows from that app, on every desktop. Use these for things like a music player or chat app that you want to see everywhere. You can also drag a window's thumbnail onto a desktop thumbnail at the bottom of the screen.
Essential Keyboard Shortcuts
| Action | Shortcut |
|---|---|
| Open Task View | Windows + Tab |
| Create New Desktop | Windows + Ctrl + D |
| Switch to Next Desktop | Windows + Ctrl + Right Arrow |
| Switch to Previous Desktop | Windows + Ctrl + Left Arrow |
| Close Current Desktop | Windows + Ctrl + F4 |
Summary
Virtual desktops help organize your digital life by letting you create separate spaces for different tasks. Start with two, one for work and one for everything else. Add more only when you actually need them.
Have a question about this guide?
Answered by AI from this guide. Good questions may be added to this page — please don't include personal details.
Did this guide fix your problem?

About the Author
Richard
Tech Writer, IT Professional
Richard is a writer at Geek Rewind who turns complex IT tasks into clear, step-by-step guides. He draws on years of hands-on experience in system administration and enterprise IT operations, focusing on Windows, Linux and WordPress: the problems people actually run into, and the fixes that work. His server and WordPress guides come from systems he runs himself. Richard builds and maintains the platform behind Geek Rewind, from its Ubuntu servers and Nginx configuration to its custom WordPress plugins. Many new tutorials start with readers' questions, and he's always glad to answer them in the comments.
[…] We recently published a post explaining Task View and how to utilize it in Windows 11. You can read that post here. […]
[…] Task View feature in Windows is a manager that lets you switch between apps on multiple desktops. Why use […]