How to Hide Task View on Windows 11 Taskbar

Task View is a built-in Windows 11 feature. It puts a button on the taskbar that shows all your open windows and virtual desktops in one view. Hiding the button removes that clutter in Windows 11 version 22H2 and later. It does not turn off the feature itself.
After you hide the button, you can still open Task View at any time by pressing Win+Tab. Every method below can be reversed, so you can bring the button back whenever you want.
Open Settings Personalization Taskbar, find the Task view toggle under Taskbar items, and switch it to Off. The button disappears immediately. Press Win+Tab anytime to still access Task View without the icon.
How to hide Task View from the Taskbar
The Settings app is the easiest method. It works on both Windows 11 Home and Pro, needs no restart, and the change takes effect straight away.
- Press Win+I to open Settings .
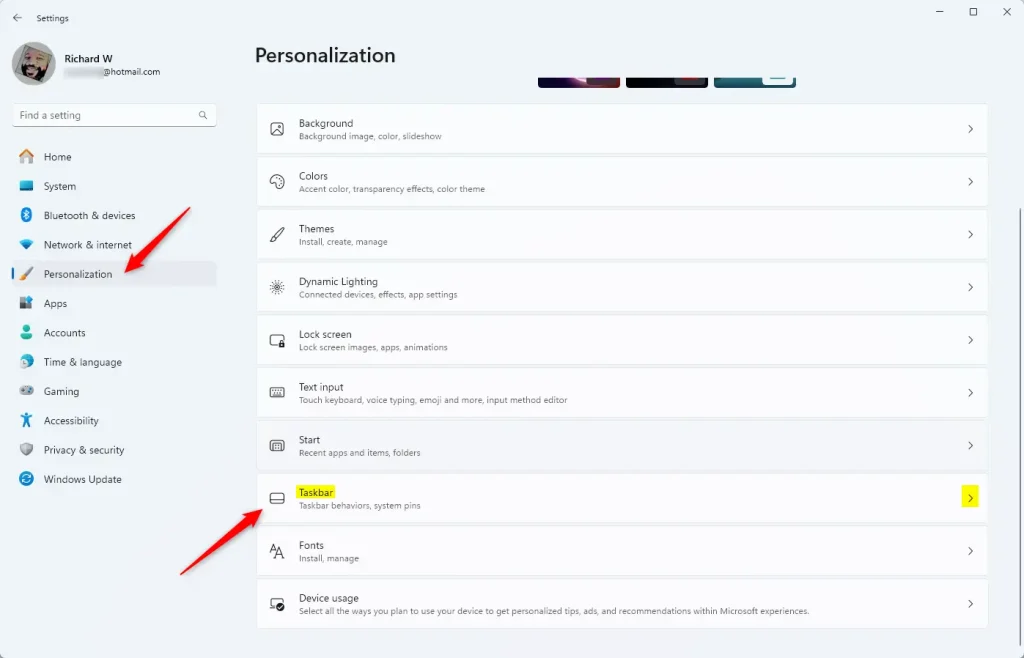
- Go to Settings Personalization Taskbar You should see a list of taskbar options.
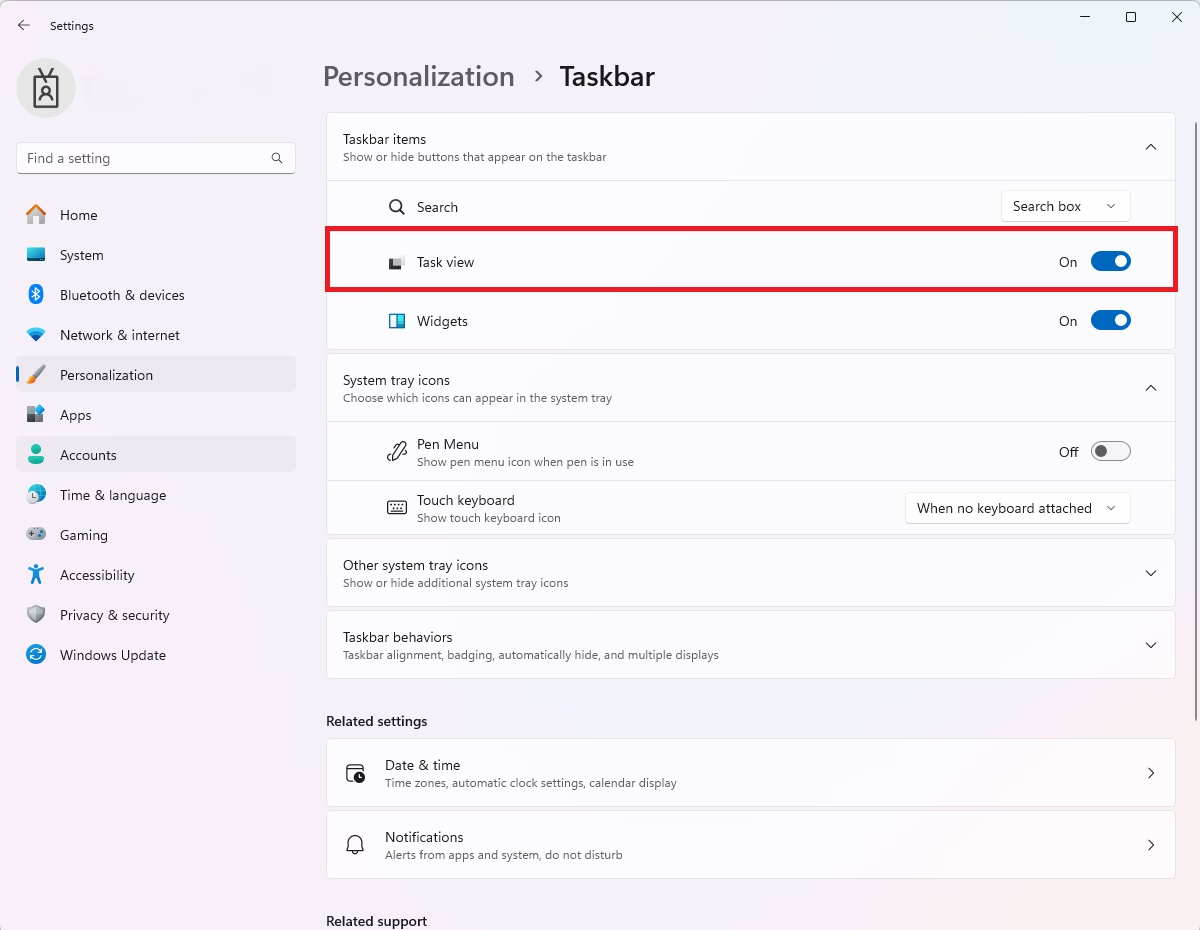
- Find the Task view toggle. It sits under the Taskbar items section at the top of the page. Expand that section if it is collapsed.
- Switch the Task view toggle to Off. The button should disappear from the taskbar immediately.
To undo this, return to the same page and switch the toggle back to On. You can also reach the page by right-clicking an empty area of the taskbar and choosing Taskbar settings.
Accessing Virtual Desktops without the button
Hiding the button does not disable virtual desktops. You can still create them, switch between them and move windows around. You just reach them by keyboard instead of by the icon.
- Press Windows key + Tab to open Task View. You should see your open windows and a desktop bar along the bottom of the screen.
- Select New desktop to add a virtual desktop, or click an existing desktop to switch to it.
- Press Esc to close Task View without changing anything.
This keeps your workflow fast without a permanent icon on the taskbar.
Advanced: Using the Registry Editor
Use it when the standard taskbar settings are unavailable or do not work for you. It edits the registry directly, so work carefully and change only the value named below. If you want a safety net, export the key first with File Export in Registry Editor.
- Press Windows key + R, type regedit, and press Enter. Approve the User Account Control prompt if it appears. Registry Editor should open.
- Go to the following path:
HKEY_CURRENT_USER\Software\Microsoft\Windows\CurrentVersion\Explorer\Advanced - Look in the right-hand pane for a DWORD value called ShowTaskViewButton. If it is missing, right-click an empty area, choose New DWORD (32-bit) Value, and name it exactly ShowTaskViewButton.
- Double-click the value to open the Edit DWORD (32-bit) Value box.
- Set Value data to 0 to hide the button, or 1 to show it, then click OK.
The button may not change straight away. If it is still there, sign out and back in, or restart your PC. To undo the change, set the value back to 1.
Enterprise Management via Group Policy
Group Policy Editor lets network administrators hide Task View on many computers at once in a business environment. The policy applies to every user the policy targets, so you do not have to update each PC one by one.
The Local Group Policy Editor is only included in Windows 11 Pro, Enterprise and Education. On Windows 11 Home it is not available, so use the Settings or Registry Editor method instead. On a domain, you normally set this in a Group Policy Object using the Group Policy Management Console.
Group Policy Editor is a tool for changing Windows settings from one central place. Here is how to hide the Task View button with it:
- Open the Group Policy Editor. You should see a policy tree on the left and settings on the right.
- Navigate to Computer Configuration Administrative Templates Windows Components Windows Taskbar
- Locate the Remove the Task View button setting and double-click it.
- Select Enabled, then click Apply and OK.
The setting may not be in exactly this folder on every Windows 11 build. If you cannot find it here, look for a setting with a similar name under the Start Menu and Taskbar folder in the Administrative Templates section, or browse the other folders. Policy changes can take a little while to reach each PC. Signing out and back in, or restarting, applies them sooner. To undo the change, set the policy to Not Configured or Disabled.
Automation with PowerShell
Network administrators can automate hiding the Task View icon on many Windows 11 computers with a script. Running it requires administrator privileges on each target machine. Automating the setting keeps the taskbar consistent across your network devices.
Keep a matching script that reverses the change, so you can restore the button quickly if users need it back.
Set-ItemProperty -Path "HKCU:\Software\Microsoft\Windows\CurrentVersion\Explorer\Advanced" -Name "ShowTaskViewButton" -Value 0
Summary
Hiding the Task View button can make your Windows 11 taskbar look tidier, and you have several ways to do it. For a single PC, the Settings app is the quickest and safest choice. Registry Editor is a fallback when Settings does not work for you. Group Policy and scripts suit administrators who manage many machines. Whichever method you use, Windows key + Tab still opens Task View, and you can bring the button back by reversing the change.
Have a question about this guide?
Answered by AI from this guide. Good questions may be added to this page — please don't include personal details.
Did this guide fix your problem?

About the Author
Richard
Tech Writer, IT Professional
Richard is a writer at Geek Rewind who turns complex IT tasks into clear, step-by-step guides. He draws on years of hands-on experience in system administration and enterprise IT operations, focusing on Windows, Linux and WordPress: the problems people actually run into, and the fixes that work. His server and WordPress guides come from systems he runs himself. Richard builds and maintains the platform behind Geek Rewind, from its Ubuntu servers and Nginx configuration to its custom WordPress plugins. Many new tutorials start with readers' questions, and he's always glad to answer them in the comments.
[…] 11. The Taskbar in Windows 11 is centered on the screen and shows the Start menu, Search, Task View, Widgets, Teams Chat, File Explorer, Microsoft Edge, and Microsoft Store buttons by […]
[…] way to add multiple desktops is to use the Task View feature. To do that, hover your mouse over the Task View icon, then using the desktop preview, select New desktop button to add a […]
[…] Menu Icon, which opens the Start menu; the Search Icon, which lets you search for files; and the Task View Icon, which enables you to see all open windows and virtual desktops, the Widgets Icon provides quick […]