How to Show All Open Windows on Taskbar on All Desktops in Windows 11
You can display all open windows on your Windows 11 taskbar across all virtual desktops by adjusting a specific setting in Taskbar behaviors.
Viewing all open applications across every virtual desktop enhances workspace management. This feature is particularly useful for users who run many programs simultaneously.
By default, Windows 11 often hides windows that aren’t on your active virtual desktop. This guide helps you change that behavior.
Go to Settings > System > Multitasking > Desktops. From the “On the taskbar, show all the open windows” dropdown, select “On all desktops”. This makes all open windows visible on your taskbar, regardless of the virtual desktop they are on.
Why This Matters
Using virtual desktops in Windows 11 helps you keep your work organized and multitask better by letting you group apps for different tasks.
Virtual desktops organize applications for different tasks, which improves computer productivity. Multiple virtual desktops help users keep unrelated projects separate. This allows users to quickly switch between these desktops before meetings, using keyboard shortcuts.
What Happens When Done
Normally, Windows 11 only shows apps from your current desktop on the taskbar, but you can change this setting to see all your open windows across all desktops.
Changing the taskbar setting for open windows displays all open applications on the taskbar across every virtual desktop. This setting helps users quickly find and switch between programs running on different desktops.
On all desktops = Windows open on all desktops will show on the taskbar for every desktop. You can quickly switch between any windows with a simple click on the icon. If the window is on a different desktop, Windows will switch to that desktop automatically.
Only on the desktop I’m using = Windows open on other virtual desktops will not show on your current taskbar. You will need to use Alt+Tab, Ctrl+Alt+Tab, or Task View (⊞ Win+Tab) to switch between open windows on other desktops.
Option One
Show All Open Windows on Taskbar Using Settings
- Open Settings (⊞ Win+I).
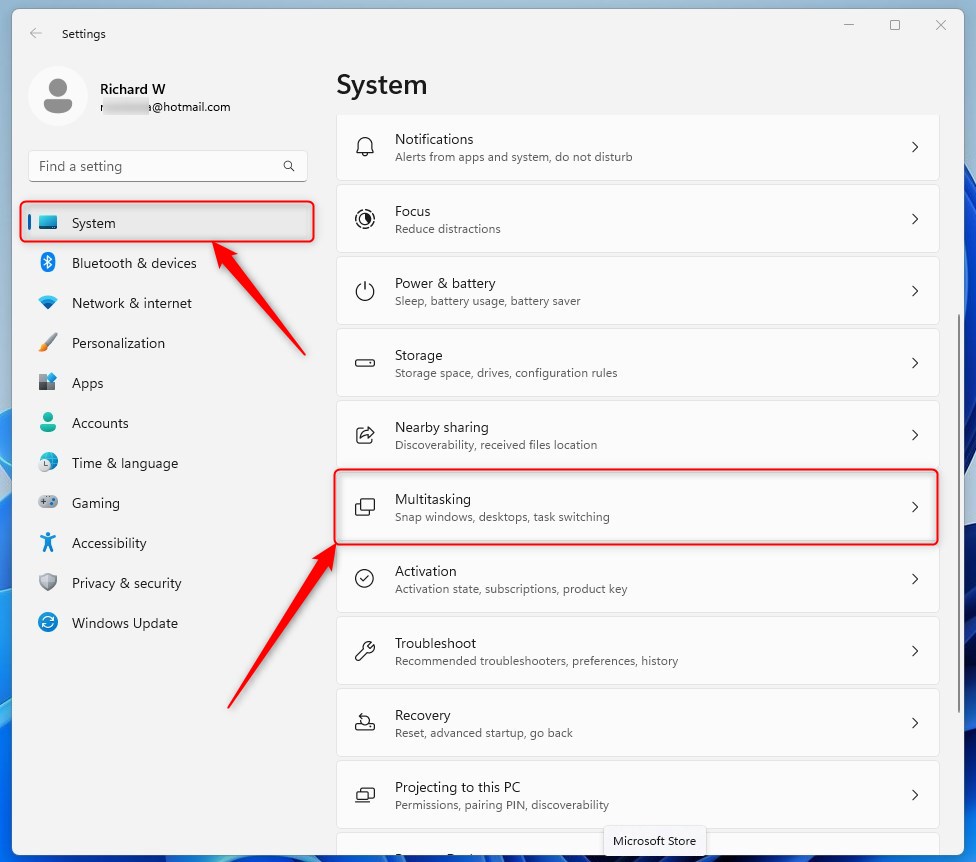
- Click on System on the left side. Then click on Multitasking on the right side.
You can easily change your Windows 11 taskbar to show all open windows on all desktops by going to the Multitasking section in Settings.
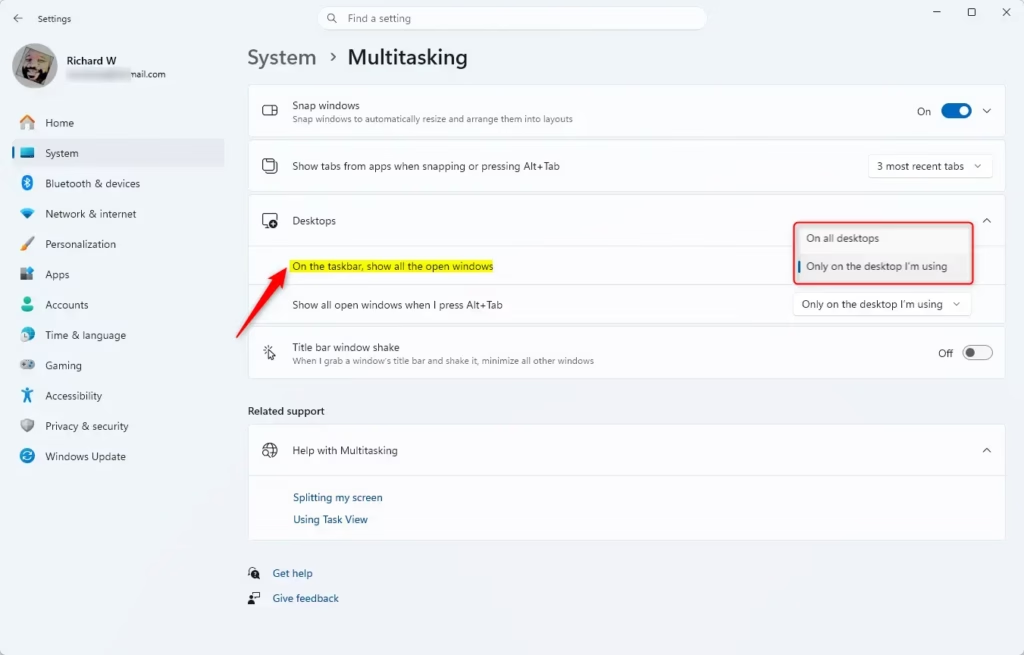
- Click on Desktops on the right side to expand it.
- Select On all desktops or Only on the desktop I’m using (default) from the “ On the taskbar, show all the open windows” dropdown menu.
- You can now close Settings if you like.
Option Two
Show All Open Windows on Taskbar Using Registry
You can change your Windows 11 taskbar to show all open windows on all desktops using a simple command in the Windows Terminal if you’re comfortable with the command line.
Open the Windows Terminal app with administrator privileges and run the command below.
Show All Open Windows on Taskbar “On all desktops”
reg add "HKEY_CURRENT_USER\Software\Microsoft\Windows\CurrentVersion\Explorer\Advanced" /v VirtualDesktopTaskbarFilter /t REG_DWORD /d 0 /f
Show All Open Windows on Taskbar “Only on the desktop I’m using”
This is the default setting.
reg add "HKEY_CURRENT_USER\Software\Microsoft\Windows\CurrentVersion\Explorer\Advanced" /v VirtualDesktopTaskbarFilter /t REG_DWORD /d 1 /f
Option Three
Show All Open Windows on Taskbar Using Registry Editor
- ⚠️ Admin Required: Open Registry Editor (regedit.exe).
- Navigate to the key location below in the left pane of Registry Editor.
For advanced users, you can adjust your Windows 11 taskbar to display all open windows across every desktop by editing specific values within the Registry Editor.
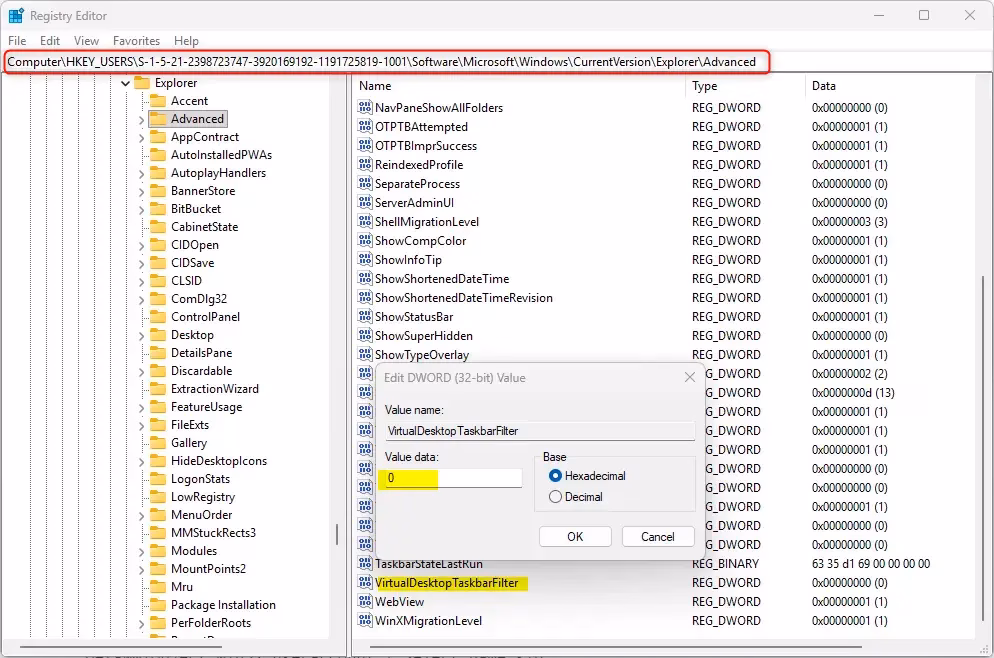
⚠️WarningSubstitute <SID> in the key path above with the actual SID for the account you want to change. For example:HKEY_USERS\S-1-5-21-2398723747-3920169192-1191725819-1001\Software\Microsoft\Windows\CurrentVersion\Explorer\Advanced - In the right pane of the Advanced key, double-click on
VirtualDesktopTaskbarFilterDWORD to modify it. - Enter
0(“On all desktops”) or1(“Only on the desktop I’m using” – default) for what you want. Then click OK. - Either restart the explorer process, sign out and sign in, or restart your computer to apply the change.
- You can now close Registry Editor if you like.
To find your SID, use the steps below:
Copy and paste the command below into PowerShell. Press Enter.
Get-WmiObject win32_useraccount | Select name,sid
Find the SID (example: “S-1-5-21-2398723747-3920169192-1191725819-1001”) for the account you want to configure. You’ll need to find the SID for the account you want to configure.
Summary
Windows 11 lets you choose how your taskbar displays open windows across virtual desktops, with options available through Settings, a REG file, or the advanced Registry Editor.
How do I get the classic taskbar back on 🪟 Windows 11?
Windows 11 does not natively support the classic taskbar from Windows 10. To achieve a similar look, you can left-align your icons via Settings > Personalization > Taskbar > Taskbar behaviors. For a fully classic experience, third-party tools like ExplorerPatcher or StartAllBack are required to modify the system interface.
How to view virtual desktops in 🪟 Windows 11?
To view virtual desktops in Windows 11, click the Task View icon on your taskbar, which looks like two overlapping rectangles. Alternatively, press the Windows key + Tab on your keyboard. This opens the interface where you can see, create, rename, or delete your active virtual desktops and open apps.
What is Microsoft replacing RDP with?
Microsoft is not replacing Remote Desktop Protocol (RDP) but is evolving its remote access strategy through Windows 365 and Azure Virtual Desktop. These cloud-based services utilize RDP technology to provide secure, scalable virtualized environments, shifting the focus from traditional on-premises server management to modern, cloud-managed desktop-as-a-service solutions for enterprise users.
What is the point of having multiple desktops on 🪟 Windows 11?
Multiple desktops in Windows 11 help you organize your computer screen by letting you group apps for different tasks, like work or personal use, making it easier to focus and switch between projects.
Was this guide helpful?

About the Author
Richard
Tech Writer, IT Professional
Richard, a writer for Geek Rewind, is a tech enthusiast who loves breaking down complex IT topics into simple, easy-to-understand ideas. With years of hands-on experience in system administration and enterprise IT operations, he’s developed a knack for offering practical tips and solutions. Richard aims to make technology more accessible and actionable. He's deeply committed to the Geek Rewind community, always ready to answer questions and engage in discussions.

No comments yet — be the first to share your thoughts!