How to Enable Variable Refresh Rate in Windows 11
Variable Refresh Rate (VRR) in Windows 11 syncs your monitor’s refresh rate with your game’s frame rate.
This technology stops screen tearing and stuttering, making games look much smoother.
VRR dynamically changes how often your monitor updates to match the exact number of frames your graphics card sends out at any moment. This means you see each frame as soon as it’s ready, avoiding those annoying visual glitches.
To use VRR, you need a monitor that supports NVIDIA G-SYNC or AMD FreeSync, plus a compatible graphics card. Your Windows 11 system should also be on build 22000 or a newer version.
Why use VRR?
Variable Refresh Rate (VRR) makes your games look smoother by matching your monitor’s refresh speed to your computer’s graphics card speed.
What happens when done?
Once enabled, your games will run more fluidly, especially older games that do not have built-in support for VRR. You will notice less screen tearing and a more responsive feel during fast-paced gameplay.
Hardware Requirements
To use VRR, your system must meet specific hardware standards:
- A monitor that supports Adaptive Sync, G-Sync, or FreeSync.
- A DisplayPort 1.2 or HDMI 2.1 cable.
- A graphics card that supports WDDM 2.7 or higher.
- The latest GPU drivers installed from your manufacturer’s website.
Dynamic Refresh Rate (DRR) vs VRR
While VRR is for gaming, Dynamic Refresh Rate (DRR) is for general use. DRR automatically switches between a low and high refresh rate to save battery life on laptops. VRR is focused on matching the monitor to the game’s frame rate to prevent visual artifacts.
How to enable VRR via Settings
You can easily enable Variable Refresh Rate (VRR) in Windows 11 using the built-in Settings app. This feature helps make games and videos run smoother by adjusting your screen’s refresh rate to match the content. Just follow a few simple steps within Windows Settings to turn it on.
- Open the Windows Settings app by pressing the Windows key + I on your keyboard.
- Click on the System button on the left menu.
windows 11 system tile - Click on the Display tile.

Windows Display Settings tile - Scroll down and click on Graphics.
Windows Graphic Settings tile - Click on Advanced graphics settings at the bottom.
- Toggle the switch for Variable refresh rate to On.
Windows Advanced graphics settings VRR button
How to enable VRR via Registry Editor
Enabling Variable Refresh Rate (VRR) in Windows 11 can also be done using the Registry Editor, though this method is more technical. If you’re comfortable editing system settings, this offers another way to control VRR. You’ll need to find a specific location in the Registry Editor and make a small change.
- Open the Windows Registry by pressing the Windows key + R, typing
regedit, and pressing Enter. - Navigate to this path:
HKEY_CURRENT_USER\Software\Microsoft\DirectX\UserGpuPreferences - If the
UserGpuPreferencesfolder is missing, right-click theDirectXfolder, select New, and create a Key namedUserGpuPreferences.
Windows UserGpuPreferences Variable Refresh Rate - Right-click in the empty space on the right side. Select New, then String Value. Name it
DirectXUserGlobalSettings. - Double-click
DirectXUserGlobalSettingsand set the Value data to1to turn it on, or0to turn it off.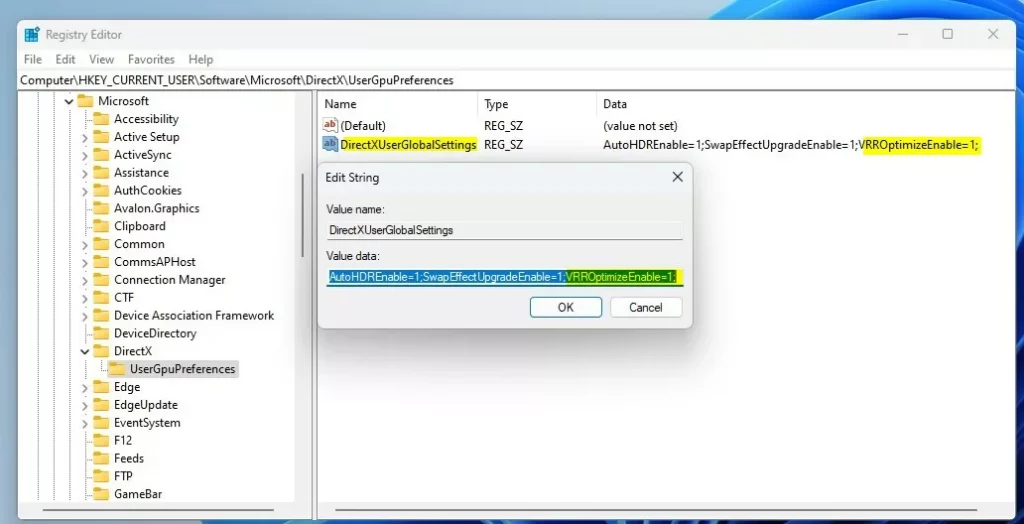
Windows UserGpuPreferences Variable Refresh Rate string value
Troubleshooting
If the option is missing, ensure your GPU drivers are updated. Check that your monitor is connected via a compatible cable and that Adaptive Sync is enabled in your monitor’s physical OSD menu.
Summary
Variable Refresh Rate makes your gaming experience much smoother by syncing your monitor to your game’s performance. You can enable this easily through your Windows display settings or by adjusting the registry if you prefer a more technical approach. For more details, see the official Microsoft display settings documentation.
Why is the Variable Refresh Rate option missing in 🪟 Windows 11?
The option may be missing if your monitor does not support Adaptive Sync or if your GPU drivers are outdated. Ensure you are using a DisplayPort 1.2 or HDMI 2.1 cable and that your graphics card supports WDDM 2.7 or higher for full compatibility with Windows 11 display settings.
Does VRR work on all monitors?
No, VRR only works on monitors that support Adaptive Sync, G-Sync, or FreeSync. Standard office monitors without these technologies will not show the VRR option in Windows settings. Always check your monitor’s manual or the manufacturer’s website to confirm if it supports variable refresh rate technology.
Is VRR the same as G-Sync or FreeSync?
VRR is the umbrella term for the technology. G-Sync and FreeSync are specific brand implementations of VRR. Windows 11 uses the VRR standard to communicate with these monitors, allowing your graphics card to control the refresh rate dynamically to eliminate screen tearing and stuttering during your gaming sessions.
Does enabling VRR affect battery life on laptops?
Enabling VRR can slightly increase power consumption because the GPU and display are working to synchronize frame rates constantly. However, for most users, the impact on battery life is minimal compared to the performance benefits. If battery life is a concern, you can toggle it off when not gaming.
Was this guide helpful?

About the Author
Richard
Tech Writer, IT Professional
Richard, a writer for Geek Rewind, is a tech enthusiast who loves breaking down complex IT topics into simple, easy-to-understand ideas. With years of hands-on experience in system administration and enterprise IT operations, he’s developed a knack for offering practical tips and solutions. Richard aims to make technology more accessible and actionable. He's deeply committed to the Geek Rewind community, always ready to answer questions and engage in discussions.

No comments yet — be the first to share your thoughts!