This article explains refreshing or rescanning available Wi-Fi networks in Windows 11.
Wi-Fi in Windows allows users to connect to wireless networks. This allows users to access the internet and other resources without needing physical cables, providing flexibility and mobility.
Wi-Fi networks within range will be visible when you open the Wi-Fi connection pane in Windows. When you see a Wi-Fi SSID, you can select and connect to it depending on whether you have the correct password.
Starting with Windows 11 build 26002 (Canary), Microsoft has rolled out a new refresh button on the Wi-Fi Quick Settings flyout, so you can now refresh the list of wireless networks available.
Instead of waiting for a network’s SSID to appear, you can use the refresh or rescan button to search for networks not displayed on the list.
Refresh the Wi-Fi list on the Quick Settings
As mentioned above, a new refresh button on the Wi-Fi Quick Settings flyout pane allows users to rescan available Wi-Fi networks.
Here’s how to do it.
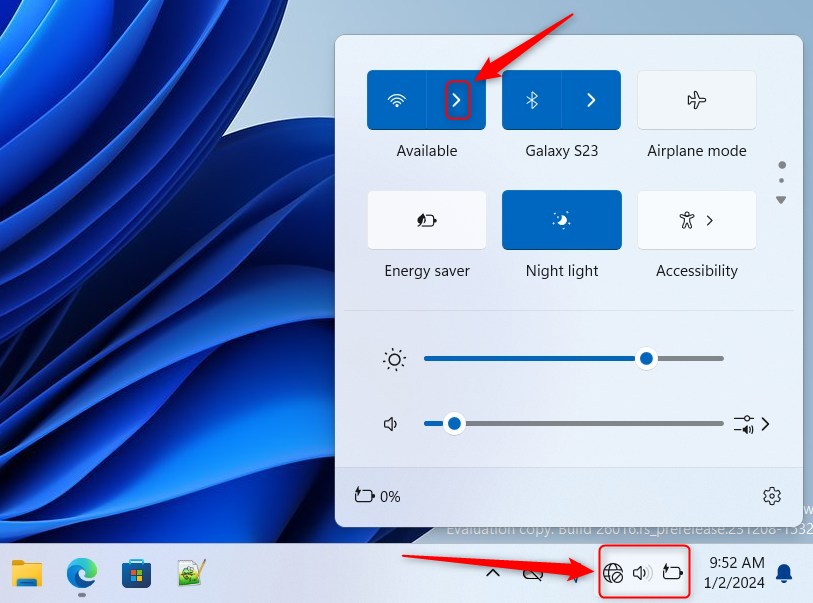
First, open Quick Settings (Win+A).
Then, select the Manage Wi-Fi connections arrow on the right side of the Wi-Fi button.

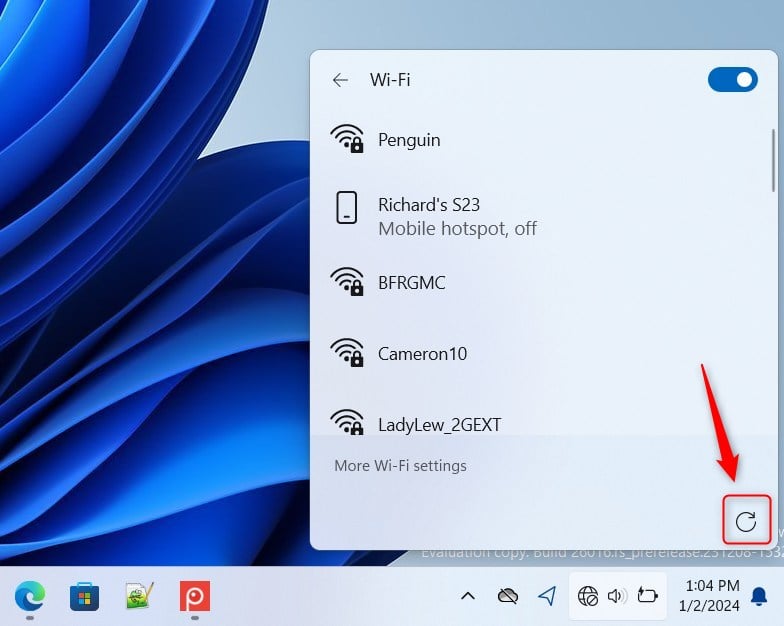
Click the ‘Refresh‘ button on the Wi-Fi connection pane to refresh the Wi-Fi networks list.

Refresh the Wi-Fi networks list using the Windows Terminal
Another way to refresh the Wi-Fi network list is to use the Windows Terminal app.
First, open the Windows Terminal app. Then select the PowerShell tab and run the command below.
Get-Service wlansvc | Restart-Service
OR
Restart-Service -Force -Name "wlansvc"
Use the Command Prompt tab with Windows Terminal and run the command below to refresh the Wi-Fi networks list.
PowerShell "Get-Service wlansvc | Restart-Service"
OR
PowerShell Restart-Service -Force -Name "wlansvc"
That should do it!
Conclusion:
- Refreshing the Wi-Fi network list in Windows 11 can help discover available networks that may not be immediately visible.
- Adding a refresh button on the Wi-Fi Quick Settings flyout in Windows 11 build 26002 has provided a convenient way to rescan for wireless networks.
- Windows Terminal also offers an alternative method to refresh the Wi-Fi networks list, giving users flexibility.
- We hope this guide has helped you with Wi-Fi network management in Windows 11. If you have feedback or additional tips, feel free to use the comments section below.

Leave a Reply