How to Show or Hide Preview Pane in File Explorer in Windows 11

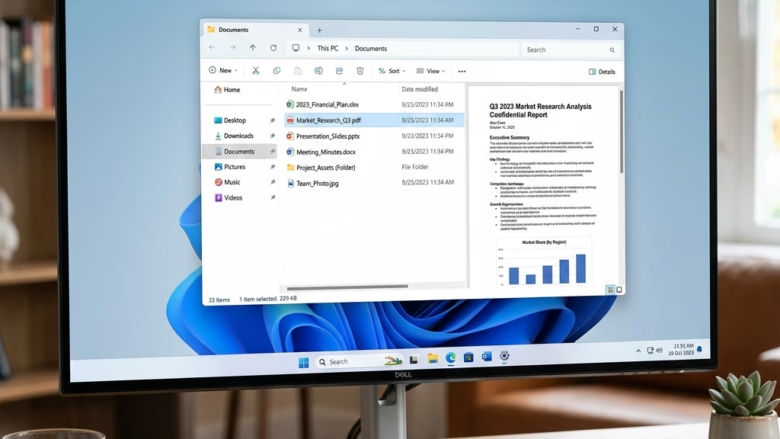
The preview pane in File Explorer shows a live look at a file on the right side of the window, without opening it in a separate app. Click a photo, text document or PDF once and its contents appear in the pane.
Hiding the pane gives your file list more room. Showing it helps you find the right file faster, because you can check the contents before you open anything. You can switch it on or off with a keyboard shortcut, from the View menu, or through the registry. The pane only changes how File Explorer looks. It does not change your files.
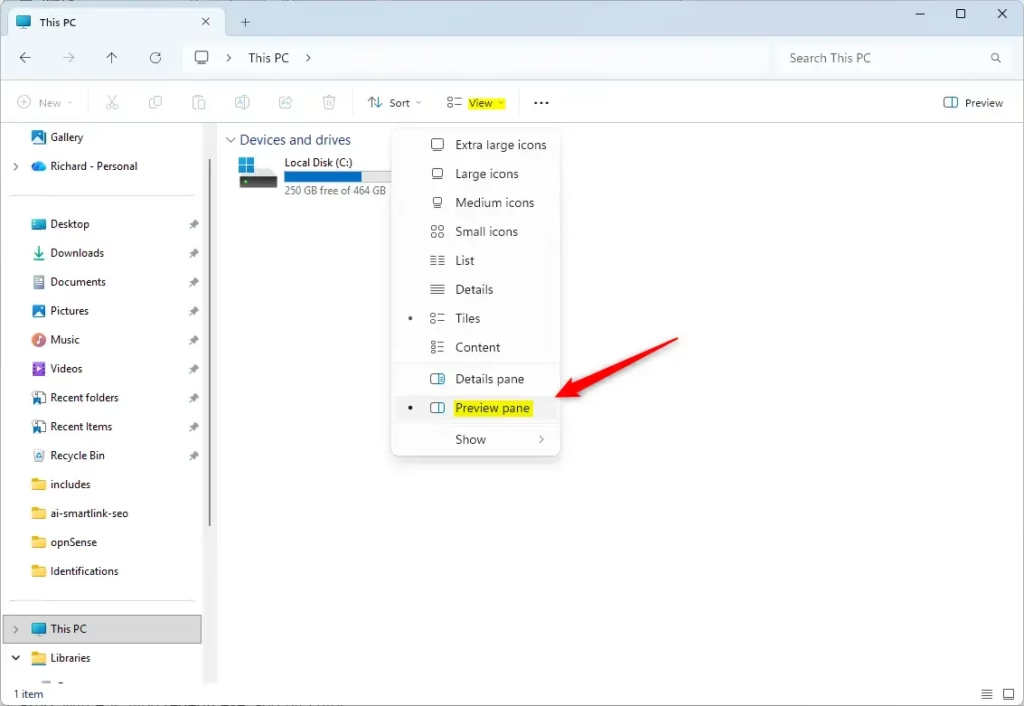
Press Alt+P in File Explorer to show or hide the preview pane. Alternatively, open File Explorer, click View Show Preview pane to toggle it on or off. The preview pane displays file contents on the right side without opening a separate app.
How to Show or Hide Preview Pane in File Explorer
Method 1The Quick Keyboard Shortcut
The keyboard shortcut is the fastest way to show or hide the preview pane. It works on both Windows 11 Home and Pro, and it needs no restart. These steps turn the preview pane on, check that it works, and turn it off again.
- Press Win+E. File Explorer opens, usually on Home or Quick access.
- Open a folder that contains files. Pictures, Documents or Downloads all work well.
- Press Alt+P. The preview pane appears on the right side of the window, usually with a short “Select a file to preview” message.
- Click a file once. Its contents show in the pane. Double-clicking would open the file in an app, so stick to a single click.
- Press Alt+P again to hide the pane. The file list expands to fill the window.
If nothing happens, click an empty area inside the File Explorer window first. The shortcut only works when File Explorer has focus. Also note that Alt+Shift+P is a different shortcut. It toggles the Details pane, which shows file properties instead of a preview. If you see a list of dates and sizes instead of the file contents, you pressed the wrong one.
Once the pane is open, you can drag its left edge to make it wider or narrower. A wider pane is useful for PDFs and large images.
Method 2Using the Command Bar
You can also toggle the pane from the menu at the top of File Explorer . Windows 11 calls this the command bar. Older versions of Windows called it the ribbon. This route is handy if you do not use keyboard shortcuts, and it shows a check mark so you can see the current state at a glance. These steps show and then hide the preview pane from the View menu.
- Press Win + E to open File Explorer. Open a folder that has files in it.
- Click View in the command bar at the top. A drop-down menu opens.
- Point to Show. A submenu opens with a list of panes and options.
- Click Preview pane. A check mark next to the name means the pane is on, and the pane appears on the right.
- Click a file once. Its contents should appear in the pane.
- Click Preview pane again under View Show to hide the pane. The check mark disappears and the pane closes.
Windows remembers your choice, so File Explorer opens the same way next time. If the command bar looks different from what is described here, check that you are on Windows 11. Windows 10 uses a ribbon with a View tab instead.
Method 3Using the Registry Editor (Advanced)
Registry Editor is the Windows tool for low-level system settings. You can use it to turn the preview pane on or off by adding a specific registry entry. This method is useful if you want to lock the setting in place, or if the View menu option is not working. For everyday use, the shortcut or the View menu is simpler and safer.
Be careful here. A wrong change in the registry can cause problems on your computer. Before you start, export a backup of the registry or create a restore point. Then use only the entries shown below. Changing the registry needs an administrator account, so if you are on a standard account, Windows will ask for admin credentials.
Show Preview pane:
reg add "HKCU\Software\Microsoft\Windows\CurrentVersion\Explorer\Modules\GlobalSettings\DetailsContainer" /v DetailsContainer /t REG_BINARY /d 0200000001000000 /f
reg add "HKCU\Software\Microsoft\Windows\CurrentVersion\Explorer\Modules\GlobalSettings\Sizer" /v DetailsContainerSizer /t REG_BINARY /d 150100000000000000000000c0030000 /f
Hide Preview pane:
reg add "HKCU\Software\Microsoft\Windows\CurrentVersion\Explorer\Modules\GlobalSettings\DetailsContainer" /v DetailsContainer /t REG_BINARY /d 0200000002000000 /f
reg add "HKCU\Software\Microsoft\Windows\CurrentVersion\Explorer\Modules\GlobalSettings\Sizer" /v DetailsContainerSizer /t REG_BINARY /d 150100000000000000000000c0030000 /f
Registry changes may not show up right away. Close and reopen File Explorer, or sign out and back in, to apply the change. If something goes wrong, restore the backup you made, or run the opposite entry to undo the change. The "Show" entry undoes the "Hide" entry, and the other way round.
Troubleshooting and Performance
Most preview pane problems fall into three groups: slow folder loading, a blank pane, or files that will not preview at all. Work through the checks below in order.
- Slow loading: Large files can make the pane lag, especially when you click through many of them quickly. Wait for one file to finish loading before you click the next, or hide the pane while you browse big folders.
- Blank pane: Not every file type can be previewed. Common types such as images, plain text and PDFs usually work. Some formats need a matching app installed to supply the preview. If a file type has no previewer, the pane shows a message or stays empty. Installing the app that normally opens that format is often enough to fix it.
- Thumbnail previews turned off: In File Explorer, click the three-dot menu in the command bar, then click Options. Open the View tab and make sure Always show icons, never thumbnails is not checked. Click Apply, then OK.
- Blocked files: Windows can block previews for files downloaded from the internet or copied from another computer. Right-click the file and choose Properties. If you trust the file, check Unblock at the bottom of the General tab, then click OK. Only unblock files from sources you know.
If the pane still misbehaves, restart File Explorer or sign out and back in. This clears most temporary glitches.
Summary
The preview pane lets you check a file's contents without opening it. You can toggle it with Alt + P, with View Show Preview pane, or through the registry. The shortcut and the View menu work in every edition of Windows 11, and the registry method is a fallback. If previews fail, check the file type, the thumbnail setting and whether Windows has blocked the file.
Have a question about this guide?
Answered by AI from this guide. Good questions may be added to this page — please don't include personal details.
Did this guide fix your problem?

About the Author
Richard
Tech Writer, IT Professional
Richard is a writer at Geek Rewind who turns complex IT tasks into clear, step-by-step guides. He draws on years of hands-on experience in system administration and enterprise IT operations, focusing on Windows, Linux and WordPress: the problems people actually run into, and the fixes that work. His server and WordPress guides come from systems he runs himself. Richard builds and maintains the platform behind Geek Rewind, from its Ubuntu servers and Nginx configuration to its custom WordPress plugins. Many new tutorials start with readers' questions, and he's always glad to answer them in the comments.
No comments yet — be the first to share your thoughts!