How to Enable or Disable Show Preview Handlers in the Preview Pane of File Explorer in Windows 11

Preview handlers in File Explorer on Windows 11 are small built-in components that show a live view of photos, PDFs, text files and similar documents in the Preview pane on the right side of the window. You don’t need to open a separate program to see the contents. Turning the feature off stops file contents from appearing automatically when you click a file. That helps protect your privacy when other people use your PC.
You can change this setting in three ways: through the File Explorer options, through the Registry Editor (a database of Windows settings ), or with PowerShell. All three work on Windows 11 Home and Pro, and none needs a full restart.
Open File Explorer , click the three dots on the toolbar and select Options. Go to the View tab, find Show preview handlers in preview pane, check or uncheck it, click Apply then OK. The change takes effect immediately without restarting Windows.
Before You Start Tweaking Your Windows Settings
A little preparation protects you from mistakes. Do this before you change anything, especially if you plan to use the Registry method.
- Back up the Registry. In the Registry Editor, choose File Export, pick a location, give the file a name and save it. If something goes wrong later, double-click that file to restore the saved settings. You can also create a restore point first for extra safety.
- Learn the Preview pane shortcut. Press Alt+P in File Explorer to show or hide the Preview pane itself. You can also use View Show Preview pane This is separate from the preview handlers setting. The pane can be open while handlers are off, and then it shows little or nothing for most files.
Method 1Change Your Settings Using Folder Options
Folder Options is the safest method. It uses the standard File Explorer menus and doesn’t touch any system files. The setting applies only to the account you are signed in to.
- Open File Explorer by clicking its folder icon on the taskbar or by pressing Win+E. A File Explorer window opens.
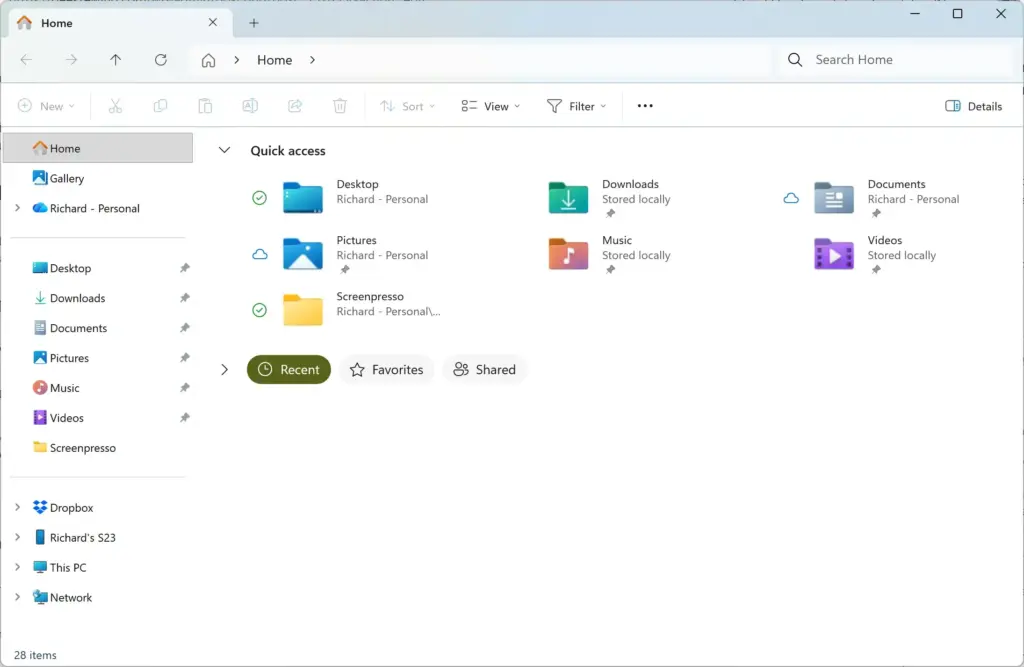
Windows 11 File Explorer showing Dropbox folder in sidebar. - Click the three horizontal dots on the top toolbar to open the more options menu, then select Options from the list. The Folder Options window appears.
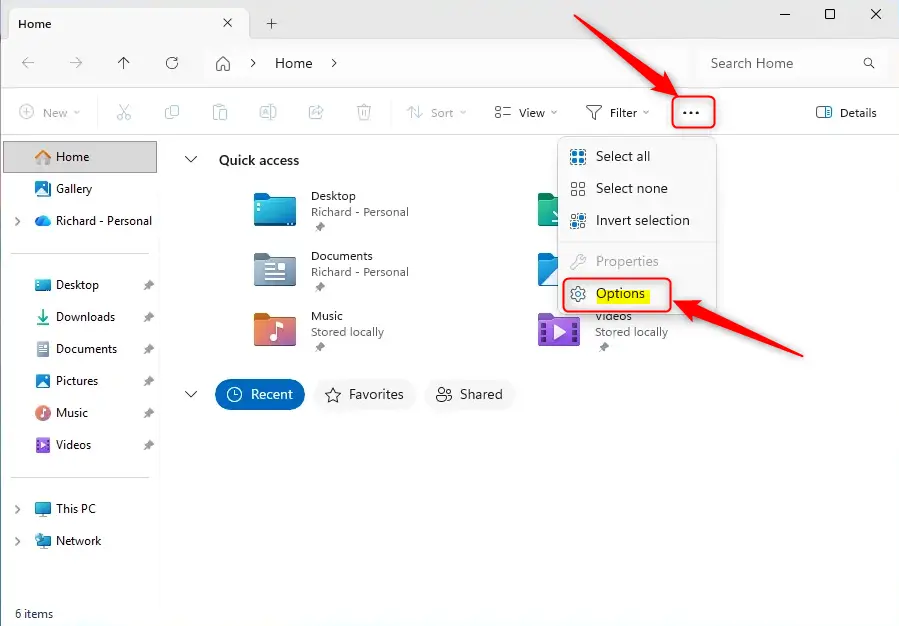
File Explorer options window showing folder open settings in Windows 11. - Click the View tab in the Folder Options window. You will see a long list of Advanced settings.
- Scroll down the list until you find the checkbox labeled Show preview handlers in preview pane.
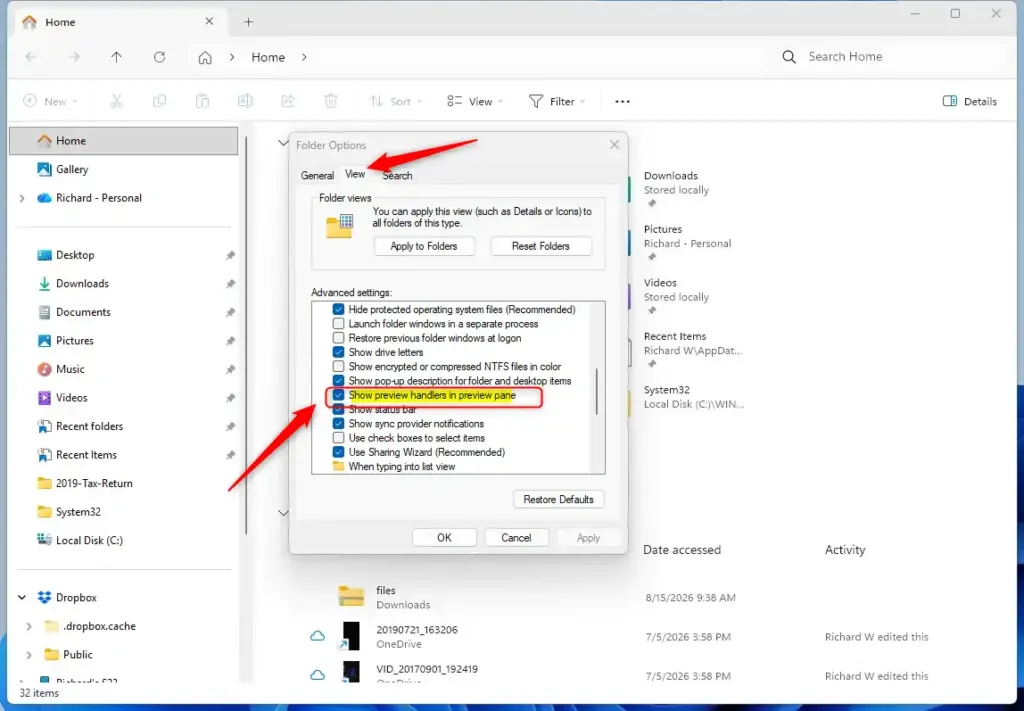
- Check the box to turn file previews on, or uncheck it to turn them off completely.
- Click Apply, then click OK to close the window. The change takes effect straight away. Click a file with the Preview pane open to confirm it.
If you turned previews off and a file still shows contents, check that you clicked Apply. To undo the change, return to the same checkbox and set it the other way.
If family members or coworkers sign in to this PC with their own accounts, their preview settings stay unchanged.
Method 2Adjust the Windows Registry for Deeper Control
The Registry Editor changes the setting by editing the value directly. Use it when you want to script or check the exact value, or when the checkbox isn't available. The path shown in the third step tells you which part of the Registry you are editing. Keys under HKEY_CURRENT_USER apply only to your own account.
- Press the Windows key + R to open the Run dialog box.
- Type
regeditinto the empty field and press Enter. Approve the User Account Control prompt if one appears. The Registry Editor window opens. - Use the left-hand sidebar to click through the following path. You can also paste it into the address bar at the top of the Registry Editor:
HKEY_CURRENT_USER\Software\Microsoft\Windows\CurrentVersion\Explorer\Advanced - Look on the right side of the screen for an entry named
ShowPreviewHandlers. If you find it, double-click it to open its properties. - If the entry is missing, right-click any empty space in the right pane, hover over New and choose DWORD (32-bit) Value. Name the new entry exactly
ShowPreviewHandlers, then double-click it to open it. - In the Value data box, type
1to turn preview handlers on, or type0to turn them off and keep the Preview pane empty. - Click OK, then close the Registry Editor window. If the change doesn't show up straight away, close and reopen File Explorer, or sign out and back in.
To undo the change, open the same entry and set the old value again, or import the backup file you exported earlier.
Changing the wrong key can make system apps misbehave, which is why the backup beforehand matters.
Method 3Automate the Process Using PowerShell
PowerShell does the same job with commands instead of menu clicks. It is quick, and you can reuse the commands in a script to apply the setting on several computers.
- Press Win + R, type
PowerShellinto the box and press Enter. A PowerShell window opens with a blinking prompt. - To disable preview handlers, copy and paste this exact command into the window, then press Enter:
Set-ItemProperty -Path "HKCU:\Software\Microsoft\Windows\CurrentVersion\Explorer\Advanced" -Name "ShowPreviewHandlers" -Value 0Stop-Process -Name explorer -Force - To enable them again later, run this command instead:
Set-ItemProperty -Path "HKCU:\Software\Microsoft\Windows\CurrentVersion\Explorer\Advanced" -Name "ShowPreviewHandlers" -Value 1Stop-Process -Name explorer -Force - Wait for the command to finish. The taskbar and desktop will flash briefly as they refresh. Then close the PowerShell window.
Tip: The second part of each command restarts the Windows desktop interface (File Explorer). The new setting then takes effect immediately, without a full computer restart. Save any open File Explorer work first, because open folder windows may close during the refresh.
Summary
Controlling file previews in Windows 11 helps protect your privacy and decides how File Explorer displays your documents. Use the Folder Options menu for the simplest route, the Registry Editor when you need direct control, or PowerShell for quick, repeatable changes. Whichever you choose, you can reverse it later in the same way.
Have a question about this guide?
Answered by AI from this guide. Good questions may be added to this page — please don't include personal details.
Did this guide fix your problem?

About the Author
Richard
Tech Writer, IT Professional
Richard is a writer at Geek Rewind who turns complex IT tasks into clear, step-by-step guides. He draws on years of hands-on experience in system administration and enterprise IT operations, focusing on Windows, Linux and WordPress: the problems people actually run into, and the fixes that work. His server and WordPress guides come from systems he runs himself. Richard builds and maintains the platform behind Geek Rewind, from its Ubuntu servers and Nginx configuration to its custom WordPress plugins. Many new tutorials start with readers' questions, and he's always glad to answer them in the comments.
No comments yet — be the first to share your thoughts!