How to Remove All Automatically Added Search Index Locations in Windows 11


- 15 steps
- Needs administrator rights
- Includes a restart or sign-out
Automatically added search index locations in Windows 11 are extra folders that the operating system tracks in the background so you can find files faster. Newer versions of Windows 11 include this feature. It watches the folders you open most often and adds them to your search database without asking.
Clearing these automatic additions stops Windows from tracking extra folders. The locations you added by hand stay in place. You need administrator rights on your PC to complete this cleanup. If you are signed in with a standard account, Windows will ask for an administrator password at some point, or the options may be greyed out.
Open Settings Privacy & security Search (called Searching Windows on some builds), expand Automatically find additional relevant locations under Find my files, switch the toggle to Off, then click Remove. Windows clears the folders it added automatically, while folders you added by hand stay in the index. Administrator rights are required.
Step 1Open Your Windows Settings Menu
Start by opening the Settings app, where all the search privacy options live.
- Press Win+I on your keyboard at the same time. You can also click the Start button and select the gear-shaped Settings icon.
- Wait for the Settings window to appear. You should see a list of categories down the left side.

Step 2Navigate to the Privacy and Security Section
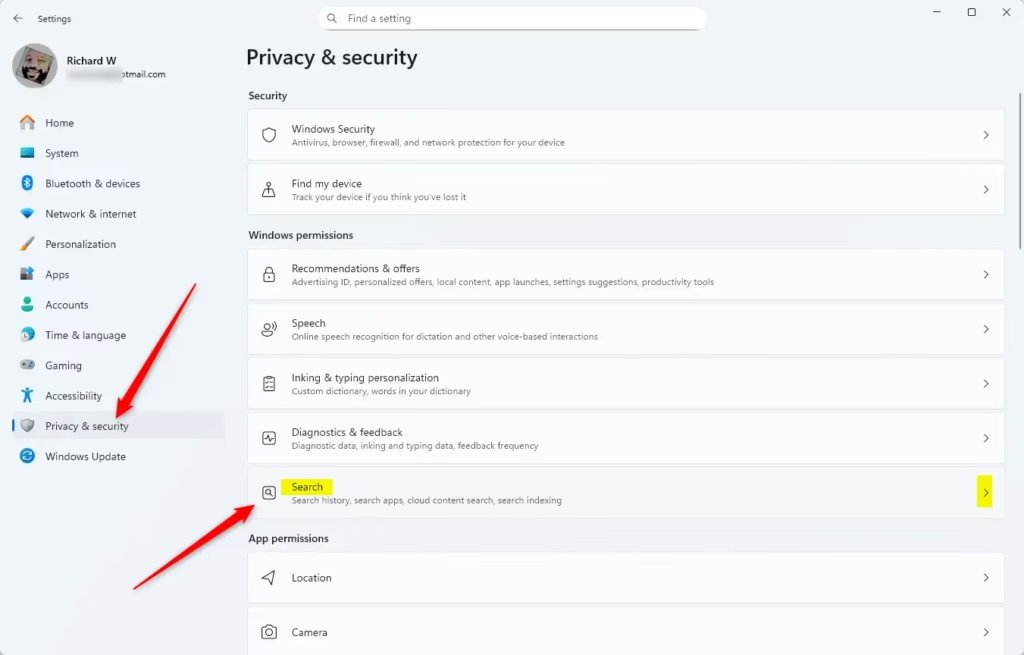
Next, go to the search settings. The path is Settings Privacy & security Search On some Windows 11 builds this page is labeled Searching Windows instead of Search. It is the same page, so use whichever name you see.
- Look at the menu running down the left side of the Settings window.
- Scroll down and click Privacy & security. The right side of the window will update to show privacy options.
- Click Search (or Searching Windows) near the top of the right-hand list. The search settings page will open.

Step 3Locate the Automated Search Expansion Controls
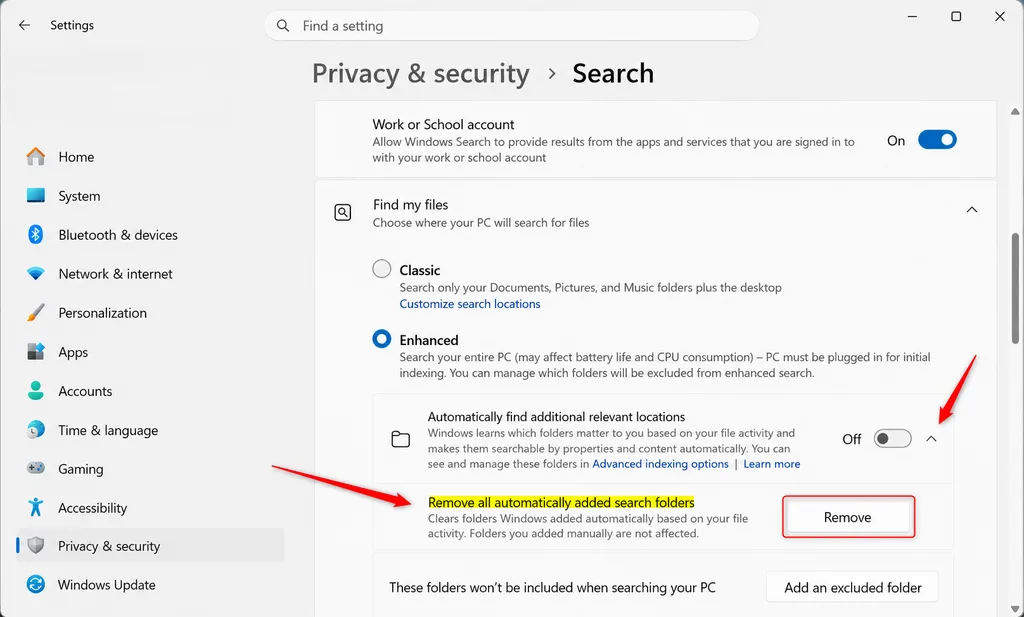
The automatic folder controls sit in the Find my files section. The setting that adds extra folders to your index is called Automatically find additional relevant locations.
- Scroll down the search page until you find the section labeled Find my files.
- Look for Automatically find additional relevant locations directly underneath that heading.
- Click that text, or the arrow next to it, to expand the setting. You should now see a toggle switch and a Remove button.
If you cannot find this setting, your version of Windows 11 may not have it yet. Run Windows Update, restart if asked, and check again.
Step 4Temporarily Turn Off the Automatic Location Finder
Turn off the toggle first. This stops Windows from adding new folders while you clean up the old ones. Your own custom index folders are not affected.
- Find the toggle switch next to Automatically find additional relevant locations inside the expanded section.
- Click the switch to turn it Off. The label next to it should change to Off. If it already says Off, skip this step.
Your custom folders stay untouched, so you will not lose any folders you chose to index.
Step 5Click the Remove Button to Clear the Slate
The Remove button purges every directory Windows added based on your recent file history, all in one step.
- Look right below the toggle switch you just turned off.
- Find the Remove button next to the text explaining that it removes all automatically added search folders.
- Click Remove once. You do not need to click it again.
This only touches the automatic entries. Files stay where they are on your drive. Only the search index entries are cleared.
Step 6Verify the Cleanup Was Successful
Check that the cleanup finished before you close Settings.
- Watch the area next to or below the Remove button.
- Look for a checkmark paired with the word Removed. That tells you every automatically added folder is gone from the search index.
You should not need to restart your PC. If you want to see the result, open the indexing options and look at the list of included locations. Only the ones you added yourself should remain.
Step 7Decide Whether to Keep the Feature Enabled Moving Forward
Now decide what to do with the toggle. This depends on whether you want Windows to keep adding folders in the future.
- If you want to stop Windows from gathering new folders based on your daily habits, leave the Automatically find additional relevant locations switch in the Off position. This is the choice for keeping your index limited to folders you picked.
- If you want to clear the current batch of folders but keep smart suggestions for the future, turn the Automatically find additional relevant locations switch back to On. Windows may start adding folders again as you work, so you might need to repeat this cleanup later.
To undo the whole change, go back to the same page and flip the switch to On. Windows will begin adding folders again. The ones you removed will only come back if you keep using them.
Summary
Clearing automatically added search locations in Windows 11 takes a few clicks in your privacy settings. Turn off the automatic location finder, then click Remove. Your search results stay clean and limited to the folders you chose.
Have a question about this guide?
Answered by AI from this guide. Good questions may be added to this page — please don't include personal details.
Did this guide fix your problem?

About the Author
Richard
Tech Writer, IT Professional
Richard is a writer at Geek Rewind who turns complex IT tasks into clear, step-by-step guides. He draws on years of hands-on experience in system administration and enterprise IT operations, focusing on Windows, Linux and WordPress: the problems people actually run into, and the fixes that work. His server and WordPress guides come from systems he runs himself. Richard builds and maintains the platform behind Geek Rewind, from its Ubuntu servers and Nginx configuration to its custom WordPress plugins. Many new tutorials start with readers' questions, and he's always glad to answer them in the comments.
No comments yet — be the first to share your thoughts!