How to Enable Separate Process for Windows 11 File Explorer
Separate processes for Windows 11 File Explorer stop one frozen window from crashing your whole computer. File Explorer is the program you use to open and manage your files and folders.
Normally, all your File Explorer windows run using just one process, called `explorer.exe`. If one of those windows freezes, the whole `explorer.exe` process can stop working, and you might have to restart your PC.
By telling Windows to give each File Explorer window its own separate process, you isolate problems. This means if one window hangs, the others keep working just fine. This makes your computer more stable and fixes file issues faster.
Enable separate processes for File Explorer by opening Folder Options, clicking the View tab, and checking “Launch folder windows in a separate process.” This prevents one crashed window from affecting others.
Launch a File Explorer folder with a separate process
You can make each File Explorer window in Windows 11 run in its own separate process to stop one window from crashing the entire program. This simple setting change helps keep File Explorer stable, so if one window has a problem, the others stay open. Follow these steps to enable the Windows 11 File Explorer separate process feature for better stability.
Here’s how to do it.
- Open the File Explorer Folder Options.
- Click on the View tab.
- Check the box next to “Launch folder windows in a separate process” to enable it . To disable it , uncheck the box .
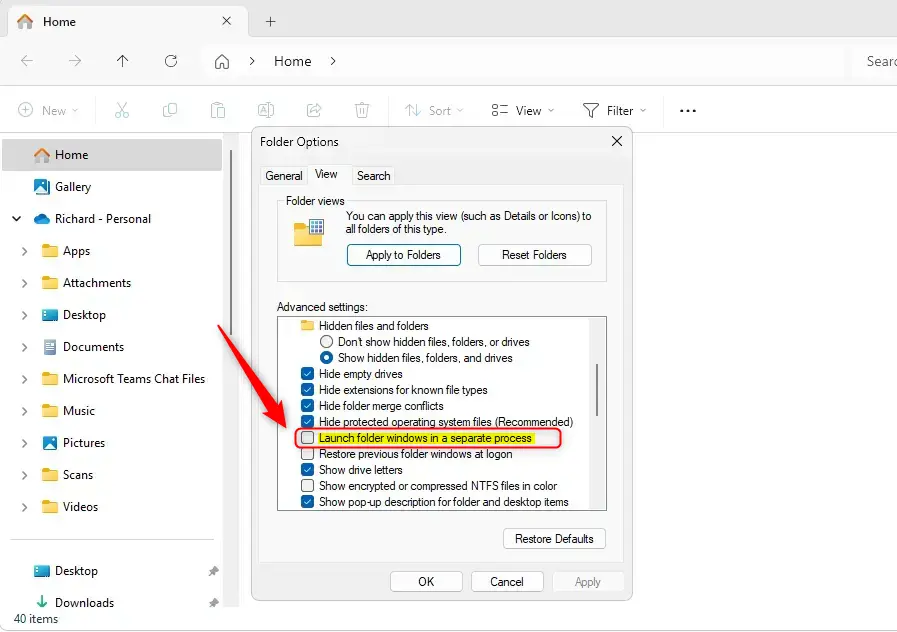
- Click OK to save your changes and exit.
Launch File Explorer window in a separate process using Windows Registry Editor
Advanced users can use the Windows Registry Editor to make each File Explorer window run in its own separate process, which is another way to set up the Windows 11 File Explorer separate process option. Before changing registry settings, it’s always a good idea to back up your registry. This method provides a technical route to achieve better File Explorer stability.
Before you dive into the Registry Editor, it’s a good idea to back up your registry or create a System Restore point.
- Open the Windows Registry and navigate to the folder key path below.
Computer\HKEY_CURRENT_USER\Software\Microsoft\Windows\CurrentVersion\Explorer\Advanced - Right-click Advanced > New > DWORD (32-bit) Value and name the new DWORD SeparateProcess.
- ⚠️ ADMIN PRIVILEGES REQUIRED — Double-click SeparateProcess and change the value to 1 to enable launching windows in a separate process in File Explorer.
- Enter 0 to disable the feature.

Sometimes, you’ll need to restart your computer for the changes to stick.
That should do it!
Summary
Turning on separate processes for Windows 11 File Explorer windows means if one window freezes, the others keep working, preventing the whole application from crashing. Each File Explorer window runs on its own, which means better stability and less chance of losing your work. This setting helps ensure that a single issue won’t bring down all your open File Explorer windows.
What happens when done? Each File Explorer window runs on its own. If one window stops responding, the others keep working normally.
Key points to remember:
- Process Isolation: Launching folder windows in separate processes prevents one unresponsive window from crashing others.
- Easy Configuration: You can easily change this setting through the File Explorer Folder Options or the Windows Registry Editor.
- Backup Precaution: Always back up your registry or create a System Restore point before making changes to the registry.
- Enhanced Stability: This feature can improve stability and responsiveness when navigating files and folders.
- Reboot Required: Changes may require a reboot, ensuring the settings are applied correctly.
Should I enable launch folder Windows in a separate process?
The main reason I’d suggest turning this on is so that if you have a folder window open which stops responding, and you close it, it won’t take the main explorer.exe with it. This means your desktop won’t be inaccessible while Windows restarts it.
How to split File Explorer in 🪟 Windows 11?
In the archive settings window, you’ll see an option called ‘split to volume bytes.’ Here, type the size you want for each chunk. For instance, if you want smaller files of 100 megabytes, type ‘100m’.
Was this guide helpful?

About the Author
Richard
Tech Writer, IT Professional
Richard, a writer for Geek Rewind, is a tech enthusiast who loves breaking down complex IT topics into simple, easy-to-understand ideas. With years of hands-on experience in system administration and enterprise IT operations, he’s developed a knack for offering practical tips and solutions. Richard aims to make technology more accessible and actionable. He's deeply committed to the Geek Rewind community, always ready to answer questions and engage in discussions.

No comments yet — be the first to share your thoughts!