How to Enable Compact View in Windows 11 File Explorer

Compact view in Windows 11 File Explorer shrinks the extra padding around files and folders so you can see up to 30 percent more items on your screen at once. This layout restores the denser spacing from Windows 10, so you scroll less when you browse large folders.
You can turn it on from the View menu in File Explorer , or from the Options dialog described below. You don’t need to change any system files or download extra software. It works the same on Windows 11 Home and Pro.
Enable compact view in File Explorer by opening it, clicking the three dots, selecting Options, going to the View tab, and checking “Decrease space between items.” This reduces spacing for a denser, more efficient layout.
How to turn on File Explorer compact view
Compact view reduces the padding between items, so more folders and files fit in the same window. The quickest route is to open File Explorer , click the three-dot menu at the top, open Options, switch to the View tab and tick the box for the denser layout.
On recent builds of Windows 11 (version 22H2 and later) you can also use the View menu in the toolbar: View Show Compact view The Options method below works on every Windows 11 release, so it is the one I walk through.
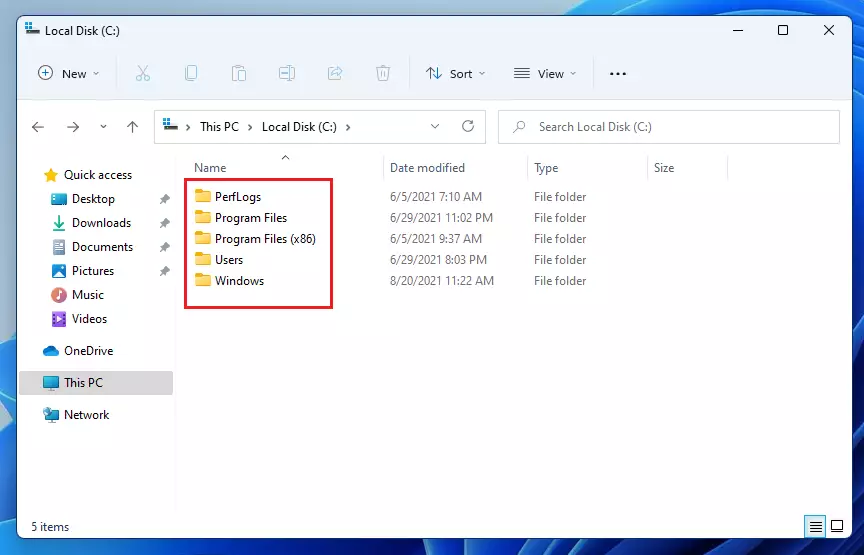
Here is a screenshot of File Explorer ’s default layout. Note how much empty space sits above and below each row:
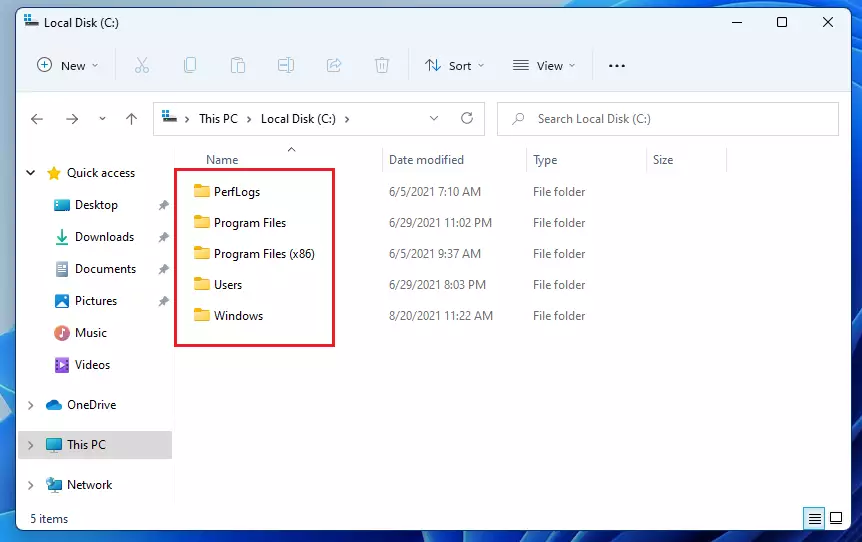
- Open File Explorer . Press Win+E or click the folder icon on the taskbar . A File Explorer window opens.
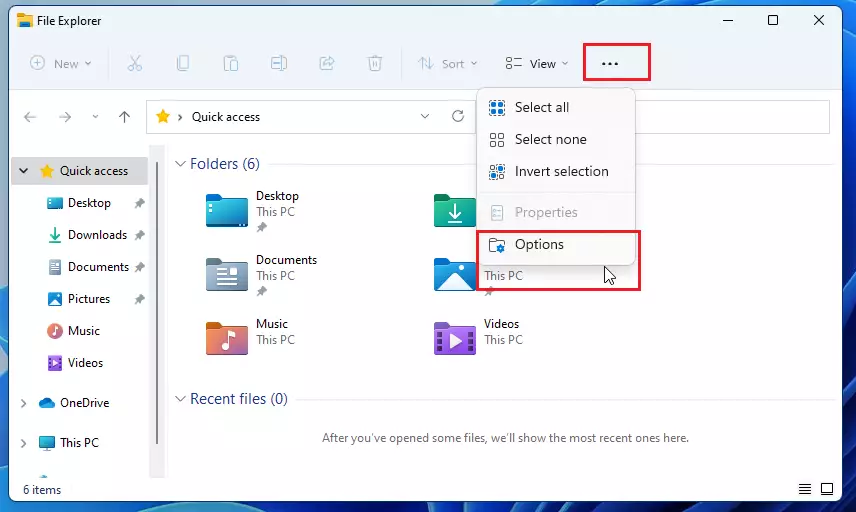
- Click the three dots (ellipsis) in the top toolbar. A drop-down menu appears. If the window is narrow, the three dots may sit at the far right edge, so widen the window if you can’t see them.
- Select Options. The Folder Options dialog opens. Older guides call this item Folder Options, but in Windows 11 the menu entry is just Options.
- Go to the View tab. You will see a long list of check boxes under Advanced settings.
- Under Advanced settings, scroll through the list and check the box for Decrease space between items (compact view).
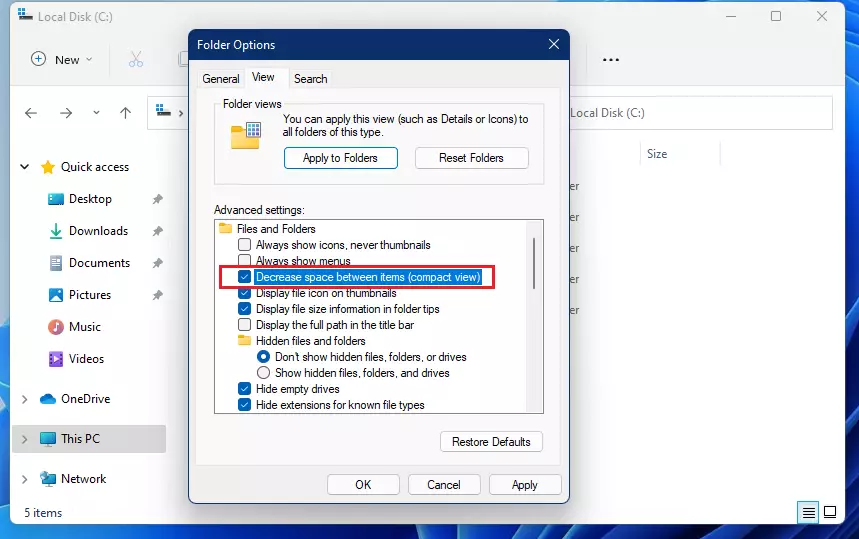
- Click Apply and then OK. The dialog closes.
Your folders now show a tighter, more compact list. The change takes effect straight away, so you don’t need to restart the PC or sign out.
To go back to the default spacing, reopen the same dialog, clear the check box and click Apply and then OK.
Advanced Configuration: Registry Tweak
If the compact view option is missing or doesn't stick, you can force it through Registry Editor, the tool for low-level system settings. Press the Windows key plus R, type regedit, and go to HKEY_CURRENT_USER\Software\Microsoft\Windows\CurrentVersion\Explorer\Advanced to change the layout value by hand.
Because this key sits under HKEY_CURRENT_USER, the change only affects your own account. Before you edit anything, back up the key: right-click Advanced in the left pane, choose Export and save the file somewhere safe. Double-clicking that file later restores the old values.
- Press Win + R, type regedit to open the Registry Editor (Windows' advanced configuration tool), and then press Enter. If a User Account Control prompt appears, click Yes.
- Navigate to:
HKEY_CURRENT_USER\Software\Microsoft\Windows\CurrentVersion\Explorer\Advanced. You can paste the path into the address bar at the top of Registry Editor, or expand the folders in the left pane one by one. The right pane then lists the values stored in that key.
- Look for a value named UseCompactMode. If it isn't there, right-click an empty area of the right pane, choose New DWORD (32-bit) Value and name it UseCompactMode.
- Double-click it and change the value to 1 to enable it, or 0 to disable it. Click OK.
Close any open File Explorer windows and open a new one to see the change. If it still looks the same, sign out and back in, or restart the PC. Setting the value back to 0 undoes the change.
Troubleshooting: Why is Compact View greyed out?
The compact view option can be greyed out or ignored when system policies, an outdated Windows 11 build or IT administrator restrictions block folder layout changes on your device. This is most common on work or school computers that are managed by an organization.
Try these checks in order:
- Install the latest Windows updates from Settings Windows Update, then restart. The View menu option for compact view only exists on newer builds, so an old build is a common cause.
- Check whether the PC is managed. If it belongs to a work or school account, ask your IT administrator. A policy applied to the device overrides your setting, and the registry edit above may be reverted the next time policies refresh.
- Make sure you are signed in with an account that has permission to change the setting. A standard account can change its own Explorer options, but it can't edit settings that apply to the whole machine.
On a personal PC with no management, Home and Pro behave the same here. If the box is still missing, the registry method above is the fallback.
Summary
Compact view is a small setting that helps you see more files on your screen by reducing the space between items. Turn it on from Options View, or from the View menu on newer builds. Use the registry only if the normal route fails, and remember you can switch it off again at any time.
Was this guide helpful?

About the Author
Richard
Tech Writer, IT Professional
Richard is a writer at Geek Rewind who turns complex IT tasks into clear, step-by-step guides. He draws on years of hands-on experience in system administration and enterprise IT operations, focusing on Windows, Linux and WordPress: the problems people actually run into, and the fixes that work. His server and WordPress guides come from systems he runs himself. Richard builds and maintains the platform behind Geek Rewind, from its Ubuntu servers and Nginx configuration to its custom WordPress plugins. Many new tutorials start with readers' questions, and he's always glad to answer them in the comments.


No comments yet — be the first to share your thoughts!