Map a Network Drive in Windows 11 File Explorer

- 21 steps
- Needs administrator rights
Mapping a network drive in Windows 11 File Explorer gives a shared folder its own drive letter, such as Z:. The folder can be on another PC, a NAS (a network storage box), or a server. The quickest route is to open This PC, select See more Map network drive, type the folder path, and select Finish.
After that, the shared folder appears in File Explorer next to your local drives. Apps and file dialogs treat it like any other drive. The steps are the same on Windows 11 Home and Pro, on 25H2 and later, and none of them need administrator rights.
To map a network drive in Windows 11 File Explorer, open This PC, select See more (the three dots), then select Map network drive. Choose a drive letter, type the share path such as \\COMPUTER-NAME\Shared in the Folder box, and select Finish. The shared folder then appears next to your local drives. You do not need administrator rights.
What Mapping a Network Drive Does
A shared folder on the network is normally reached through a path called a UNC path (Universal Naming Convention). It looks like \\COMPUTER-NAME\Shared. Mapping attaches that path to a drive letter, so you click a drive instead of typing the path each time.
Before You Start
Gather these items first. Most failed attempts come from one of them.
- The network path. Use the form
\\COMPUTER-NAME\Sharedor\\192.0.2.10\Shared. The first part is the device name or IP address. The second part is the share name. - A user name and password that the other device accepts. This is an account on that device, not necessarily your Microsoft account.
- A working connection to the same network, or to a VPN that reaches it.
- A shared folder. The folder must already be shared on the host device (the PC or NAS that holds the folder). Mapping does not create the share.
If your Windows 11 PC is the one sharing the folder, set it up first. Right-click the folder, select Properties, open the Sharing tab, and select Share. Add the people who need access, and note the network path Windows shows.
Turn On Network Discovery First
Network discovery lets your PC see other devices on the local network. File and printer sharing lets it reach their shared folders. Both are normally on for a Private network and off for a Public one.
- Open Settings. Press
Windows key + I.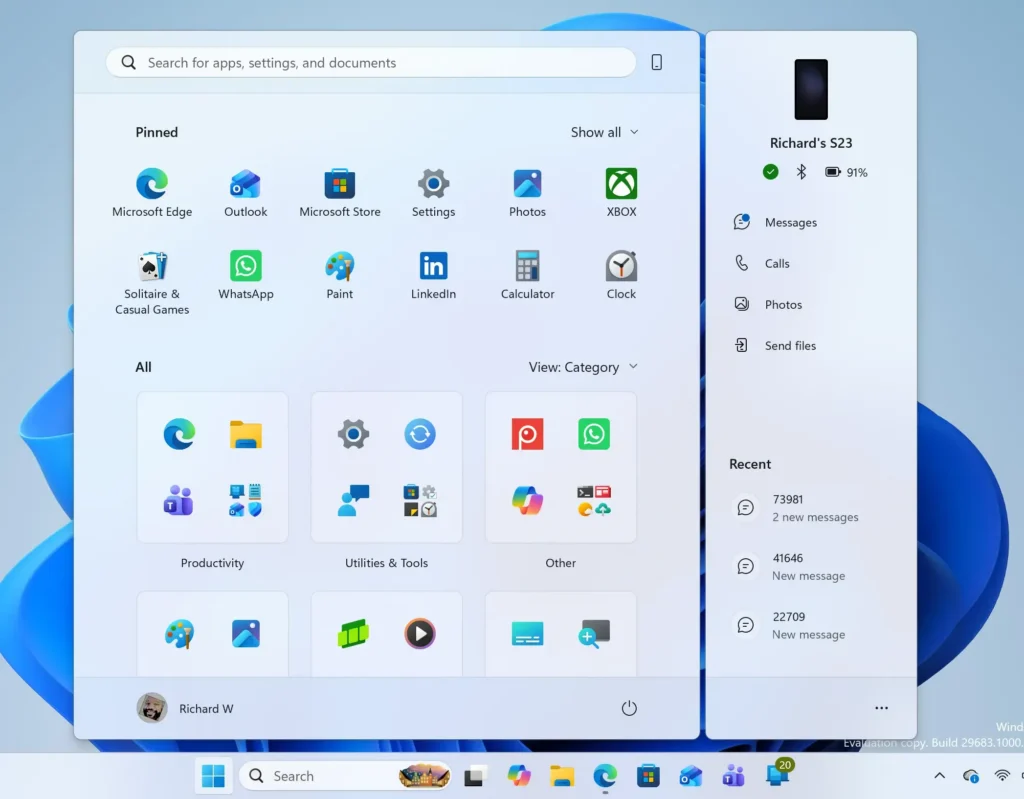
Windows 11 Start menu search panel for opening OpenSSH Client settings - Select Network & internet. The connection list appears.
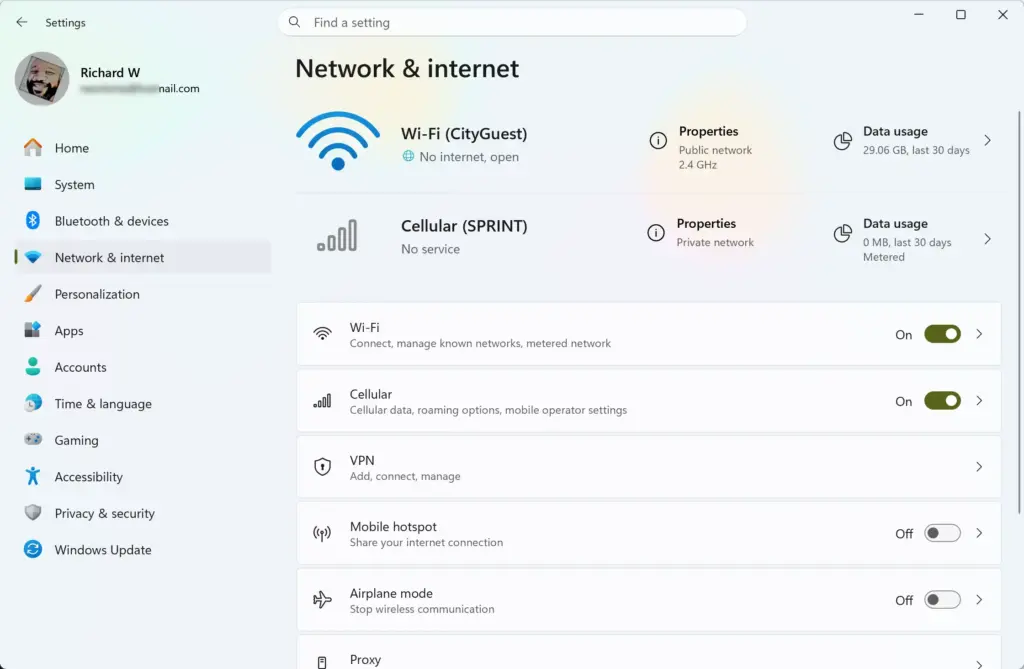
Settings › Network & internet - Select Advanced network settings, then Advanced sharing settings. The profiles for Private networks, Public networks, and All networks appear.
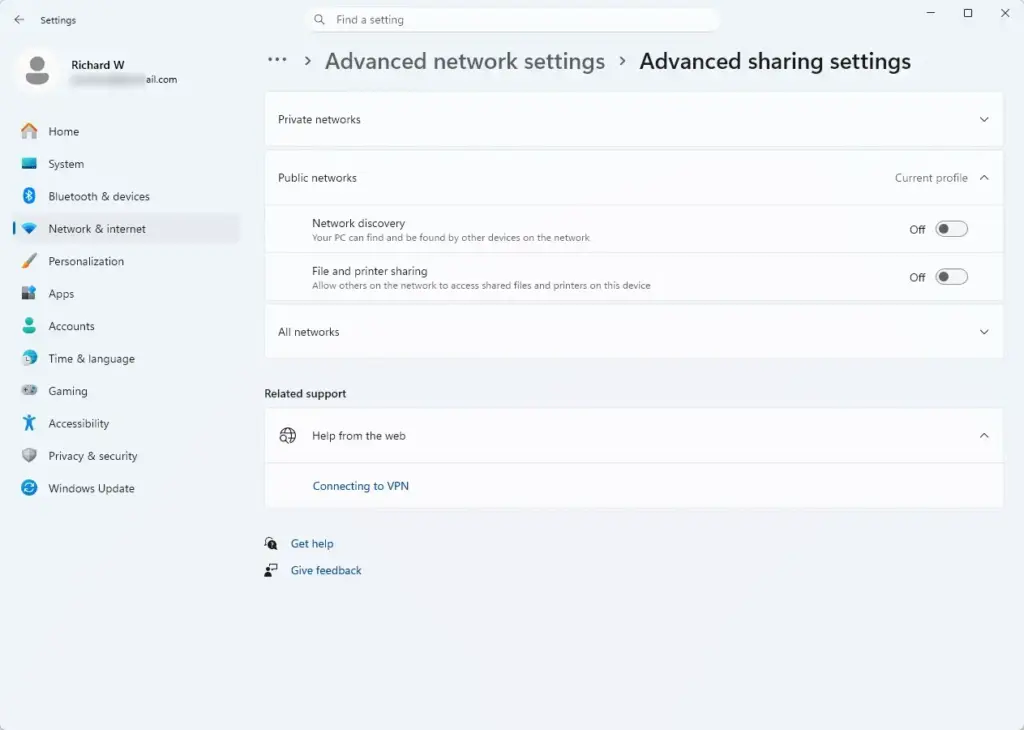
Settings › Network & internet › Advanced network settings › Advanced sharing settings - Expand Private networks. Turn on Network discovery and File and printer sharing.
If you connect through Wi-Fi or Ethernet and the connection is set to Public, open that connection’s properties in Settings Network & internet. Then choose Private network for the network profile type. Do this only on a network you trust, such as your home or office.
How to Map a Network Drive in 🪟 Windows 11 File Explorer
These steps map a network drive in Windows 11 File Explorer from start to finish. Each step tells you what to do, then what you should see on screen.
- Open File Explorer. Press
Windows key + E, or select the folder icon on the taskbar. A File Explorer window opens.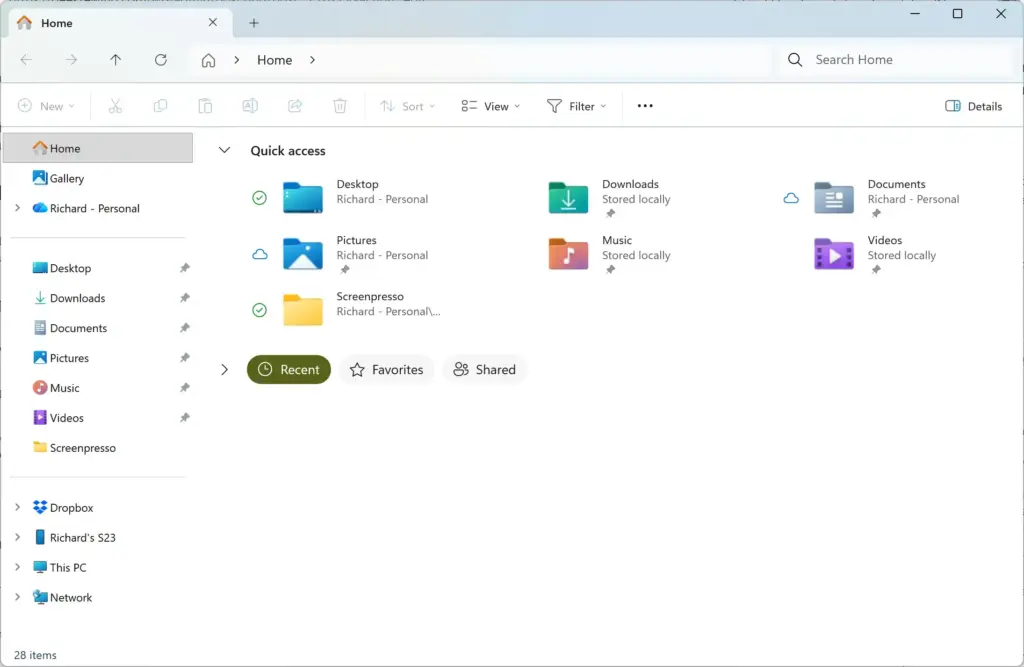
Windows 11 File Explorer showing Dropbox folder in sidebar. - Select This PC in the left pane. Your local drives and any existing network locations appear on the right. The command bar at the top changes to show drive-related commands.
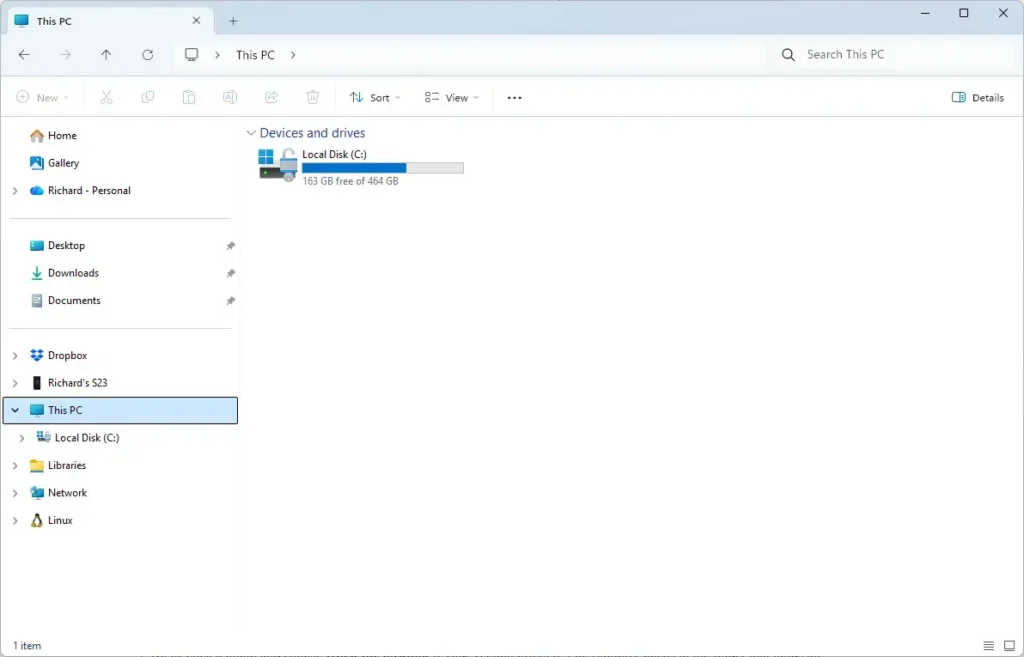
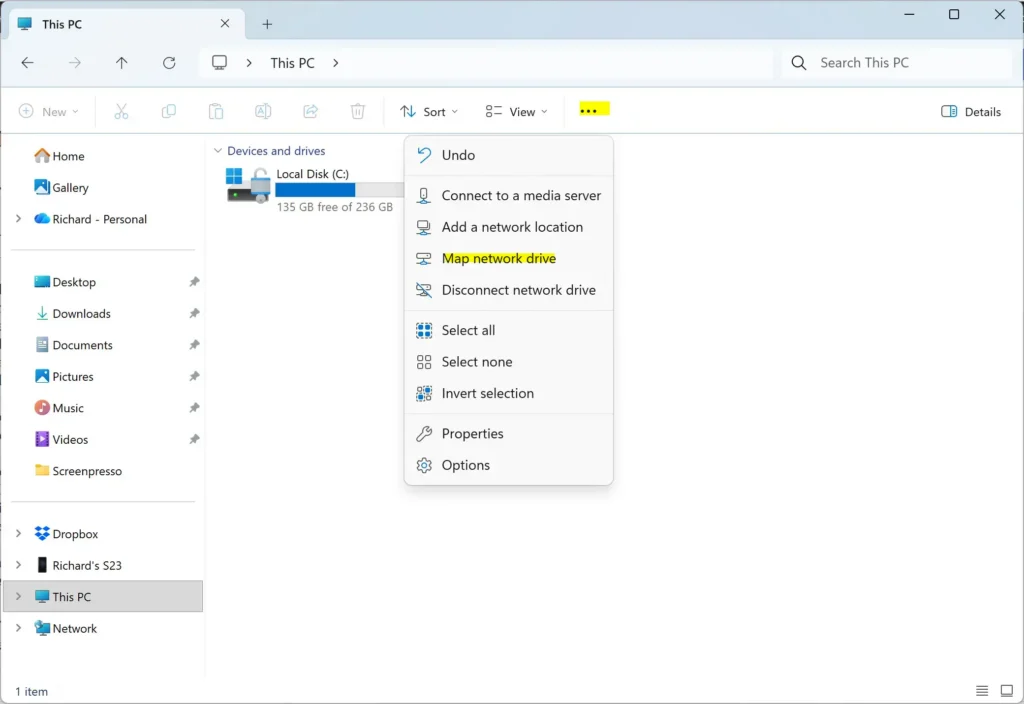
File Explorer - Select See more (the three dots) on the command bar. A menu drops down.
- Select Map network drive. The Map Network Drive window opens with two fields, Drive and Folder.
File Explorer - Choose a letter in the Drive list. Windows suggests a free letter. Accept it, or pick another that is not in use. You cannot change the letter later without disconnecting and mapping again.
- Type the share path in the Folder box. Enter it as
\\COMPUTER-NAME\Shared. If you do not know the path, see the Browse section below.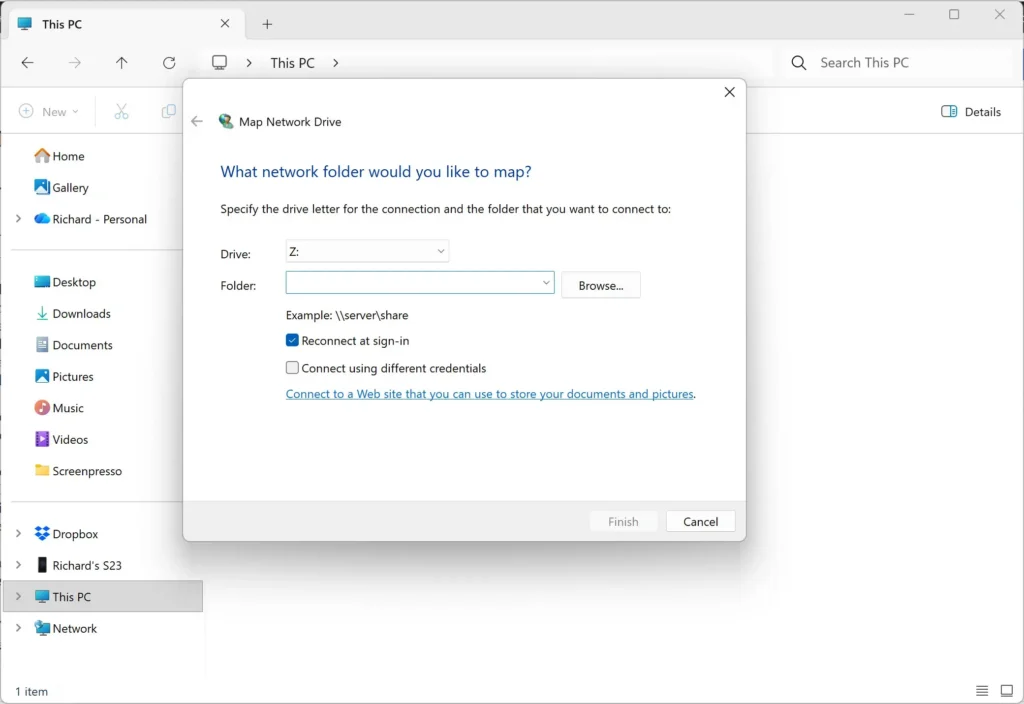
File Explorer - Select Reconnect at sign-in to keep the drive after a restart. Leave it cleared if you want the drive to disappear when you sign out.
- Select Connect using different credentials if your Windows sign-in is not valid on the host. Skip this step if the host accepts the account you use on this PC.
- Select Finish. Windows contacts the host. If the host needs a sign-in, a sign-in window opens and asks for the user name and password for the host.
- Enter the user name and password for the host. Use the account that has access to the share. Select Remember my credentials so Windows does not ask again, then select OK.
- Confirm the drive worked. A new window opens on the shared folder. Under This PC, the drive now appears in the Network locations group with its letter, for example Z:.
COMPUTER-NAME\USERNAME.Find the Shared Folder With Browse Instead of Typing the Path
The Browse button builds the path for you, which avoids typos. It works only when network discovery is on and the host is visible.
- Select Browse in the Map Network Drive window. A Browse For Folder window opens.
- Expand Network in the list. Devices that Windows can see appear.
- Expand the host and select the shared folder. Select OK. The path fills in the Folder box.
If the host does not appear, type the path or its IP address instead. Some NAS devices and routers do not announce themselves to Windows, even though the share works. If the Network icon is missing from File Explorer, see how to hide or show the Network icon in Windows 11 File Explorer.
Open and Use the Mapped Drive
Select the drive under This PC to open it. You can copy, move, and rename files as you would on a local drive, subject to the permissions the host gave your account. Reading and writing speeds depend on the network, so large transfers over Wi-Fi are slower than over Ethernet.
To give the drive a more useful name, select it and press F2. Type a label and press Enter. The label is stored for your user account on this PC and does not change anything on the host.
If you use the drive daily, pin a folder from it to Quick access. The guide on using Favorites in Windows 11 File Explorer covers that. Windows also hides or shows drive letters through a File Explorer option, which this drive letters guide explains. Use that option if your mapped drive shows a name but no letter.
Disconnect or Change a Mapped Drive
Disconnecting removes the drive letter from your PC. It does not delete anything on the host. You can map the same folder again at any time.
- Open File Explorer, then select This PC. The mapped drive appears under Network locations.
- Right-click the mapped drive. A short menu opens.
- Select Disconnect. If you do not see it, select Show more options and look there. The drive disappears from This PC.
You can also select the drive, then select See more > Disconnect network drive on the command bar. Windows 11 25H2 with update KB5127936 or later adds a Customize menu option to the right-click menu, which lets you hide built-in commands. If a command you expect is missing after you customize the menu, use the See more menu on the toolbar instead.
To change the letter or the folder, disconnect the drive and repeat the mapping steps with the new values.
Fix Problems When You Map a Network Drive
Most errors fall into a few patterns. Match what you see to the cause below.
The Network Path Was Not Found
Windows cannot reach the host. Check that the other device is on and connected to the same network. Check the spelling of the path, then try the IP address in place of the name, for example \\192.0.2.10\Shared. If the IP address works and the name does not, the problem is how your network turns the device name into an address, not the share.
Also confirm that network discovery and file and printer sharing are on, as described earlier, and that your connection uses the Private profile.
Access Is Denied or the Password Is Not Correct
The host rejected your account. Return to the Map Network Drive window and select Connect using different credentials. Enter an account that exists on the host and has permission to the share. Share permissions and folder permissions both apply, so check both on the host.
Multiple Connections to a Server Are Not Allowed
Windows allows only one set of credentials per host at a time. This error appears when you already have a connection to the same host under a different account. Disconnect every mapped drive that points to that host, then map the drive again with the account you want.
The Drive Shows a Red X After a Restart
This happens when Windows starts before the network is ready. The drive is not lost. Select it in This PC and Windows reconnects it once the network is up. If the red X stays after you open the drive, the host is off or unreachable.
Apps Running as Administrator Cannot See the Drive
Mapped drives belong to your normal user session. An app opened with Run as administrator works separately from your normal user session, so it cannot see them. Inside the elevated app, use the full UNC path (the network address that starts with two backslashes), such as \\COMPUTER-NAME\Shared, instead of the drive letter.
An Older NAS or Device Will Not Connect
Very old network devices use an outdated file-sharing protocol called SMB 1. Windows 11 does not enable it by default because it has known security weaknesses. The safer fix is to update the device’s firmware (its built-in software) or set it to use a newer version of SMB, the file-sharing protocol. Re-enabling SMB 1 is not something to do on a PC you care about.
The Map Network Drive Command Is Missing
The command appears only when This PC is selected. If you opened a folder, go back to This PC and open the See more menu again. If File Explorer is misbehaving in other ways, get help with File Explorer in Windows 11 lists the built-in fixes.
What to Do Next
Open the mapped drive after your next restart. If it shows a red X, wait a few seconds and select it again. To change how File Explorer looks around your new drive, such as the layout, panes, and views, see how to customize Windows 11 File Explorer for your needs. If a file change on the drive goes wrong, using Undo and Redo in Windows 11 File Explorer can reverse moves and renames in many cases.
Have a question about this guide?
Answered by AI from this guide. Good questions may be added to this page — please don't include personal details.
Did this guide fix your problem?

About the Author
Richard
Tech Writer, IT Professional
Richard is a writer at Geek Rewind who turns complex IT tasks into clear, step-by-step guides. He draws on years of hands-on experience in system administration and enterprise IT operations, focusing on Windows, Linux and WordPress: the problems people actually run into, and the fixes that work. His server and WordPress guides come from systems he runs himself. Richard builds and maintains the platform behind Geek Rewind, from its Ubuntu servers and Nginx configuration to its custom WordPress plugins. Many new tutorials start with readers' questions, and he's always glad to answer them in the comments.
No comments yet — be the first to share your thoughts!