Find File Explorer Settings in the Windows 11 Settings App

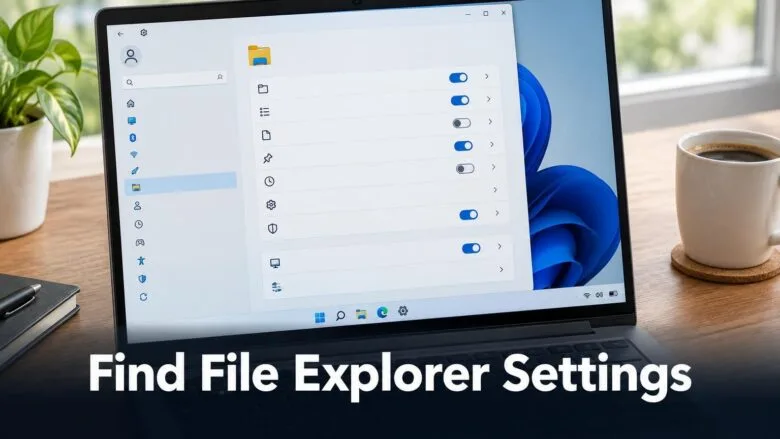
- 12 steps
- Needs administrator rights
File Explorer settings in Windows 11 mostly live in the classic File Explorer Options dialog, not in the Settings app (the window you open with Win+I). To find File Explorer settings in the Windows 11 Settings app, go to System For developers and expand the File Explorer section.
That section needs Windows 11 version 23H2 or later, and it holds only a handful of toggles, such as showing file extensions and hidden files. Several other Settings pages also change how File Explorer behaves, and this post covers each one. No step here needs administrator privileges.
To find File Explorer settings in the Windows 11 Settings app, press Win+I, select System, then choose For developers and expand the File Explorer section. It needs Windows 11 version 23H2 or later and holds only a few toggles, such as Show file extensions and Show hidden and system files. Folder, view and search options stay in File Explorer Options.
What the Settings app holds, and what it doesn’t
Microsoft split File Explorer’s controls across two places. The Settings app has a few toggles. The File Explorer Options dialog, which looks like an older Windows window, has the full list of folder, view and search options.
If you want something specific, such as changing what File Explorer opens to or turning off the preview pane, you probably need File Explorer Options. The guide to opening File Explorer Options in Windows 11 covers every way to reach it.
The Settings app is the better choice for showing file extensions (the letters after the dot in a file name, such as .docx) and hidden files. It also handles storage, search and default apps. The sections below show where each one lives.
Find the File Explorer section in Settings
Open Settings and go to System For developers. Expand the File Explorer section to see the toggles. From there you can show file extensions and hidden files without opening the classic dialog.
- Open Settings. Press Win+I, or right-click Start and choose Settings. The Settings window opens with a list of categories on the left.
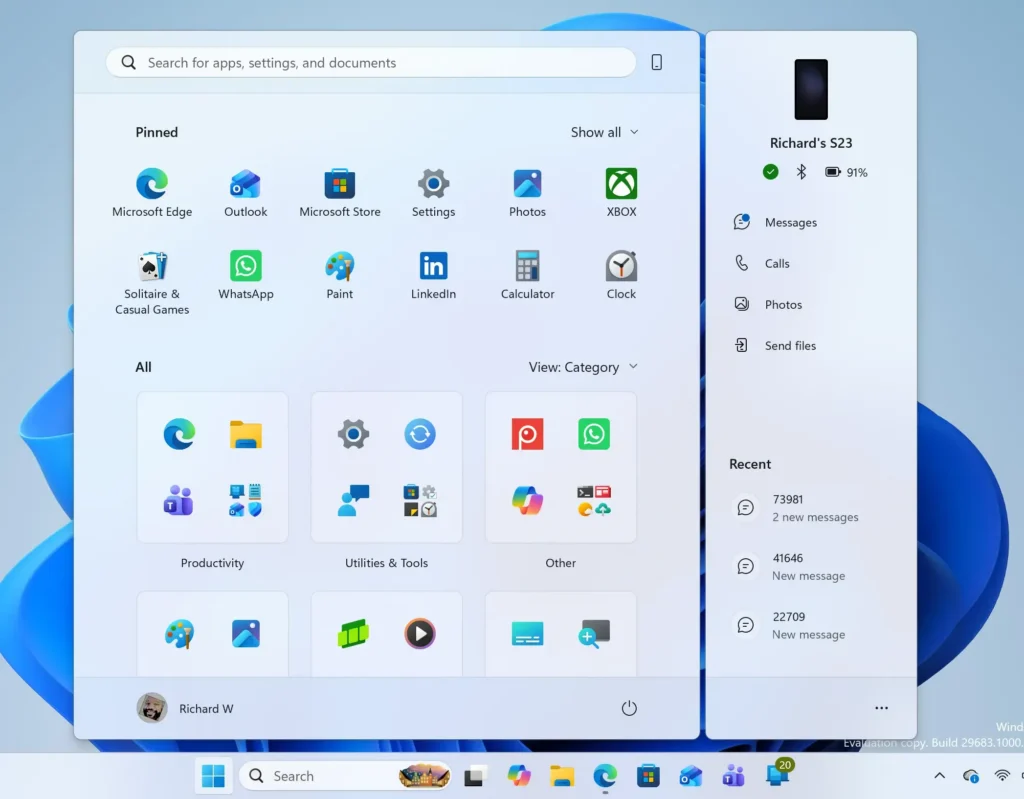
Start Menu - Select System. It is the first category in the left pane, and its page opens on the right.
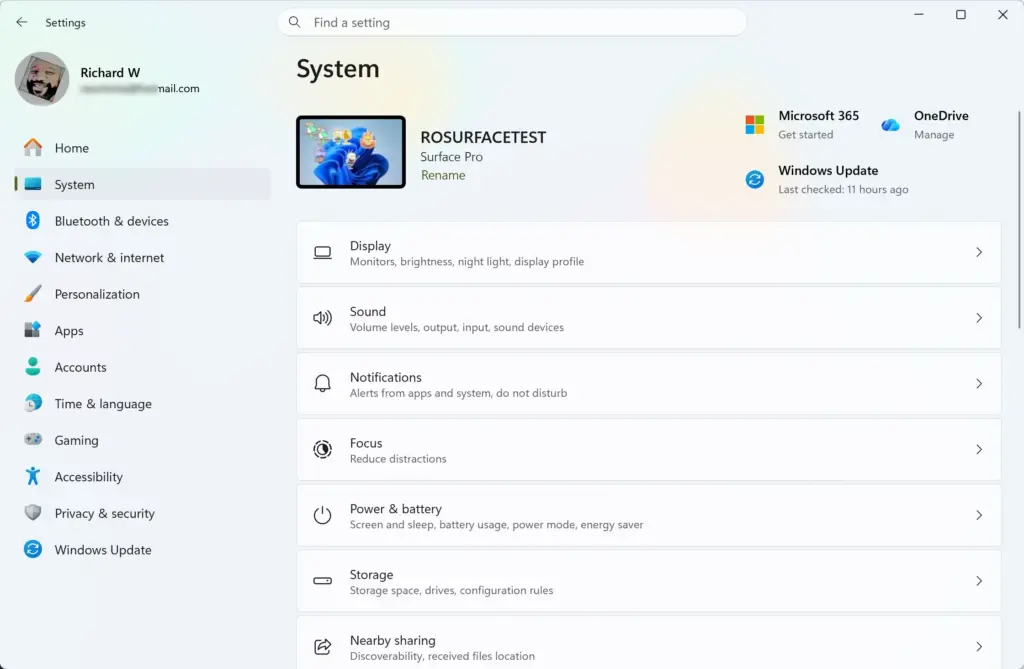
Settings › System - Scroll down and select For developers. The entry sits near the bottom of the System page. If you cannot find it, see the missing-section notes further down.
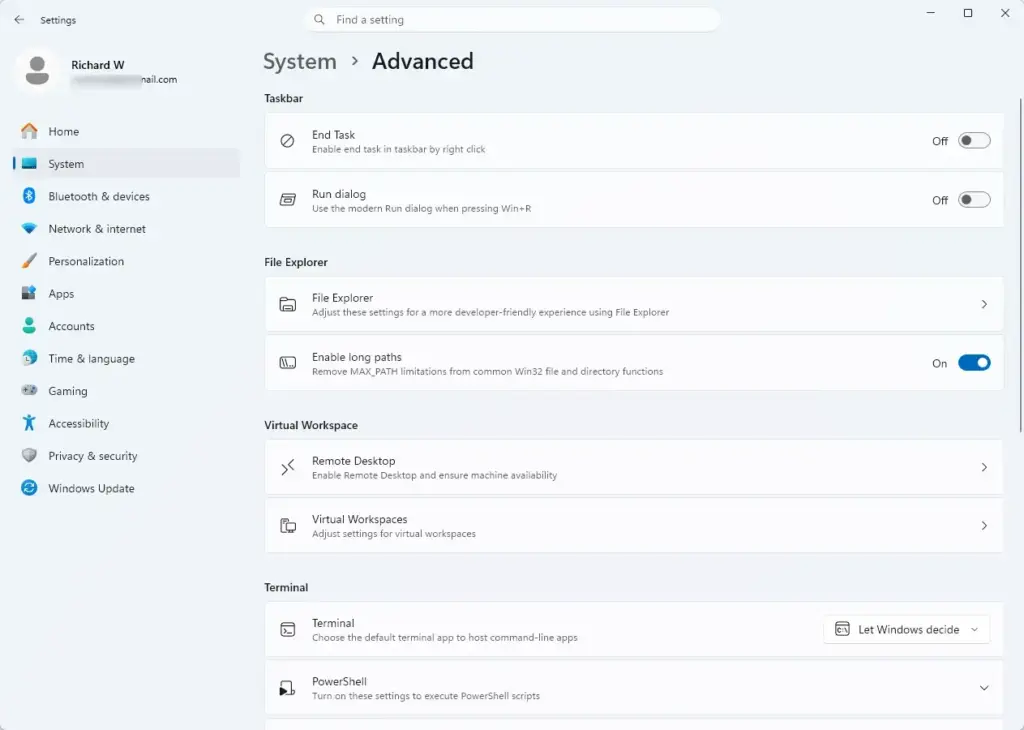
Settings › System › Advanced - Find the File Explorer heading. It appears as a collapsible group, so click its name to expand it. The toggles for File Explorer appear underneath.
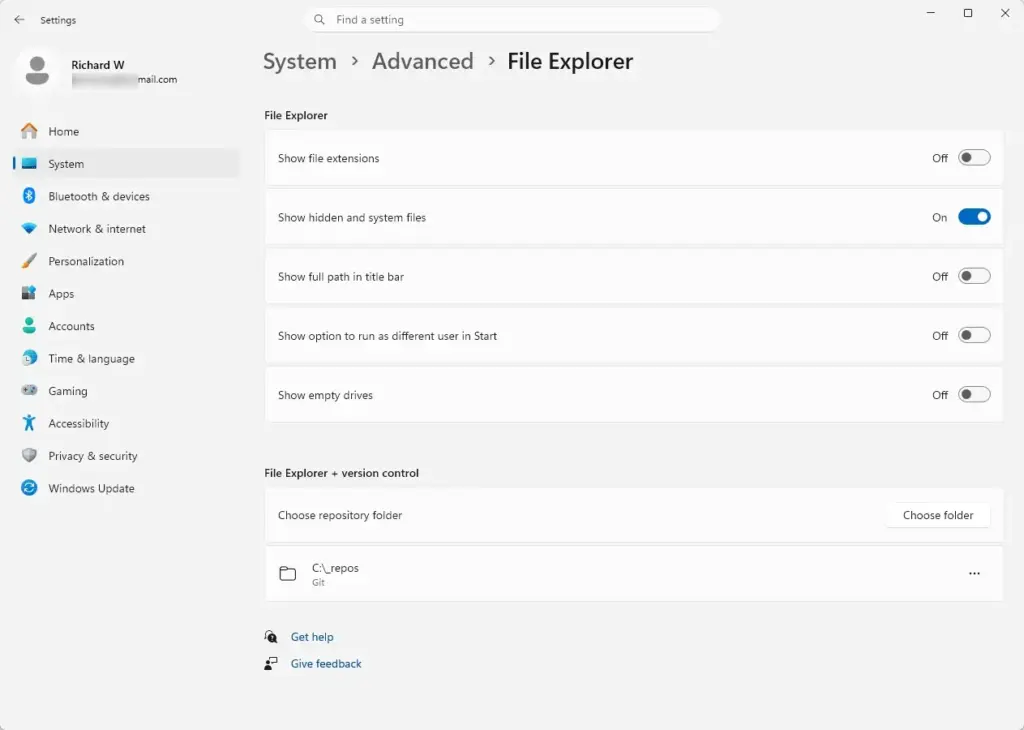
Settings › System › Advanced › File Explorer - Turn on Show file extensions. Click the toggle so it reads On. File names in File Explorer now end with their extension, for example report.docx instead of report.
- Turn on Show hidden and system files if you need them. This reveals files that Windows hides by default. Hidden items appear slightly faded in File Explorer.
- Review any other toggles in the group. Newer builds add options, such as showing the full path in the title bar, and the exact list varies by build.
- Open File Explorer to check the result. Press Win+E. If an already-open window does not change, press F5 to refresh it or close it and open a new one.
The changes apply to your user account right away, and Windows does not ask for a restart.
What the toggles change
Each toggle maps to something you would otherwise set inside File Explorer Options. Knowing the difference helps you decide which place to use.
- Show file extensionsAdds the extension to every file name. This helps you spot a file named invoice.pdf.exe, a common trick in malicious attachments.
- Show hidden and system filesReveals files and folders that Windows hides to protect them.
Other Settings pages that affect File Explorer
Several other Settings pages also change File Explorer behavior. Their names do not include “File Explorer.” These are the ones worth knowing.
Recent items: Settings > Personalization > Start
This page has a toggle called Show recently opened items in Start, Jump Lists, and File Explorer. Jump Lists are the menus of recent files that appear when you right-click an app’s taskbar icon. Turn the toggle off if you do not want recent files listed in those places.
File Explorer Options has its own separate controls for Quick access (the Home area that lists your frequent folders and recent files) and recent files, so you may need to check both pages. For pinned folders, see how to use Favorites in Windows 11 File Explorer.
Search and indexing: Settings > Privacy & security > Searching Windows
This page controls how Windows indexing (building a searchable list of your files) works. Indexing affects how fast File Explorer’s search box returns results. The Find My Files setting offers two modes: Classic and Enhanced. Classic searches your Documents, Pictures, Music and Desktop folders. Enhanced searches your whole PC.
The same page lets you exclude folders from Enhanced search. Excluding a folder means File Explorer’s search box will not return files stored in it.
Storage and cleanup: Settings > System > Storage
The Storage page shows what is using space on your drives and offers cleanup recommendations. It also has Storage Sense, a feature that deletes temporary files and empties the Recycle Bin on a schedule you choose. If File Explorer shows a nearly full drive, start here.
Default apps: Settings > Apps > Default apps
This page decides which app opens when you double-click a file in File Explorer. Type a file extension such as .jpg or .pdf into the search box on the page, then pick the app you want. If double-clicking a file opens the wrong program, change it here instead of using the right-click Open with menu every time.
Network sharing: Settings > Network & internet > Advanced network settings
Choose Advanced sharing settings on this page to turn network discovery (which lets your PC see other devices on the network) and file and printer sharing on or off. These settings decide whether other PCs on your network can see your shared folders in File Explorer. The choices are kept separately for private and public networks.
Reach File Explorer Options through Settings search
If the toggle you want is not in the Settings app, open the classic File Explorer Options dialog instead. The numbered steps below show how.
- Open Settings. Press Win+I.
- Click the search box. It sits at the top of the Settings window, above the page content.
- Type File Explorer Options. Matching results appear as you type.
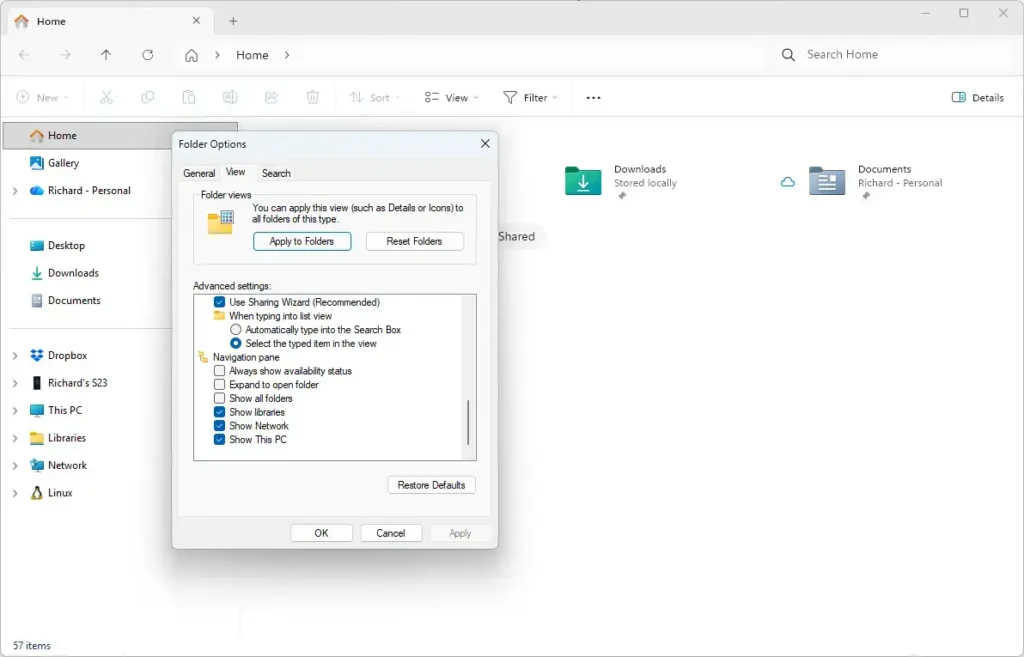
File Explorer - Select File Explorer Options from the results. The classic dialog opens, with the General, View and Search tabs.
If Settings search does not list it, type File Explorer Options into the Start menu search box. The dialog is the same from either route.
The View tab holds the long list of Advanced settings. For layout choices such as details view or icon size, read how to change the File Explorer layout in Windows 11. For a wider tour of what you can adjust, see how to customize Windows 11 File Explorer for your needs.
If the File Explorer section is missing or greyed out
Two causes account for most cases: an older Windows 11 version, and a PC managed by an organization.
The For developers page has no File Explorer group
The File Explorer group appeared in Windows 11 version 23H2. Earlier versions do not have it. Open Settings System About and check the Version line. If it reads 22H2 or earlier, install the latest updates from Settings Windows Update and check again. Do the same if your PC is up to date but the group is still absent. In the first release of Windows 11, For developers sat under Privacy & security and had only the Developer Mode switch.
Microsoft has moved and renamed Settings pages between Windows 11 updates. If the layout on your PC differs from the steps above, use the Settings search box to look for the option by name.
A toggle is greyed out or reverts
A greyed-out toggle, or a message that says “Some settings are managed by your organization”, means a rule set by your organization or a management tool controls that option. This is common on work or school computers. Only your IT administrator can change a managed setting.
On a personal PC, a toggle that flips back after a restart usually points to a third-party tweaking tool or a leftover policy. Check any system-tuning software you have installed.
Windows Home and Pro
The Settings toggles described here work the same on Windows 11 Home and Pro. The difference is that Pro and higher editions can be managed through Group Policy (a Windows tool that sets rules for a PC, often used by work and school IT teams), which makes managed (greyed-out) settings more likely on business PCs.
How to undo the changes
Every toggle in the File Explorer group is reversible. Return to Settings System For developers, expand File Explorer, and switch the toggle back to Off. The change takes effect right away. If an open File Explorer window does not update, press F5 to refresh it.
For the Personalization, Search, Storage and Default apps pages, the same rule applies: reopen the page and reverse the control you changed. If you excluded a folder from Enhanced search, remove it from the exclusion list on the Searching Windows page.
If you have been through the File Explorer Options dialog as well and want to put everything back, open File Explorer Options View and select Restore Defaults. On the General tab, the same button restores the General settings.
What to do next
If the setting you want is not in the Settings app, open File Explorer Options and check the View tab, since most remaining controls live there. To make File Explorer reopen your folders after you sign in, see how to restore File Explorer windows at logon. For faster navigation, learn how to use access keys in Windows 11 File Explorer.
Have a question about this guide?
Answered by AI from this guide. Good questions may be added to this page — please don't include personal details.
Did this guide fix your problem?

About the Author
Richard
Tech Writer, IT Professional
Richard is a writer at Geek Rewind who turns complex IT tasks into clear, step-by-step guides. He draws on years of hands-on experience in system administration and enterprise IT operations, focusing on Windows, Linux and WordPress: the problems people actually run into, and the fixes that work. His server and WordPress guides come from systems he runs himself. Richard builds and maintains the platform behind Geek Rewind, from its Ubuntu servers and Nginx configuration to its custom WordPress plugins. Many new tutorials start with readers' questions, and he's always glad to answer them in the comments.
No comments yet — be the first to share your thoughts!