How to Enable or Disable Suggested Content in Windows 11

- 6 steps
- Needs administrator rights
- Group Policy needs Windows 11 Pro, Enterprise or Education
- Includes a restart or sign-out
Suggested content in Windows 11 covers the ads, tips, and app recommendations that appear in the Start menu, on the lock screen, and in the Settings app. These prompts use your PC habits, such as which apps you open, to show tailored ideas. You can turn them off to cut the distractions and limit how much of that activity Windows uses.
This guide covers three ways to do it. The Settings app is the quickest and works on every edition. Group Policy suits Windows 11 Pro, Enterprise and Education. The Registry Editor works on any edition, including Home. Nothing here affects Windows Update or security patches, and every change can be reversed.
Open Settings, select Privacy & security, then General, and switch off Show me suggested content in the Settings app. The change takes effect straight away with no restart, and it works on Windows 11 Home and Pro. To remove suggestions from the Start menu too, go to Settings Personalization Start and turn off Show recommendations.
How to disable suggested content in Settings
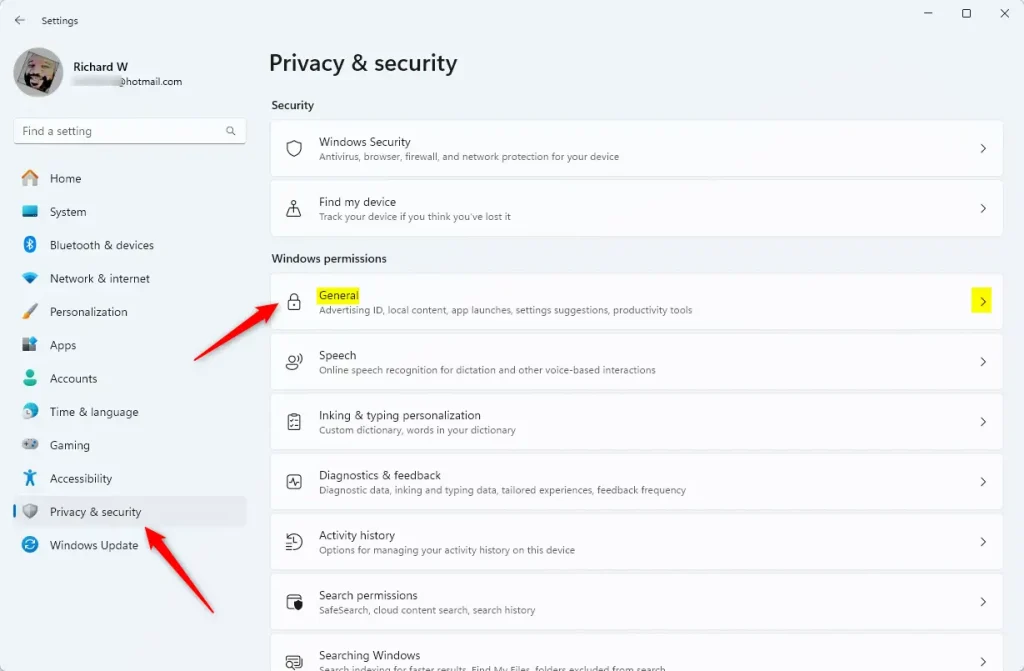
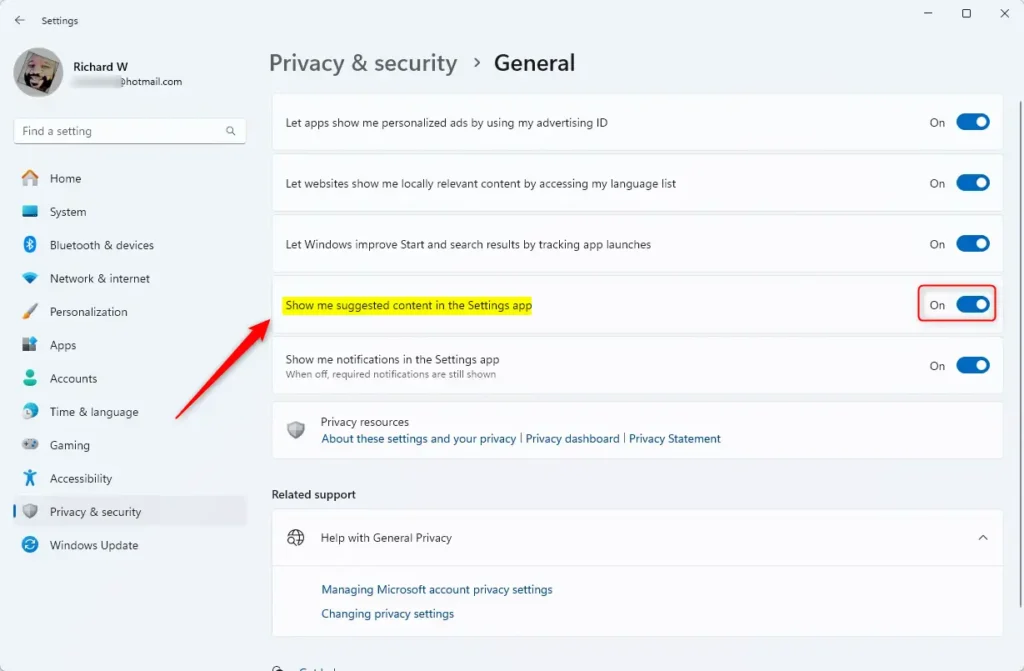
The Settings app is the first place to look. Go to Privacy & security, select General, and turn off the switch next to Show me suggested content in the Settings app. This stops Windows from showing tips, ads, and app recommendations based on how you use your computer. It works on Home and Pro, needs no administrator rights, and takes effect straight away, with no restart.
- Open the Windows Settings app. Pressing Win+I is the fastest way. You should see the Settings window with a category list on the left.
- Select Privacy & security on the left. The privacy options appear on the right.
- Click the General tile. It is the first one under the Windows permissions heading. A short list of switches opens.
On the General page, find Show me suggested content in the Settings app and toggle the switch to Off. The label on the switch changes to Off right away. To turn suggestions back on later, return to this page and flip the switch to On.
Other switches on this page, such as the advertising ID one, control related tracking. Turn those off too if you want less personalized advertising.
Newer builds, like 23H2 or 24H2, also have separate options for the Start menu. Open Settings Personalization Start and turn off Show recommendations for tips, shortcuts, new apps, and more. If you do not see that option, your build is older. Update Windows or skip this step.
For tips on the lock screen, open Settings Personalization Lock screen. Set the lock screen to Picture or Slideshow, then clear the tips option if one is shown.
Advanced: Group Policy Editor (GPO)
- Press Win+R, type
gpedit.msc, and hit Enter. The Local Group Policy Editor opens. If Windows says it cannot find the file, you are on Home. - In the left pane, go to Computer Configuration Administrative Templates Windows Components Cloud Content. Click Cloud Content and its policies appear in the right pane.
- Double-click Turn off all Windows spotlight features, set it to Enabled, then click Apply and OK. The policy now shows Enabled in the State column.
Advanced: Registry Editor
The policy applies the next time Group Policy refreshes. Signing out and back in, or restarting, makes it apply sooner. To undo it, open the same policy and set it to Not Configured.
You can also disable suggested content in Windows 11 by editing the registry. Use this method if you run Home, or if the switch in Settings does not hold. Open the Registry Editor by typing regedit in the Start menu and go to 🗝️HKEY_CURRENT_USER\
HKEY_CURRENT_USER\Software\Microsoft\Windows\CurrentVersion\ContentDeliveryManager
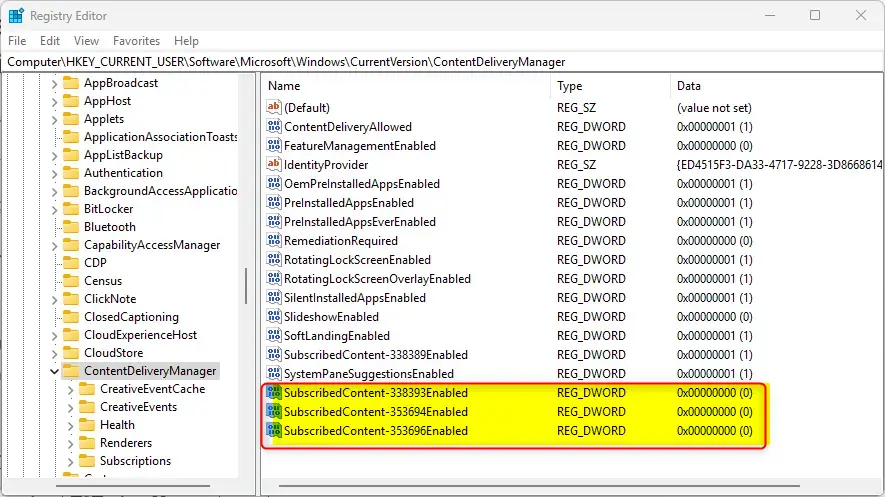
Select the ContentDeliveryManager key in the left pane, and its values appear on the right. Find the items listed below, double-click each one, set its Value data to 0, and click OK. If one of them is missing, your build may not use it. You can skip it. Then restart the machine to finish:
SubscribedContent-338393EnabledSubscribedContent-353694EnabledSubscribedContent-353696Enabled
Restart your PC to finish. After you sign back in, the Start menu and Settings app should show far fewer suggestions. To undo the registry change, set the values back to 1, or double-click the .reg file you exported earlier and confirm the merge.
Summary
Disabling suggested content in Windows 11 helps remove ads and clutter. The Settings app offers a quick toggle that works on every edition. Group Policy and the Registry Editor provide more permanent control. If a major update brings a suggestion back, check the Settings switches first, since feature updates sometimes change them. These adjustments declutter the system and improve privacy without affecting essential Windows updates.
Have a question about this guide?
Answered by AI from this guide. Good questions may be added to this page — please don't include personal details.
Did this guide fix your problem?

About the Author
Richard
Tech Writer, IT Professional
Richard is a writer at Geek Rewind who turns complex IT tasks into clear, step-by-step guides. He draws on years of hands-on experience in system administration and enterprise IT operations, focusing on Windows, Linux and WordPress: the problems people actually run into, and the fixes that work. His server and WordPress guides come from systems he runs himself. Richard builds and maintains the platform behind Geek Rewind, from its Ubuntu servers and Nginx configuration to its custom WordPress plugins. Many new tutorials start with readers' questions, and he's always glad to answer them in the comments.
No comments yet — be the first to share your thoughts!