How to Change On-Screen Indicator Position in Windows 11
Windows 11 on-screen indicators can be repositioned from their default bottom-center location.
These indicators are small pop-ups that appear when you change settings like volume or screen brightness. Windows 11 shows them in the middle at the bottom of your screen automatically.
You might want to move them so they don’t block important parts of whatever you’re looking at. Fortunately, Windows 11 lets you change where these indicators show up.
You can change the on-screen indicator position in Windows 11 by first enabling the feature using ViVeTool or by editing the registry. After enabling, navigate to Settings > System > Notifications for ViVeTool, or create a DWORD value named PositionIndex in the registry editor to select your preferred location.
How to Enable Position Settings
Enabling Position Settings: Windows 11 lets you change the on-screen indicator position for things like volume and brightness overlays. To do this, you’ll first need to enable a hidden setting. This requires using a utility called ViVeTool and running a specific command in the command prompt, which needs administrator permissions.
To change the on-screen indicator position in Windows 11, first download ViVeTool, a utility for managing Windows features. Then, open the command prompt with administrator permissions and input a specific command.
Restart your computer after running the command. Upon restart, go to Settings, then System, then Notifications to find the new position options for the on-screen indicator. This feature lets users move the overlay to a spot that will not block active windows. Volume and brightness bars will then appear in the chosen corner instead of the bottom center.
https://geekrewind.com/how-to-enable-or-disable-hidden-features-with-vivetool-in-windows-11
Changing Position via Registry Editor
Changing Position via Registry Editor
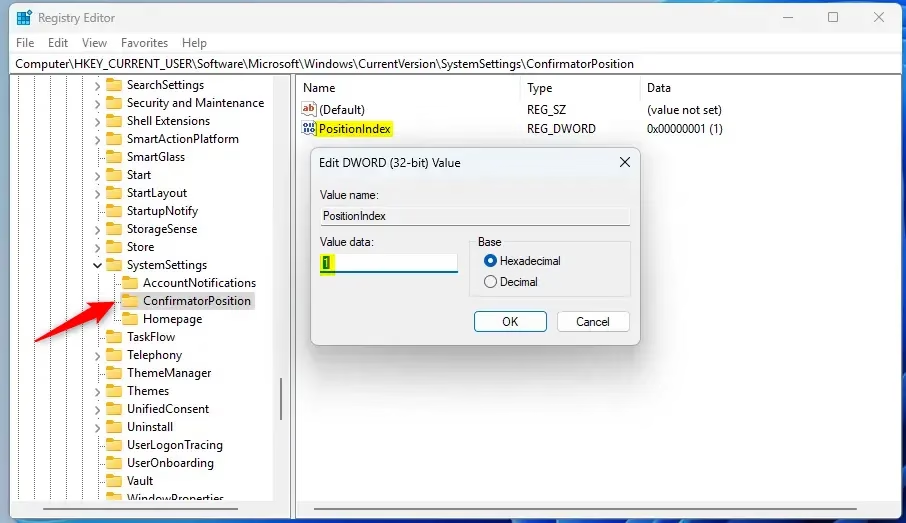
You can change the on-screen indicator position in Windows 11 using the Registry Editor. This built-in tool lets you adjust hidden computer settings without extra software.
To begin, open the Registry Editor with administrator permissions. Navigate to the specific registry key: HKEY_CURRENT_USER\Control Panel\Accessibility\Keyboard Response.
HKEY_CURRENT_USER\Software\Microsoft\Windows\CurrentVersion\Explorer\Advanced
3. Right-click in the right pane. Select ‘New’ > ‘DWORD (32-bit) Value’ and name it PositionIndex.4. Set its value to 1 (Bottom), 2 (Top Left), or 3 (Top Center).
Troubleshooting and Reverting Changes
If your indicators disappear or your system feels unstable, delete the PositionIndex value you created in the registry. Restarting your computer usually fixes minor glitches. If you used ViVeTool, run vivetool /disable /id:48103152 to revert to the default Windows 11 UI behavior.
Summary
Changing the on-screen indicator position in Windows 11 lets you move overlays like volume and brightness. You can use ViVeTool to access the setting or edit the Registry Editor for more direct control. Both methods help you tidy up your screen.
Can I move the volume indicator to the bottom of the screen?
Yes, the bottom center is the default position for the volume flyout in Windows 11. If you have moved it to the top, you can return it to the bottom by setting the PositionIndex value to 1 in the registry or selecting the bottom option in your system settings.
Will changing the registry affect system stability?
Editing the registry carries a small risk. However, changing this specific key is generally safe. Always create a system restore point before making changes so you can easily revert your system to its previous state if you encounter any unexpected issues or performance problems.
Do I need to restart Windows after changing the indicator position?
Yes, a restart is often required for the Windows shell to recognize the new registry settings or the enabled feature flag. If the change does not appear immediately after applying the setting, save your work and reboot your computer to ensure the new UI configuration is fully loaded.
Was this guide helpful?

About the Author
Richard
Tech Writer, IT Professional
Richard, a writer for Geek Rewind, is a tech enthusiast who loves breaking down complex IT topics into simple, easy-to-understand ideas. With years of hands-on experience in system administration and enterprise IT operations, he’s developed a knack for offering practical tips and solutions. Richard aims to make technology more accessible and actionable. He's deeply committed to the Geek Rewind community, always ready to answer questions and engage in discussions.


No comments yet — be the first to share your thoughts!